About This Course
These modules are designed to teach gross anatomy and common surgical approaches to orthopaedic surgery residents and practicing surgeons through a self-paced, structured curriculum that includes learning objectives, indications, an anatomy review, illustrated descriptions of approaches, and review questions.
Requirements
The UCSF Ortho Anatomy Core is meant to be an educational resources for orthopaedics trainees. Learners should be practicing surgeons or surgeons in training.
Course Staff
Faculty Contributor:
Dr. Paul Toogood

Shoulder - Deltopectoral Approach
Deltopectoral Approach - Dr. Toogood
- Read Full Text
-
Objectives
At the end of this module, the learner should be able to:
1. List the indications for a deltopectoral approach to the shoulder
2. Understand the relevant anatomy of the deltopectoral approach to the shoulder
3. Discuss in detail the deltopectoral approach to the shoulder, including:
a. Patient positioning
b. Landmarks for incision
c. Relevant internervous plains
d. Sequence of the superficial and deep dissection
Indications
Indications for a Deltopectoral Approach to the Shoulder:
1. Open reduction internal fixation of fractures of the proximal humerus
2. Hemiarthroplasty
3. Total Shoulder Arthroplasty
4. Reverse Total Shoulder Arthroplasty
5. Open reduction internal fixation of anterior glenoid fractures
6. Open stabilization procedures for glenohumeral dislocation
7. Debridement and drainage of acute or chronic septic shoulder
Anatomy
Internervous Plain:
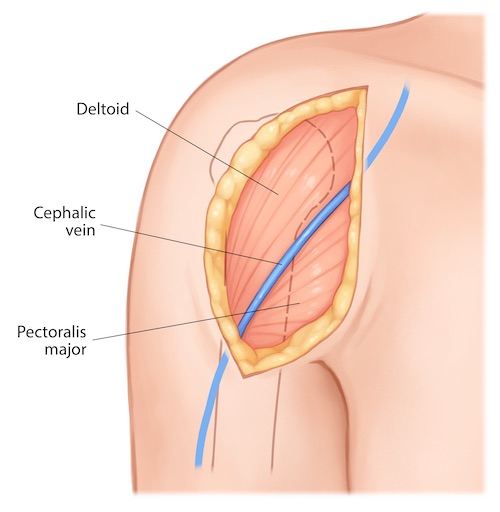
The superficial portion of the dissection is performed within a true internervous plain between the deltoid (axillary nerve) and pectoralis major (medial and lateral pectoral nerves). The deltoid is retracted laterally while the pectoralis major is retracted medially. This internervous plane is conveniently marked by the course of the cephalic vein which runs in the junction between these two muscles.
Muscular Anatomy:
The deltopectoral approach can be conceptualized as occurring through three consecutive muscular layers. The most superficial layer is that created by the deltoid and pectoralis major muscles. The middle layer consists of the clavicopectoral fascia and the conjoint tendon (short head of the biceps and coracobrachialis muscles) which originates from the coracoid process of the scapula. The deep layer consists of the rotator cuff muscles (supraspinatus, infraspinatus, teres minor, and subscapularis) which surround and is intimate with the shoulder capsule.
An additional muscle with a complex relationship to the shoulder that may be encountered during this approach is the long head of the biceps brachii. This muscular head originates from the supraglenoid tubercle on the cephalad portion of the glenoid labrum. It then passes through the shoulder joint itself in the rotator interval. Once it exits the shoulder joint capsule the tendon travels distally in the intertubercular groove (also called the biceps groove) between the greater and lesser tuberosities of the humerus covered by the transverse ligament, which is an extension of the subscapularis tendon beyond the lesser tuberosity. From there is passes beneath the tendinous insertion of the pectoralis major on its way to the anterior compartment of the arm.
Deltoid:
Origin: Lateral half of the clavicle, acromion, and scapular spine
Insertion: Deltoid tuberosity of the humerus, half way down the lateral humeral shaft
Innervation: Axillary nerve
Action: Shoulder abduction, flexion, extension
Pectoralis Major:
Origin: Medial half of the clavicle, manubrium, sternum, and aponerosis of the external oblique
Insertion: Lateral lip of the intertubercular groove of the humerus
Innervation: Medial and lateral pectoral nerves
Action: Shoulder adduction, internal rotation
Pectoralis Minor:
Origin: Coracoid process of the scapula
Insertion: 3rd-5th ribs
Innervation: Medial pectoral nerve
Action: With the ribs held stationary, this muscle draws scapula anterior and inferior. With the scapula held stationary this muscle elevates the 3rd-5th ribs, potentially serving as an accessory muscle to respiration.
Coracobrachialis:
Origin: Coracoid process of the scapula
Insertion: Middle of the medial shaft of the humerus
Innervation: Musculocutaneous nerve
Action: Shoulder adduction, flexion
Biceps Brachii:
Origin:
Long head: Supraglenoid tubercle
Short head: Coracoid process of the scapula
Insertion: The primary tendon inserts onto the biceps tuberosity on the proximal radius. An aponeurosis also forms from this muscle distally in the antecubital fossa which spreads out and inserts superficial on the muscles of the flexor pronator mass of the proximal medial forearm.
Innervation: Musculocutaneous nerve
Action: Forearm supination, elbow flexion, shoulder flexion
Supraspinatus:
Origin: Supraspinous fossa of the scapula
Insertion: Superior facet of the greater tuberosity of the humerus
Innervation: Suprascapular nerve
Action: Glenohumeral stabilization, shoulder abduction
Infraspinatus:
Origin: Infraspinous fossa of the scapula
Insertion: Middle facet of the greater tuberosity of the humerus
Innervation: Suprascapular nerve
Action: Glenohumeral stabilization, shoulder external rotation
Teres Minor:
Origin: Lateral border of scapula
Insertion: Inferior facet of greater tuberosity of the humerus
Innervation: Axillary nerve
Action: Glenohumeral stabilization, shoulder external rotation
Subscapularis:
Origin: Subscapular fossa of the scapula
Insertion: Lesser tuberosity of the humerus
Innervation: Upper and lower subscapular nerves
Action: Glenohumeral stabilization, shoulder internal rotation
Vascular Anatomy:
The only vascular structure that is routinely encountered during the deltopectoral approach to the shoulder is the cephalic vein. This vein begins as tributaries along the radially aspect of the forearm and travels along the anterior lateral aspect of the arm prior to running in the deltopectoral groove proximally over the shoulder. It eventually joins with the basilic vein to form the axillary vein.
The axillary artery is not routinely exposed during the deltopectoral approach to the shoulder, though it is in close proximity. This artery runs deep to the pectoralis minor muscle and is intimately associated with the brachial plexus. It is commonly divided into three sections based upon its relationship with the pectoralis minor muscle:
Part 1: Lateral edge of the first rib to the medial border of the pectoralis minor
Part 2: Deep to the pectoralis minor
Part 3: Distal to the lateral border of the pectoralis minor to the inferior border of the teres major, where it then becomes the brachial artery
Each portion of the axillary artery has named arterial branches which arise from it. Conveniently, the number of branches from each part corresponds to the numerical ordering of the part themselves:
Part 1: Superior thoracic artery
Part 2: Lateral thoracic artery, Thoraco-acromial artery
Part 3: Subscapular artery (gives rise to the scapular circumflex and thoracodorsal arteries) and anterior & posterior circumflex humeral arteries.
Nervous Anatomy:
No nerves are routinely exposed during the deltopectoral approach. The musculocutaneous nerve runs through the coracobrachialis muscle 5-8cm distal to the coracoid process and is at risk only if dissection is errantly made medial to the conjoint tendons which arise from the coracoid process or if these same tendons are rigorously retracted during the case. Injury to this nerve will produce weakness in the muscles of the anterior compartment of the arm (coracobrachialis, brachialis, biceps brachii). Injury will also produce numbness on the radial aspect of the forearm; the distal extent of the musculocutaneous nerve is the lateral cutaneous nerve of the forearm. Similarly the axillary nerve is in close proximity during this approach, running just inferior to the lower border of the subscapularis muscle. Injury to this nerve will produce weakness in the teres minor and the deltoid and numbness on the lateral aspect of the shoulder.
Brachial Plexus:
The brachial plexus is a complex anatomic structure. Its underlying purpose is to take a series of five ventral spinal nerves at its proximal end and combine and redistribute them on the distal end to generate a multitude of functioning peripheral nerves.
The brachial plexus can be artificially divided into five sections to aid in understanding it course.
Nerve Roots: The 5 ventral rami of C5-T1 typically contribute to the plexus. Occasionally individuals will have a plexus from C4-C8 or C6-T2, termed pre-fixed and post-fixed respectively.
Trunks: The combination of some of the nerve roots creates 3 trunks.
Superior Trunk: Combination of C5 with C6
Middle Trunk: The simple continuation of C7
Inferior Trunk: Combination of C8 and T1
Divisions: Each trunk listed above divides into and anterior and posterior division, producing a total of 6 divisions (3 anterior, 3 posterior)
Cords: The 6 divisions combine to generate a total of three cords, which are named with respect to the positions to the axillary artery.
Lateral Cord: The combination of the anterior divisions of the superior and middle trunks
Posterior Cord: The combination of the posterior divisions of all three trunks
Medial Cord: The simpe continuation of the anterior division of the inferior trunk
Terminal Branches: The three cords each divide at their terminal extent to generate 6 branches. Two of these branches, one from the medial and one from the lateral cord, quickly recombine to reduce the final number of terminal branches to 5.
Musculocutaneous nerve: A final terminal branch of the lateral cord
Median nerve: The combination of a final terminal branch from each of the medial an lateral cords
Ulnar nerve: A final terminal branch of the medial cord
Radial nerve: A final terminal branch of the posterior cord
Axillary nerve: A final terminal branch of the posterior cord
In addition to the structure just described, the brachial plexus also gives off numerous minor terminal branches along various places along its course:
Dorsal scapular nerve: From root of C5, innervates rhomboids and levator scapulae
Long thoracic nerve: From combination of branches from roots of C5-C7, innervates serratus anterior
Suprascapular nerve: From superior trunk, innervates supraspinatus and infraspinatus
Nerve to the subclavius: From superior trunk, innervates subclavius
Lateral pectoral nerve: From lateral cord, innervates pectoralis major
Upper and Lower subscapular nerves: From posterior cord, innervates subscapularis (both) and teres major (lower only)
Thoracodorsal nerve: From posterior cord, innervates latissimus dorsi
Medial pectoral nerve: From medial cord, inneravtes pectoralis major and minor
Medial cutaneous nerve of the arm: From medial cord, sensation to medial arm
Medial antebrachial cutaneous nerve: From medial cord, sensation to medial forearm
Spaces and Intervals around the Shoulder:
Two spaces and one interval are often used to describe the relationship of various neurovascular structures around the posterior aspect of the shoulder. A region designated as a space actually has the contents listed pass through the space. The region designated as an interval only has the contents visible through the space, but the contents do not pass through it.
Quadralateral Space:
Borders: Teres minor, Teres major, long and lateral heads of the triceps
Contents: Axillary nerve, posterior humeral circumflex artery
Triangular Space:
Borders: Teres minor, Teres major, Lateral head of the triceps
Contents: Scapular circumflex artery
Triangular Interval:
Borders: Teres major, Long and Lateral head of the triceps
Contents: Radial nerve and Profunda brachii artery
Position & Markings
Patient Positioning:
The patient is placed supine on a reversed (base of the table at the feet), radiolucent cantilever table. The torso should be shifted until it is at the edge of the table and similarly the patient's head should be placed at the corner of the table. The head should be secured with tape and the endotracheal tube positioned away from the operative field. The operative arm should rest on a radiolucent arm board. As the patient is shifted on the table towards the operative side, the contralateral arm can often simply rest by the patient's side on the table itself. The table is turned 90 degrees from a standard position such that the operative limb is towards the surgeon and the non-operative limb is towards anesthesia.
Intra-op Imaging:
The fluoroscopy unit should come in from the patient's head. A true AP of the glenohumeral joint is obtained by tilting the fluoroscopy unit towards anesthesia 5-10 degrees to remove the overlap of the humeral head and the glenoid caused by the plane of the scapula being slightly internally rotated compared with coronal plane. An axillary lateral view is obtained by bringing the fluoroscopy unit to a lateral position and abducting the arm. This view is only obtainable if the patient's shoulder has been brought off the cantilever table and onto the radiolucent arm board as described above.
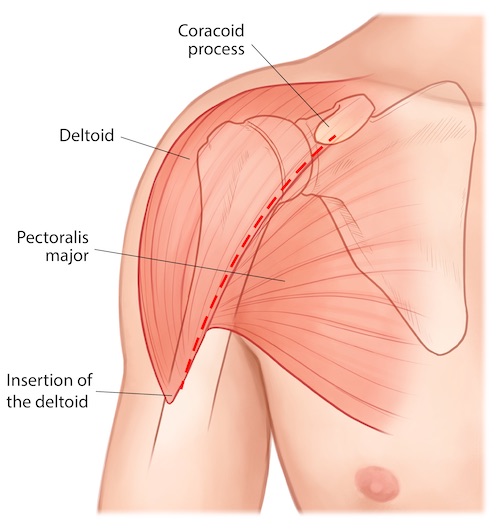
Marking the Incision:
The incision begins proximally at the coracoid. This bony landmark may be palpable just inferior and medial to the acromioclavicular joint, which is often easier to locate by palpation. In muscular, obese, or very swollen patients imaging can be used to confirm the position of the coracoid. The incision extends 10-15cm towards the lateral aspect of the humeral shaft in the palpable groove between the deltoid and pectoralis major muscles.
Deltopectoral Approach to the Shoulder
Superficial dissection:
A knife is used to make the incision as previously described from the coracoid process proximally towards the insertion of the deltoid distally in the palpable groove between the deltoid and pectoralis major muscles. Cautery should be used to control bleeding from the skin edges. Dissection is continued down to fascia using scissors to avoid injury to the cephalic vein.
The cephalic vein should be identified and serves as the landmark for the interval between the deltoid and pectoralis major muscles. The cephalic vein should be dissected out and tributaries medially or laterally cauterized to allow mobilization of the vein laterally or medially. Mobilizing the vein medially produces less tension on the vein as the muscles and vein are retracted throughout the remainder of the case.
Tips, Tricks & Precautions
Precautions:
Identification of the cephalic vein is critical to identifying the correct interval between the deltoid and pectoralis major during the initial portions of the dissection. In obese or swollen patients the initial skin marking can be difficult to place accurately along the groove between these two muscles. If once down to fascia the cephalic vein is not immediately apparent dissect along the plain of the fascia medially or laterally to try and locate the vein. If no vein is identified and dissection is taken deep by splitting muscle fibers the surgeon is almost certainly dissecting within the substance of the deltoid or pectoralis major, which may lead to deinnervation of the muscle.
Dissection should not be carried unintentionally medial to the tendons of the coracobrachialis and short head of the biceps; this puts the axillary vessels and brachial plexus at risk.
If the subscapularis must be taken down for exposure of the glenohumeral joint a trio of transverse vessels (anterior humeral circumflex vessels) along its inferior border mark the inferior extent of the subscapularis tendon. Using this landmark may prevent the surgeon from straying too inferiorly, endangering the axillary nerve which runs beneath the inferior border of the subscapularis tendon.
Tips:
During fracture surgery stay sutures in the tendons of the rotator cuff are critical for safe manipulation of the tuberosity fragments. These sutures may also be placed through the proximal portion of the plate used to internally fix a proximal humerus fracture to serve as additional fixation of these fragments which are difficult or impossible to capture even with contemporary locked plates.
Control of the shaft fragment of a proximal humerus fracture can also be challenging and critical to obtaining a reduction. This can be achieved with a bone hook placed through a drill hole in this fragment. This allows for controlled traction and manipulation of the shaft. An apex anterior deformity of the shaft relative to the proximal fragments is typical. This can be overcome by elevating the arm distally and applying downward pressure proximally on the shaft of the humerus.
Objectives
At the end of this module, the learner should be able to:
1. List the indications for a deltopectoral approach to the shoulder
2. Understand the relevant anatomy of the deltopectoral approach to the shoulder
3. Discuss in detail the deltopectoral approach to the shoulder, including:
a. Patient positioning
b. Landmarks for incision
c. Relevant internervous plains
d. Sequence of the superficial and deep dissection
Indications
Indications for a Deltopectoral Approach to the Shoulder:
1. Open reduction internal fixation of fractures of the proximal humerus
2. Hemiarthroplasty
3. Total Shoulder Arthroplasty
4. Reverse Total Shoulder Arthroplasty
5. Open reduction internal fixation of anterior glenoid fractures
6. Open stabilization procedures for glenohumeral dislocation
7. Debridement and drainage of acute or chronic septic shoulder
Anatomy
Internervous Plain:
The superficial portion of the dissection is performed within a true internervous plain between the deltoid (axillary nerve) and pectoralis major (medial and lateral pectoral nerves). The deltoid is retracted laterally while the pectoralis major is retracted medially. This internervous plane is conveniently marked by the course of the cephalic vein which runs in the junction between these two muscles.
Muscular Anatomy:
The deltopectoral approach can be conceptualized as occurring through three consecutive muscular layers. The most superficial layer is that created by the deltoid and pectoralis major muscles. The middle layer consists of the clavicopectoral fascia and the conjoint tendon (short head of the biceps and coracobrachialis muscles) which originates from the coracoid process of the scapula. The deep layer consists of the rotator cuff muscles (supraspinatus, infraspinatus, teres minor, and subscapularis) which surround and is intimate with the shoulder capsule.
An additional muscle with a complex relationship to the shoulder that may be encountered during this approach is the long head of the biceps brachii. This muscular head originates from the supraglenoid tubercle on the cephalad portion of the glenoid labrum. It then passes through the shoulder joint itself in the rotator interval. Once it exits the shoulder joint capsule the tendon travels distally in the intertubercular groove (also called the biceps groove) between the greater and lesser tuberosities of the humerus covered by the transverse ligament, which is an extension of the subscapularis tendon beyond the lesser tuberosity. From there is passes beneath the tendinous insertion of the pectoralis major on its way to the anterior compartment of the arm.
Deltoid:
Origin: Lateral half of the clavicle, acromion, and scapular spine
Insertion: Deltoid tuberosity of the humerus, half way down the lateral humeral shaft
Innervation: Axillary nerve
Action: Shoulder abduction, flexion, extension
Pectoralis Major:
Origin: Medial half of the clavicle, manubrium, sternum, and aponerosis of the external oblique
Insertion: Lateral lip of the intertubercular groove of the humerus
Innervation: Medial and lateral pectoral nerves
Action: Shoulder adduction, internal rotation
Pectoralis Minor:
Origin: Coracoid process of the scapula
Insertion: 3rd-5th ribs
Innervation: Medial pectoral nerve
Action: With the ribs held stationary, this muscle draws scapula anterior and inferior. With the scapula held stationary this muscle elevates the 3rd-5th ribs, potentially serving as an accessory muscle to respiration.
Coracobrachialis:
Origin: Coracoid process of the scapula
Insertion: Middle of the medial shaft of the humerus
Innervation: Musculocutaneous nerve
Action: Shoulder adduction, flexion
Biceps Brachii:
Origin:
Long head: Supraglenoid tubercle
Short head: Coracoid process of the scapula
Insertion: The primary tendon inserts onto the biceps tuberosity on the proximal radius. An aponeurosis also forms from this muscle distally in the antecubital fossa which spreads out and inserts superficial on the muscles of the flexor pronator mass of the proximal medial forearm.
Innervation: Musculocutaneous nerve
Action: Forearm supination, elbow flexion, shoulder flexion
Supraspinatus:
Origin: Supraspinous fossa of the scapula
Insertion: Superior facet of the greater tuberosity of the humerus
Innervation: Suprascapular nerve
Action: Glenohumeral stabilization, shoulder abduction
Infraspinatus:
Origin: Infraspinous fossa of the scapula
Insertion: Middle facet of the greater tuberosity of the humerus
Innervation: Suprascapular nerve
Action: Glenohumeral stabilization, shoulder external rotation
Teres Minor:
Origin: Lateral border of scapula
Insertion: Inferior facet of greater tuberosity of the humerus
Innervation: Axillary nerve
Action: Glenohumeral stabilization, shoulder external rotation
Subscapularis:
Origin: Subscapular fossa of the scapula
Insertion: Lesser tuberosity of the humerus
Innervation: Upper and lower subscapular nerves
Action: Glenohumeral stabilization, shoulder internal rotation
Vascular Anatomy:
The only vascular structure that is routinely encountered during the deltopectoral approach to the shoulder is the cephalic vein. This vein begins as tributaries along the radially aspect of the forearm and travels along the anterior lateral aspect of the arm prior to running in the deltopectoral groove proximally over the shoulder. It eventually joins with the basilic vein to form the axillary vein.
The axillary artery is not routinely exposed during the deltopectoral approach to the shoulder, though it is in close proximity. This artery runs deep to the pectoralis minor muscle and is intimately associated with the brachial plexus. It is commonly divided into three sections based upon its relationship with the pectoralis minor muscle:
Part 1: Lateral edge of the first rib to the medial border of the pectoralis minor
Part 2: Deep to the pectoralis minor
Part 3: Distal to the lateral border of the pectoralis minor to the inferior border of the teres major, where it then becomes the brachial artery
Each portion of the axillary artery has named arterial branches which arise from it. Conveniently, the number of branches from each part corresponds to the numerical ordering of the part themselves:
Part 1: Superior thoracic artery
Part 2: Lateral thoracic artery, Thoraco-acromial artery
Part 3: Subscapular artery (gives rise to the scapular circumflex and thoracodorsal arteries) and anterior & posterior circumflex humeral arteries.
Nervous Anatomy:
No nerves are routinely exposed during the deltopectoral approach. The musculocutaneous nerve runs through the coracobrachialis muscle 5-8cm distal to the coracoid process and is at risk only if dissection is errantly made medial to the conjoint tendons which arise from the coracoid process or if these same tendons are rigorously retracted during the case. Injury to this nerve will produce weakness in the muscles of the anterior compartment of the arm (coracobrachialis, brachialis, biceps brachii). Injury will also produce numbness on the radial aspect of the forearm; the distal extent of the musculocutaneous nerve is the lateral cutaneous nerve of the forearm. Similarly the axillary nerve is in close proximity during this approach, running just inferior to the lower border of the subscapularis muscle. Injury to this nerve will produce weakness in the teres minor and the deltoid and numbness on the lateral aspect of the shoulder.
Brachial Plexus:
The brachial plexus is a complex anatomic structure. Its underlying purpose is to take a series of five ventral spinal nerves at its proximal end and combine and redistribute them on the distal end to generate a multitude of functioning peripheral nerves.
The brachial plexus can be artificially divided into five sections to aid in understanding it course.
Nerve Roots: The 5 ventral rami of C5-T1 typically contribute to the plexus. Occasionally individuals will have a plexus from C4-C8 or C6-T2, termed pre-fixed and post-fixed respectively.
Trunks: The combination of some of the nerve roots creates 3 trunks.
Superior Trunk: Combination of C5 with C6
Middle Trunk: The simple continuation of C7
Inferior Trunk: Combination of C8 and T1
Divisions: Each trunk listed above divides into and anterior and posterior division, producing a total of 6 divisions (3 anterior, 3 posterior)
Cords: The 6 divisions combine to generate a total of three cords, which are named with respect to the positions to the axillary artery.
Lateral Cord: The combination of the anterior divisions of the superior and middle trunks
Posterior Cord: The combination of the posterior divisions of all three trunks
Medial Cord: The simpe continuation of the anterior division of the inferior trunk
Terminal Branches: The three cords each divide at their terminal extent to generate 6 branches. Two of these branches, one from the medial and one from the lateral cord, quickly recombine to reduce the final number of terminal branches to 5.
Musculocutaneous nerve: A final terminal branch of the lateral cord
Median nerve: The combination of a final terminal branch from each of the medial an lateral cords
Ulnar nerve: A final terminal branch of the medial cord
Radial nerve: A final terminal branch of the posterior cord
Axillary nerve: A final terminal branch of the posterior cord
In addition to the structure just described, the brachial plexus also gives off numerous minor terminal branches along various places along its course:
Dorsal scapular nerve: From root of C5, innervates rhomboids and levator scapulae
Long thoracic nerve: From combination of branches from roots of C5-C7, innervates serratus anterior
Suprascapular nerve: From superior trunk, innervates supraspinatus and infraspinatus
Nerve to the subclavius: From superior trunk, innervates subclavius
Lateral pectoral nerve: From lateral cord, innervates pectoralis major
Upper and Lower subscapular nerves: From posterior cord, innervates subscapularis (both) and teres major (lower only)
Thoracodorsal nerve: From posterior cord, innervates latissimus dorsi
Medial pectoral nerve: From medial cord, inneravtes pectoralis major and minor
Medial cutaneous nerve of the arm: From medial cord, sensation to medial arm
Medial antebrachial cutaneous nerve: From medial cord, sensation to medial forearm
Spaces and Intervals around the Shoulder:
Two spaces and one interval are often used to describe the relationship of various neurovascular structures around the posterior aspect of the shoulder. A region designated as a space actually has the contents listed pass through the space. The region designated as an interval only has the contents visible through the space, but the contents do not pass through it.
Quadralateral Space:
Borders: Teres minor, Teres major, long and lateral heads of the triceps
Contents: Axillary nerve, posterior humeral circumflex artery
Triangular Space:
Borders: Teres minor, Teres major, Lateral head of the triceps
Contents: Scapular circumflex artery
Triangular Interval:
Borders: Teres major, Long and Lateral head of the triceps
Contents: Radial nerve and Profunda brachii artery
Position & Markings
Patient Positioning:
The patient is placed supine on a reversed (base of the table at the feet), radiolucent cantilever table. The torso should be shifted until it is at the edge of the table and similarly the patient's head should be placed at the corner of the table. The head should be secured with tape and the endotracheal tube positioned away from the operative field. The operative arm should rest on a radiolucent arm board. As the patient is shifted on the table towards the operative side, the contralateral arm can often simply rest by the patient's side on the table itself. The table is turned 90 degrees from a standard position such that the operative limb is towards the surgeon and the non-operative limb is towards anesthesia.
Intra-op Imaging:
The fluoroscopy unit should come in from the patient's head. A true AP of the glenohumeral joint is obtained by tilting the fluoroscopy unit towards anesthesia 5-10 degrees to remove the overlap of the humeral head and the glenoid caused by the plane of the scapula being slightly internally rotated compared with coronal plane. An axillary lateral view is obtained by bringing the fluoroscopy unit to a lateral position and abducting the arm. This view is only obtainable if the patient's shoulder has been brought off the cantilever table and onto the radiolucent arm board as described above.
Marking the Incision:
The incision begins proximally at the coracoid. This bony landmark may be palpable just inferior and medial to the acromioclavicular joint, which is often easier to locate by palpation. In muscular, obese, or very swollen patients imaging can be used to confirm the position of the coracoid. The incision extends 10-15cm towards the lateral aspect of the humeral shaft in the palpable groove between the deltoid and pectoralis major muscles.
Deltopectoral Approach to the Shoulder
Superficial dissection:
A knife is used to make the incision as previously described from the coracoid process proximally towards the insertion of the deltoid distally in the palpable groove between the deltoid and pectoralis major muscles. Cautery should be used to control bleeding from the skin edges. Dissection is continued down to fascia using scissors to avoid injury to the cephalic vein.
The cephalic vein should be identified and serves as the landmark for the interval between the deltoid and pectoralis major muscles. The cephalic vein should be dissected out and tributaries medially or laterally cauterized to allow mobilization of the vein laterally or medially. Mobilizing the vein medially produces less tension on the vein as the muscles and vein are retracted throughout the remainder of the case.
Tips, Tricks & Precautions
Precautions:
Identification of the cephalic vein is critical to identifying the correct interval between the deltoid and pectoralis major during the initial portions of the dissection. In obese or swollen patients the initial skin marking can be difficult to place accurately along the groove between these two muscles. If once down to fascia the cephalic vein is not immediately apparent dissect along the plain of the fascia medially or laterally to try and locate the vein. If no vein is identified and dissection is taken deep by splitting muscle fibers the surgeon is almost certainly dissecting within the substance of the deltoid or pectoralis major, which may lead to deinnervation of the muscle.
Dissection should not be carried unintentionally medial to the tendons of the coracobrachialis and short head of the biceps; this puts the axillary vessels and brachial plexus at risk.
If the subscapularis must be taken down for exposure of the glenohumeral joint a trio of transverse vessels (anterior humeral circumflex vessels) along its inferior border mark the inferior extent of the subscapularis tendon. Using this landmark may prevent the surgeon from straying too inferiorly, endangering the axillary nerve which runs beneath the inferior border of the subscapularis tendon.
Tips:
During fracture surgery stay sutures in the tendons of the rotator cuff are critical for safe manipulation of the tuberosity fragments. These sutures may also be placed through the proximal portion of the plate used to internally fix a proximal humerus fracture to serve as additional fixation of these fragments which are difficult or impossible to capture even with contemporary locked plates.
Control of the shaft fragment of a proximal humerus fracture can also be challenging and critical to obtaining a reduction. This can be achieved with a bone hook placed through a drill hole in this fragment. This allows for controlled traction and manipulation of the shaft. An apex anterior deformity of the shaft relative to the proximal fragments is typical. This can be overcome by elevating the arm distally and applying downward pressure proximally on the shaft of the humerus.
Humeral Shaft - Anterior Lateral Approach
- Read Full Text
-
Objectives
At the end of this module, the learner should be able to:
1. List the indications for an anterior lateral approach to the humeral shaft
2. Understand the relevant anatomy of the anterior lateral approach to the humeral shaft
3. Discuss in detail the anterior lateral approach to the humeral shaft, including:
a. Patient positioning
b. Landmarks for incision
c. Relevant internervous plains
d. Sequence of the superficial and deep dissection
Anatomy
Internervous Plain:
The superficial portion of the dissection is performed through an intramuscular, though not an internervous plain. Once through the fascia of the anterior compartment of the arm the biceps brachii is retracted medially, exposing the underlying brachialis muscle. Both of these muscles are innervated by the musculocunateous nerve. If done gently and bluntly this does not produce deinnervation of either muscle.
The deep portion of the dissection can be performed in two fashions: either the brachialis muscle can be split in its mid-substance or the entire brachialis can be moved en masse from lateral to medial. The brachialis always receives innervation from the musculocutaneous nerve. In the majority of individuals it also receives some innervation from the radial nerve. Splitting the muscle in its midsubstance, though muscle splitting, may thus actually be a more internervous approach. The alternative, moving the entire muscle en masse is of course the opposite. The portion of this muscle's innervation from the radial is sacrificed, however the muscle belly itself remains intact.
Muscular Anatomy:
The simplest form of this approach, to the true mid-shaft of the humerus, is quite straight forward. Only two muscles, the biceps brachii and the brachialis are expose and retracted. The shared innervation to these muscles, the musculocutaneous nerve, is also exposed and protected. For many fractures of the humeral shaft, however, dissection proximal or distal to the mid-shaft is required in order to achieve adequate fixation on either side of a fracture. As such, it is critical to understand the more complex anatomy proximally and distally to allow for safe extension of this approach as needed.
Proximal extension of this approach involves performing all or some of the deltopectoral approach to the shoulder. The details of this approach are discussed in separate module, however the confluence of these approaches is complex and worth anticipating and reviewing. The deltoid and the pectoralis major both descend and insert on the humeral shaft. The deltoid inserts broadly and more laterality on the deltoid tuberosity. The pectoralis major inserts onto the lateral lip of the intertubercular groove. The long head of the biceps brachii runs within the intertubercular groove on its way towards the muscle belly of the biceps brachii lying in the anterior compartment of the arm on top of the brachialis muscle. Proximal extension of the anterior lateral approach to the humeral shaft thus involves recognizing the confluence of these four muscles and typically elevation of the anterior portion of the deltoid insertion to allow for anterior lateral plating. Care should be taken not to simply extend the splitting or retraction of the brachialis proximally into the pectoralis major, whose insertion should be left intact unless required for fracture reduction and fixation.
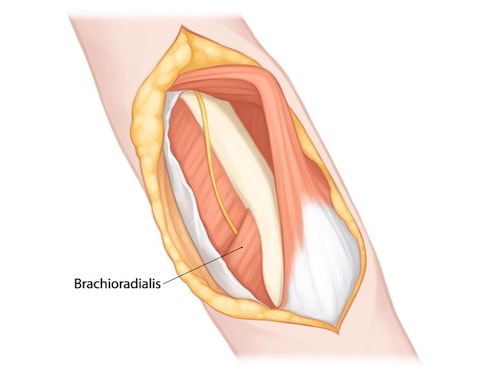
Distal extension of this approach is also occasionally required and safe as long as the relationship between the brachialis and brachioradialis is defined and the radial nerve identified and protected. The brachioradialis arises from the lateral supracondylar ridge of the humerus. The brachialis arises just medially to the brachioradialis on the anterior surface of the distal humeral shaft. Between these two muscles runs the radial nerve, after it has pierced the intermuscular septum to pass from the posterior into the anterior compartment. Dissection within 10 cm of the lateral epicondyle must be halted until the interval between these muscles has been developed and the radial nerve identified.
Deltoid:
Origin: Lateral half of the clavicle, acromion, and scapular spine
Insertion: Deltoid tuberosity of the humerus, half way down the lateral humeral shaft
Innervation: Axillary nerve
Action: Shoulder abduction, flexion, extension
Pectoralis Major:
Origin: Medial half of the clavicle, manubrium, sternum, and aponerosis of the external oblique
Insertion: Lateral lip of the intertubercular groove of the humerus
Innervation: Medial and lateral pectoral nerves
Action: Shoulder adduction, internal rotation
Coracobrachialis:
Origin: Coracoid process of the scapula
Insertion: Middle of the medial shaft of the humerus
Innervation: Musculocutaneous nerve
Action: Shoulder adduction, flexion
Biceps Brachii:
Origin:
Long head: Supraglenoid tubercle
Short head: Coracoid process of the scapula
Insertion: The primary tendon inserts onto the biceps tuberosity on the proximal radius. An aponeurosis also forms from this muscle distally in the antecubital fossa which spreads out and inserts superficial on the muscles of the flexor pronator mass of the proximal medial forearm.
Innervation: Musculocutaneous nerve
Action: Forearm supination, elbow flexion, shoulder flexion
Brachialis:
Origin: Distal half of the anterior shaft of the humerus
Insertion: Coronoid and tuberosity of the ulna
Innervation: Musculocutaneous nerve, Radial nerve
Action: Elbow flexion
Brachioradialis:
Origin: Proximal 2/3rds of the lateral supracondylar ridge of the humerus
Insertion: Radial aspect of the distal radius
Innervation: Radial nerve
Action: Elbow flexion
Vascular Anatomy:
The primary artery which traverses the arm is the brachial artery, which runs medially in the anterior compartment of the arm. During an anterior lateral approach to the arm it is not routinely exposed or encountered. Though not exposed, its presence on the medial side of the arm should not be forgotten, especially if retractors are place around the medial aspect of the humerus.
Superficially the cephalic vein may be encountered; as such careful dissection through the subcutaneous tissue is warranted to avoid unintended injury.
Nervous Anatomy:
The musculocutaneous nerve is the primary nerve at risk during any anterior lateral approach to the humeral shaft. This muscle begins as a terminal branch off of the lateral cord of the brachial plexus. It passes through the coracobrachialis muscle and then descends distally in the anterior compartment of the arm between the biceps brachii and the brachialis muscles. This nerve is often found on the medial portion of the brachilias after the biceps brachii has been retracted medially. It must be identified and protected during the remainder of the dissection, especially if the surgeon chooses to split the brachialis to expose the mid-portion of the humeral shaft. This nerve continues distally to become the lateral antebrachial cutaneous nerve. Damage to the musculocutaneous nerve from trauma or surgical dissection thus may lead to deinnervation of the biceps brachii and brachialis and also numbness on the lateral aspect of the forearm.
If the dissection must be extended to within 10cm of the lateral epicondyle then the radial nerve should be identified. This nerve pierces the lateral intermuscular septum and then travels between the brachioradialis and brachialis on its way toward the elbow. Even if dissection within 10cm of the lateral epicondyle is not performed, the surgeon should remain mindful of this nerve's close proximity to the bone in the mid-shaft of the humerus. The radial nerve lies directly on bone in the spiral groove on the posterior aspect of the humeral shaft. Retractors or clamps passed posteriorly without care to remain directly on bone risk injury to this nerve.
Position & Markings
Patient Positioning:
The patient is placed supine on a reversed (base of the table at the feet), radiolucent cantilever table. The torso should be shifted until it is at the edge of the table and similarly the patient's head should be placed at the corner of the table. The head should be secured with tape and the endotracheal tube positioned away from the operative field. The operative arm should rest on a radiolucent arm board. As the patient is shifted on the table towards the operative side, the contralateral arm can often simply rest by the patient's side on the table itself. The table is turned 90 degrees from a standard position such that the operative limb is towards the surgeon and the non-operative limb is towards anesthesia. This positioning is the same as for the deltopectoral approach to the shoulder. As the anterior lateral approach to the humeral shaft is often used for humeral shaft fractures in the proximal 2/3rds of the bone this positioning allows for imaging of both the proximal and shaft portions of the humerus.
Intra-op Imaging:
The fluoroscopy unit should come in from the patient's head. A true AP of the glenohumeral joint and shaft is obtained by tilting the fluoroscopy unit towards anesthesia 5-10 degrees to remove the overlap of the humeral head and the glenoid caused by the plane of the scapula being slightly internally rotated compared with coronal plane. An axillary lateral view is obtained by bringing the fluoroscopy unit to a lateral position and abducting the arm. This view is only obtainable if the patient's shoulder has been brought off the cantilever table and onto the radiolucent arm board as described above.
Marking the Incision:
The incision runs along the anterior lateral aspect of the arm centered at the fracture site as confirmed by palpation or fluoroscopy. As the approach is often combined with a portion of the deltopectoral approach proximally it is perhaps best to draw out a deltopectoral approach and extend this distally along the anterior lateral aspect of the arm to insure any proximal extensions are placed in the appropriate interval. The incision must be long enough to allow for six cortices of fixation (three bicortical screws on each side of the fracture) and so generally is at least 15cm in length.
Anterior Lateral Approach to the Humeral Shaft
Superficial dissection:
A knife is used to make the incision as previously described along the anterior lateral aspect of the arm. Cautery should be used to control bleeding from the skin edges. Dissection is continued down to fascia using scissors to avoid injury to the cephalic vein. The biceps brachii, brachialis, and deltoid insertion are exposed.
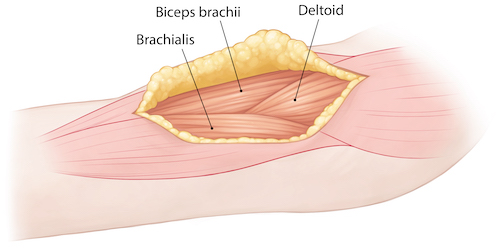
The fascia over the anterior lateral aspect of the biceps brachii is incised and the muscle belly exposed. The interval between the biceps brachii and brachialis is developed bluntly and the biceps brachii is retracted medially to expose the underlying brachialis.
Deep dissection:
The musculocutaneous nerve must next be identified between the biceps brachii and the brachialis. It is typically found running on the medial aspect of the brachialis muscle. If not found there it may be running on the deep surface of the biceps brachii muscle if blunt dissection kept it with the biceps brachii rather than lying on the brachialis. This nerve must be identified along its entire course to allow for it to be protected during the remainder of the dissection.
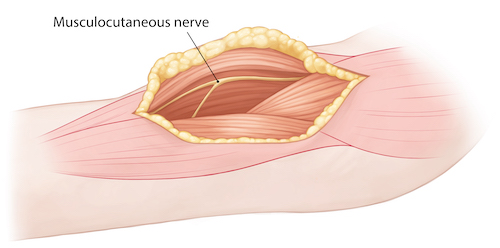
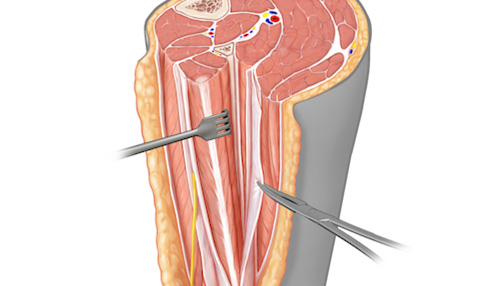
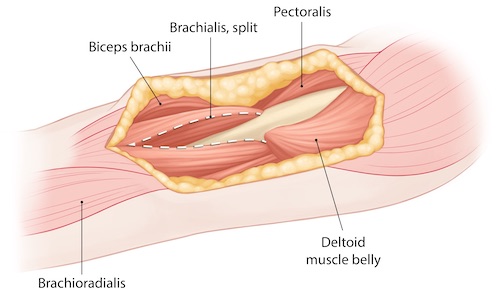
The deep portion of the dissection can be performed in two fashions: either the brachialis muscle can be split in its mid-substance (image 3) or the entire brachialis can be moved en masse from lateral to medial (images 1 and 2). The brachialis always receives innervation from the the musculocutaneous nerve. In the majority of individuals it also receives some innervation from the radial nerve. Splitting the muscle in its midsubstance, though muscle splitting, may thus actually be a more internervous approach. The alternative, moving the entire muscle en masse is of course the opposite. The portion of this muscle's innervation from the radial is sacrificed, however the muscle belly itself remains intact. Exposure of the entire mid-shaft of the humerus can be accomplished with either technique.
Image 1
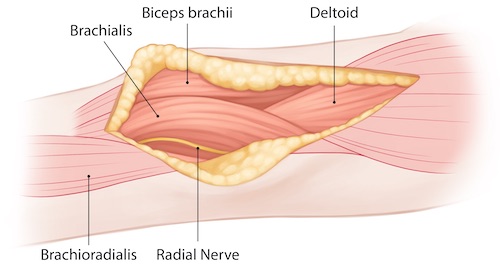
Image 2
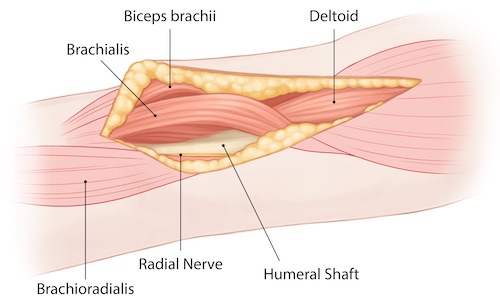
Image 3
Proximal extension of this approach involves performing all or some of the deltopectoral approach to the shoulder. The details of this approach are discussed in separate module, however the confluence of these approaches is complex and worth anticipating and reviewing. The deltoid and the pectoralis major both descend and insert on the humeral shaft. The deltoid inserts broadly and more laterality on the deltoid tuberosity. The pectoralis major inserts onto the lateral lip of the intertubercular groove. The long head of the biceps brachii runs within the intertubercular groove on its way towards the muscle belly of the biceps brachii lying in the anterior compartment of the arm on top of the brachialis muscle. Proximal extension of the anterior lateral approach to the humeral shaft thus involves recognizing the confluence of these four muscles and typically elevation of the anterior portion of the deltoid insertion to allow for anterior lateral plating. Care should be taken not to simply extend the splitting or retraction of the brachialis proximally into the pectoralis major, whose insertion should be left intact unless required for fracture reduction and fixation.
Distal extension of this approach is also occasionally required and safe as long as the relationship between the brachialis and brachioradialis is defined and the radial nerve identified and protected. The brachioradialis arises from the lateral supracondylar ridge of the humerus. The brachialis arises just medially to the brachioradialis on the anterior surface of the distal humeral shaft. Between these two muscles runs the radial nerve, after it has pierced the intermuscular septum to pass from the posterior into the anterior compartment. Dissection within 10 cm of the lateral epicondyle must be halted until the interval between these muscles has been developed and the radial nerve identified.
Tips, Tricks & Precautions
Tips:
The anterior lateral approach is an excellent extensile approach which should be strongly considered for combined fractures of the proximal humerus and shaft and for humeral shaft fractures in the proximal 2/3rds of the bone. That said, it may also be extended distally as long as the radial nerve has been identified. Combined with the deltopectoral approach to the shoulder and volar approach to the radius, it can be used to address fractures anywhere in the shaft of the humerus and entire radius.
Proximal extension of the anterior lateral approach is performed by developing all or a portion of the deltopectoral approach to the shoulder. The junction of these two approaches can be confusing, as the deltoid and pectoralis major insert in this region and the long head of the biceps runs beneath the pectoralis major on its way into the anterior compartment of the arm. Developing the deltopectoral approach proximally and the anterior lateral approach distally, prior to trying to understand the confluence of these two approaches, may aid in clarifying this portion of the dissection.
Precautions:
The cephalic vein may be encountered during the superficial dissection through subcutaneous tissue. Injury to this structure can be avoided by using scissors once through skin to get down to the fascia over the anterior compartment of the arm.
The musculocutaneous nerve must be identified in the interval between the biceps brachii and the brachialis during the deep portion of the dissection. It is typically found on the medial portion of the brachialis muscle. Injury leads to deinnervation of the of the biceps brachii and brachialis as well as numbness on the lateral aspect of the forearm.
If this approach is extended within 10cm of the lateral epicondyle the interval between the brachialis and brachioradialis may need to be developed and the radial nerve sought to allow for safe distal exposure. ANY approach to the humeral shaft, however, regardless of whether the radial nerve is directly identified, should be performed with the knowledge that the radial nerve lies directly next to bone in the spiral groove along the posterior aspect of the humerus. Retractors and clamps should thus be placed with great care in this region.
Humeral Shaft - Posterior Approach
Posterior Approach to the Humeral Shaft - Dr. Toogood
- Read Full Text
-
Objectives
At the end of this module, the learner should be able to:
1. List the indications for a posterior approach to the humeral shaft
2. Understand the relevant anatomy of the posterior approach to the humeral shaft
3. Discuss in detail the posterior approach to the humeral shaft, including:
a. Patient positioning
b. Landmarks for incision
c. Relevant internervous plains
d. Sequence of the superficial and deep dissection
Indications
Indications for a Posterior Approach to the Humeral Shaft
Open reduction internal fixation of fractures of the humeral shaft, particularly of the middle and distal thirds.
Open reduction internal fixation of combined distal humerus and humeral shaft fractures when combined with a formal posterior approach to the distal humerus
Anatomy
Internervous Plain:
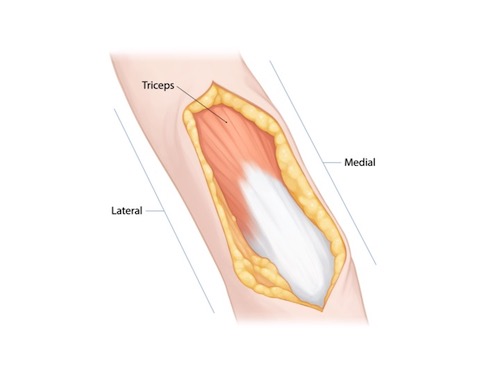
The posterior approach to the humeral shaft does not use an internervous interval. The primary muscle encountered during this approach is the triceps and all three of this muscle's heads (long, lateral, and medial/deep) are innervated by the radial nerve. The dissection is instead a radial nerve dissection, which then allows for mobilization of the nerve and also mobilization of the heads of the triceps in such a way as to not risk deinnervation.
Muscular Anatomy:
As stated above the triceps is the primary muscle encountered during this approach and understanding its relationship with the radial nerve is the key to safe access to the posterior aspect of the humeral shaft. The triceps, as its name implies, has three heads. The Long head arises off the infra-glenoid tubercle. The Lateral head arises of the posterior humeral shaft, proximal to the spiral groove. The Medial/Deep head arises from the posterior humeral shaft also, but distal to the spiral groove. These three heads do not exist in a single plane. Rather the long and lateral heads, which arise proximally, come together to form a superficial layer of the triceps. This superficial layer passes over and combines with the Medial/Deep head distally to then insert as a single tendon onto the olecranon of the ulna. As such, it is possible to split the triceps bluntly proximal to the spiral groove between the lateral and long heads to expose the proximal portion of the humeral shaft and the neurovascular bundle within the spiral groove itself. If this superficial layer is split distal to the spiral groove it will then reveal the underlying Medial/Deep head of the triceps. The Medial/Deep head can then be split to reveal the underling humeral shaft. This muscular splitting approach to the humeral shaft is still used by some surgeons, though will not be the approach discussed here, as it requires a muscle split which can be avoided.
If the dissection is carried out far proximally the deltoid muscle may be exposed and the posterior branch of the axillary nerve at risk.
Triceps:
Origin:
Long head: Infra-glenoid tubercle
Lateral head: Posterior humeral shaft proximal to the spiral groove
Medial/Deep head: Posterior humeral shaft distal to the spiral groove
Insertion: Olecranon of the ulna
Innervation: Radial nerve
Action: Elbow extension, shoulder extension (long head only)
Deltoid:
Origin: Lateral half of the clavicle, acromion, and scapular spine
Insertion: Deltoid tuberosity of the humerus, half way down the lateral humeral shaft
Innervation: Axillary nerve
Action: Shoulder abduction, flexion, extension
Vascular Anatomy:
The only vascular structure routinely encountered are those vessels which accompany the radial nerve as it runs in the spiral groove on the posterior aspect of the humeral shaft. These vessels are the profunda brachii (sometimes simply called the "deep artery of the arm"). The profunda brachii artery arises from the axillary artery and continues with the radial artery through the lateral intermuscular septum distally where it eventually connects with the radial recurrent artery to form one of the four arterial anastomoses around the elbow.
Nervous Anatomy:
The radial nerve is not only the dominant nerve during the posterior approach to the humeral shaft but is also the dominant anatomic structure in general that must be understood and safely dissected during this approach. Along with the axillary nerve, the radial nerve is a final terminal peripheral nerve which branches from the posterior cord of the brachial plexus in the axilla. From there it passes below the inferior edge of the teres major muscle and can be seen between the long and lateral heads of the triceps within the triangular interval. It passes from superior medial to inferior lateral within the spiral groove on the posterior aspect of the humerus where for several centimeters it is in direct contact with bone. The nerve's close proximity to bone, with no soft tissue interposed, is responsible for the frequent palsies of this nerve associated with humeral shaft fractures. The nerve sends branches to each of the heads of the triceps along its course. The nerve pierces the lateral intermuscular septum 10-15cm proximal to the lateral epicondyle, passing into the anterior compartment of the arm between the brachialis and brachioradialis. Just before passing through the septum the radial nerve provides a sensory nerve branch to the dorsal surface of the arm and forearm, the lower (or inferior) lateral brachial cutaneous nerve.
Position & Markings
Patient Positioning:
The patient may either be positioned lateral or prone. Lateral positioning avoids the hazards of pressure points on the face, chest, pelvis, knees, and feet seen with prone positioning and also provides easier access to the airway. The operative extremity, however, can be brought further from the table in the prone position, which may simplify intra-operative imaging.
For lateral positioning the patient is placed on a reversed cantilever table with the operative extremity up. The patient's head is brought to the cephalad extent of the table and head/torso are also shifted towards the operative field, leaving only enough room for rolled blankets to be used to help hold the patient in position. An axillary roll is placed and the down lower extremity should be padded to avoid pressure on the peroneal nerve at the knee and lateral malleoli at the ankle. Pillows or blankets may be placed between the legs. Rolled towels are placed on either side of the patient's torso and along with tape are used to maintain the patient in the lateral position throughout the case. The head should be elevated from the bed with folded sheets or a blanket so the neck is in line with the remainder of the spine. The non-operative, down extremity is flexed to 90 degrees at the shoulder and elbow such that the hand is resting just in front of the patient's face. This extremity should be rested on a radiolucent arm board which extends only 8-10cm from the operating table. This non-operative extremity should not be allow to fully externally rotate until it is parallel to the floor, but rather be elevated at the hand/wrist to reduce the external rotation stress that might otherwise be felt at the shoulder. The operative extremity is placed over a radiolucent, L-shaped arm board which is secured to the head of the bed and runs parallel with the operating table. The bed should be turned 90 degrees to the standard position such that the operative extremity is positioned coming out towards the surgeon and away from the anesthesiologist.
For the prone position the patient is placed on a reversed cantilever table. The head is placed in a well padded head-holder with a well secured airway. The chest/torso lies on rolls made from blankets or gel pads. The knees should be well padded to avoid pressure on the patellas and the lower legs placed on pillows to avoid pressure on the shins and feet. The non-operative extremity may be positioned next to the patient in a fully adducted position or placed on a prone positioning arm board with the shoulder flexed just less that 90 degrees and slightly internal rotated (arms headed down towards the floor relative to the torso) and the elbow flexed at 90 degrees. The operative extremity is outstretched on a radiolucent arm board which extends ~15cm away from the operating table. This arm board is padded with blankets until the arm rests at the level of the shoulder. The shoulder is abducted just less that 90 degrees and the elbow is allowed to flex over the end of the radiolucent arm board. The bed should be turned 90 degrees to the standard position such that the operative extremity is positioned coming out towards the surgeon and away from the anesthesiologist.
Intra-op Imaging:
The fluoroscopy unit should come in from the patient's head. An AP image is simply taken by positioning the fluoroscopy unit over the desired portion of the humeral shaft or elbow. A lateral image is obtained by rolling the fluoroscopy unit to a true lateral position, parallel with the operating table. As the operative extremity has been positioned on an arm board that runs parallel to, but just away from, the operating table, there is room to place the fluoroscopy unit just along the edge of the operating table to capture the needed lateral images. It is important to make sure adequate lateral images can be obtained prior to prepping and draping the limb; positioning of the table, patient, arm boards for the operative and non-operative extremity, and fluoroscopy unit all have to be quite precise to allow for adequate images in this position.
Marking the Incision:
The incision is made longitudinally directly over the posterior aspect of the arm centered over the humeral shaft fracture site. Its length is determined by the exposure needed for reduction and fixation, but is frequently 15-20cm in length, extending all the way to the tip of the olecranon.
Posterior Approach to the Humeral Shaft
Superficial dissection:
A knife is used to make the incision as previously described over the posterior surface of the humeral shaft centered at the fracture site and typically extending to, or several centimeters past, the tip of the olecranon. There are no significant neurovascular structures, or even large superficial veins, on the posterior surface of the arm, and as such a knife or cautery may be used to cleanly dissect down to the level of the fascia over the triceps muscle.
The fascia over the triceps muscle should then be incised in line with the skin incision, exposing the muscle belly and tendon distally. Coming through the fascia, rather than staying superficial to it, is a critical step. The remainder of the dissection essentially involves elevating the triceps off the lateral intermuscular septum as well as the posterior surface of the humeral shaft itself. If the surgeon stays superficial to the fascia of the triceps while dissecting laterally the intermuscular septum will not be encountered; instead the surgeon will pass over it and onto the fascia of the anterior compartment of the arm. This is because the fascia of the posterior and anterior compartments is continuous and the lateral intermuscular septum originates off the deep surface of this fascia and then extends down to the humeral shaft, separating the anterior and posterior compartment musculature.
Deep dissection:
Once through the fascia a full thickness flap is raised laterally, starting distally and proceeding proximally. The fascia and the medial/deep head of the triceps muscle may be separated from each other bluntly using an elevator. The medial/deep head of the triceps is retracted medially while the skin/subcutaeous tissue/fascial flap is retracted laterally.
Dissection is carried down to the level of the lateral intermuscular septum just proximal to the lateral epicondyle. From here the medial/deep head of the triceps is gently elevated in a distal to proximal progression off the lateral intermuscular septum and distal humeral shaft. When dissection begins to proceed more than 8cm proximal to the lateral epicondyle the surgeon must then begin to seek the radial nerve.
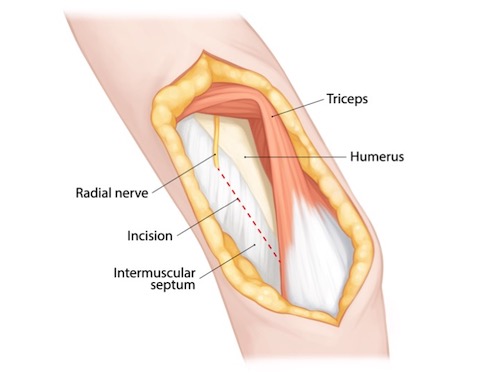
The radial nerve will be found piercing the lateral intermuscular septum, heading into the anterior compartment of the arm. Once the radial nerve has been identified the septum distal to it should be incised longitudinally, starting at the point where the nerve pierces the septum, and extending distally for several centimeters. This reduces tension on the nerve as it is retracted later during the case.
The radial nerve should then also be dissected out along its course on the posterior aspect of the humeral shaft. A penrose drain may be used to retract the nerve during this dissection.
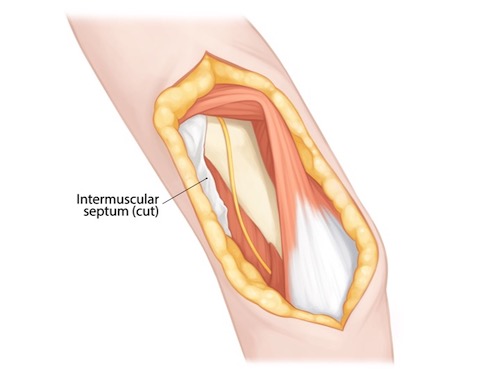
The lateral head of the triceps may then also be elevated off the posterior aspect of the humeral shaft proximal to the radial groove from lateral to medial, exposing more than 90% of the humeral shaft.
Alternatively, if only a small amount of dissection proximal to the radial groove is required for fracture fixation, dissection can be performed between the long and lateral heads of the triceps. Through this interval the radial nerve can be visualized and protected and fixation through the proximal extent of a plate can be accomplished.
Tips, Tricks & Precautions
Tips/Tricks:
Though seemingly simple, it is critical to incise the fascia over the triceps rather than beginning to dissect laterally superficial to the fascia. The lateral intermuscular septum is deep to the fascia separating the posterior and anterior compartments of the arm and so will not be come upon if dissection occurs superficial to the fascia.
Some surgeons attempt to identify a small cutaneous nerve on the lateral intermuscular septum (lower lateral cutaneous nerve) and to follow this proximally to the radial nerve proper. While this is a reasonable technique, finding the large radial nerve and its accompanying vessels is often more straight forward and is the true imperative of this dissection.
The lateral head of the triceps may be mobilized from lateral to medial like the medial/deep head to expose the majority of the humeral shaft. However, if only a few centimeters of exposure is required for reduction and fixation proximal to the radial groove then the plain between the long and lateral heads may also be safely developed to allow for radial nerve protection and completion of fixation proximally.
Though medial dissection and exposure of the ulnar nerve are required for reduction and fixation of distal humerus fractures, this is typically not the case for humeral shaft fractures. Note that the description of the dissection in this module does not include a discussion of medial dissection! Instead, most shaft fractures can be managed completely through a lateral exposure. The surgeon must be mindful, however, of the course of the ulnar nerve along the medial intermuscular septum when passing clamps, etc.
Precautions:
Avoiding tension on the radial nerve, which is relatively intolerant, is key to avoiding post-operative palsy. Dissecting the nerve out along its course is required, as is splitting of the lateral intermuscular septum distal to the point where the nerve pierces the septum.
Objectives
At the end of this module, the learner should be able to:
1. List the indications for a posterior approach to the humeral shaft
2. Understand the relevant anatomy of the posterior approach to the humeral shaft
3. Discuss in detail the posterior approach to the humeral shaft, including:
a. Patient positioning
b. Landmarks for incision
c. Relevant internervous plains
d. Sequence of the superficial and deep dissection
Indications
Indications for a Posterior Approach to the Humeral Shaft
Open reduction internal fixation of fractures of the humeral shaft, particularly of the middle and distal thirds.
Open reduction internal fixation of combined distal humerus and humeral shaft fractures when combined with a formal posterior approach to the distal humerus
Anatomy
Internervous Plain:
The posterior approach to the humeral shaft does not use an internervous interval. The primary muscle encountered during this approach is the triceps and all three of this muscle's heads (long, lateral, and medial/deep) are innervated by the radial nerve. The dissection is instead a radial nerve dissection, which then allows for mobilization of the nerve and also mobilization of the heads of the triceps in such a way as to not risk deinnervation.
Muscular Anatomy:
As stated above the triceps is the primary muscle encountered during this approach and understanding its relationship with the radial nerve is the key to safe access to the posterior aspect of the humeral shaft. The triceps, as its name implies, has three heads. The Long head arises off the infra-glenoid tubercle. The Lateral head arises of the posterior humeral shaft, proximal to the spiral groove. The Medial/Deep head arises from the posterior humeral shaft also, but distal to the spiral groove. These three heads do not exist in a single plane. Rather the long and lateral heads, which arise proximally, come together to form a superficial layer of the triceps. This superficial layer passes over and combines with the Medial/Deep head distally to then insert as a single tendon onto the olecranon of the ulna. As such, it is possible to split the triceps bluntly proximal to the spiral groove between the lateral and long heads to expose the proximal portion of the humeral shaft and the neurovascular bundle within the spiral groove itself. If this superficial layer is split distal to the spiral groove it will then reveal the underlying Medial/Deep head of the triceps. The Medial/Deep head can then be split to reveal the underling humeral shaft. This muscular splitting approach to the humeral shaft is still used by some surgeons, though will not be the approach discussed here, as it requires a muscle split which can be avoided.
If the dissection is carried out far proximally the deltoid muscle may be exposed and the posterior branch of the axillary nerve at risk.
Triceps:
Origin:
Long head: Infra-glenoid tubercle
Lateral head: Posterior humeral shaft proximal to the spiral groove
Medial/Deep head: Posterior humeral shaft distal to the spiral groove
Insertion: Olecranon of the ulna
Innervation: Radial nerve
Action: Elbow extension, shoulder extension (long head only)
Deltoid:
Origin: Lateral half of the clavicle, acromion, and scapular spine
Insertion: Deltoid tuberosity of the humerus, half way down the lateral humeral shaft
Innervation: Axillary nerve
Action: Shoulder abduction, flexion, extension
Vascular Anatomy:
The only vascular structure routinely encountered are those vessels which accompany the radial nerve as it runs in the spiral groove on the posterior aspect of the humeral shaft. These vessels are the profunda brachii (sometimes simply called the "deep artery of the arm"). The profunda brachii artery arises from the axillary artery and continues with the radial artery through the lateral intermuscular septum distally where it eventually connects with the radial recurrent artery to form one of the four arterial anastomoses around the elbow.
Nervous Anatomy:
The radial nerve is not only the dominant nerve during the posterior approach to the humeral shaft but is also the dominant anatomic structure in general that must be understood and safely dissected during this approach. Along with the axillary nerve, the radial nerve is a final terminal peripheral nerve which branches from the posterior cord of the brachial plexus in the axilla. From there it passes below the inferior edge of the teres major muscle and can be seen between the long and lateral heads of the triceps within the triangular interval. It passes from superior medial to inferior lateral within the spiral groove on the posterior aspect of the humerus where for several centimeters it is in direct contact with bone. The nerve's close proximity to bone, with no soft tissue interposed, is responsible for the frequent palsies of this nerve associated with humeral shaft fractures. The nerve sends branches to each of the heads of the triceps along its course. The nerve pierces the lateral intermuscular septum 10-15cm proximal to the lateral epicondyle, passing into the anterior compartment of the arm between the brachialis and brachioradialis. Just before passing through the septum the radial nerve provides a sensory nerve branch to the dorsal surface of the arm and forearm, the lower (or inferior) lateral brachial cutaneous nerve.
Position & Markings
Patient Positioning:
The patient may either be positioned lateral or prone. Lateral positioning avoids the hazards of pressure points on the face, chest, pelvis, knees, and feet seen with prone positioning and also provides easier access to the airway. The operative extremity, however, can be brought further from the table in the prone position, which may simplify intra-operative imaging.
For lateral positioning the patient is placed on a reversed cantilever table with the operative extremity up. The patient's head is brought to the cephalad extent of the table and head/torso are also shifted towards the operative field, leaving only enough room for rolled blankets to be used to help hold the patient in position. An axillary roll is placed and the down lower extremity should be padded to avoid pressure on the peroneal nerve at the knee and lateral malleoli at the ankle. Pillows or blankets may be placed between the legs. Rolled towels are placed on either side of the patient's torso and along with tape are used to maintain the patient in the lateral position throughout the case. The head should be elevated from the bed with folded sheets or a blanket so the neck is in line with the remainder of the spine. The non-operative, down extremity is flexed to 90 degrees at the shoulder and elbow such that the hand is resting just in front of the patient's face. This extremity should be rested on a radiolucent arm board which extends only 8-10cm from the operating table. This non-operative extremity should not be allow to fully externally rotate until it is parallel to the floor, but rather be elevated at the hand/wrist to reduce the external rotation stress that might otherwise be felt at the shoulder. The operative extremity is placed over a radiolucent, L-shaped arm board which is secured to the head of the bed and runs parallel with the operating table. The bed should be turned 90 degrees to the standard position such that the operative extremity is positioned coming out towards the surgeon and away from the anesthesiologist.
For the prone position the patient is placed on a reversed cantilever table. The head is placed in a well padded head-holder with a well secured airway. The chest/torso lies on rolls made from blankets or gel pads. The knees should be well padded to avoid pressure on the patellas and the lower legs placed on pillows to avoid pressure on the shins and feet. The non-operative extremity may be positioned next to the patient in a fully adducted position or placed on a prone positioning arm board with the shoulder flexed just less that 90 degrees and slightly internal rotated (arms headed down towards the floor relative to the torso) and the elbow flexed at 90 degrees. The operative extremity is outstretched on a radiolucent arm board which extends ~15cm away from the operating table. This arm board is padded with blankets until the arm rests at the level of the shoulder. The shoulder is abducted just less that 90 degrees and the elbow is allowed to flex over the end of the radiolucent arm board. The bed should be turned 90 degrees to the standard position such that the operative extremity is positioned coming out towards the surgeon and away from the anesthesiologist.
Intra-op Imaging:
The fluoroscopy unit should come in from the patient's head. An AP image is simply taken by positioning the fluoroscopy unit over the desired portion of the humeral shaft or elbow. A lateral image is obtained by rolling the fluoroscopy unit to a true lateral position, parallel with the operating table. As the operative extremity has been positioned on an arm board that runs parallel to, but just away from, the operating table, there is room to place the fluoroscopy unit just along the edge of the operating table to capture the needed lateral images. It is important to make sure adequate lateral images can be obtained prior to prepping and draping the limb; positioning of the table, patient, arm boards for the operative and non-operative extremity, and fluoroscopy unit all have to be quite precise to allow for adequate images in this position.
Marking the Incision:
The incision is made longitudinally directly over the posterior aspect of the arm centered over the humeral shaft fracture site. Its length is determined by the exposure needed for reduction and fixation, but is frequently 15-20cm in length, extending all the way to the tip of the olecranon.
Posterior Approach to the Humeral Shaft
Superficial dissection:
A knife is used to make the incision as previously described over the posterior surface of the humeral shaft centered at the fracture site and typically extending to, or several centimeters past, the tip of the olecranon. There are no significant neurovascular structures, or even large superficial veins, on the posterior surface of the arm, and as such a knife or cautery may be used to cleanly dissect down to the level of the fascia over the triceps muscle.
The fascia over the triceps muscle should then be incised in line with the skin incision, exposing the muscle belly and tendon distally. Coming through the fascia, rather than staying superficial to it, is a critical step. The remainder of the dissection essentially involves elevating the triceps off the lateral intermuscular septum as well as the posterior surface of the humeral shaft itself. If the surgeon stays superficial to the fascia of the triceps while dissecting laterally the intermuscular septum will not be encountered; instead the surgeon will pass over it and onto the fascia of the anterior compartment of the arm. This is because the fascia of the posterior and anterior compartments is continuous and the lateral intermuscular septum originates off the deep surface of this fascia and then extends down to the humeral shaft, separating the anterior and posterior compartment musculature.
Deep dissection:
Once through the fascia a full thickness flap is raised laterally, starting distally and proceeding proximally. The fascia and the medial/deep head of the triceps muscle may be separated from each other bluntly using an elevator. The medial/deep head of the triceps is retracted medially while the skin/subcutaeous tissue/fascial flap is retracted laterally.
Dissection is carried down to the level of the lateral intermuscular septum just proximal to the lateral epicondyle. From here the medial/deep head of the triceps is gently elevated in a distal to proximal progression off the lateral intermuscular septum and distal humeral shaft. When dissection begins to proceed more than 8cm proximal to the lateral epicondyle the surgeon must then begin to seek the radial nerve.
The radial nerve will be found piercing the lateral intermuscular septum, heading into the anterior compartment of the arm. Once the radial nerve has been identified the septum distal to it should be incised longitudinally, starting at the point where the nerve pierces the septum, and extending distally for several centimeters. This reduces tension on the nerve as it is retracted later during the case.
The radial nerve should then also be dissected out along its course on the posterior aspect of the humeral shaft. A penrose drain may be used to retract the nerve during this dissection.
The lateral head of the triceps may then also be elevated off the posterior aspect of the humeral shaft proximal to the radial groove from lateral to medial, exposing more than 90% of the humeral shaft.
Alternatively, if only a small amount of dissection proximal to the radial groove is required for fracture fixation, dissection can be performed between the long and lateral heads of the triceps. Through this interval the radial nerve can be visualized and protected and fixation through the proximal extent of a plate can be accomplished.
Tips, Tricks & Precautions
Tips/Tricks:
Though seemingly simple, it is critical to incise the fascia over the triceps rather than beginning to dissect laterally superficial to the fascia. The lateral intermuscular septum is deep to the fascia separating the posterior and anterior compartments of the arm and so will not be come upon if dissection occurs superficial to the fascia.
Some surgeons attempt to identify a small cutaneous nerve on the lateral intermuscular septum (lower lateral cutaneous nerve) and to follow this proximally to the radial nerve proper. While this is a reasonable technique, finding the large radial nerve and its accompanying vessels is often more straight forward and is the true imperative of this dissection.
The lateral head of the triceps may be mobilized from lateral to medial like the medial/deep head to expose the majority of the humeral shaft. However, if only a few centimeters of exposure is required for reduction and fixation proximal to the radial groove then the plain between the long and lateral heads may also be safely developed to allow for radial nerve protection and completion of fixation proximally.
Though medial dissection and exposure of the ulnar nerve are required for reduction and fixation of distal humerus fractures, this is typically not the case for humeral shaft fractures. Note that the description of the dissection in this module does not include a discussion of medial dissection! Instead, most shaft fractures can be managed completely through a lateral exposure. The surgeon must be mindful, however, of the course of the ulnar nerve along the medial intermuscular septum when passing clamps, etc.
Precautions:
Avoiding tension on the radial nerve, which is relatively intolerant, is key to avoiding post-operative palsy. Dissecting the nerve out along its course is required, as is splitting of the lateral intermuscular septum distal to the point where the nerve pierces the septum.
Elbow - Posterior Approach
Paratricipital Approach - Dr. Kandemir
- Read Full Text
-
Objectives
At the end of this module, the learner should be able to:
1. List the indications for a posterior approach to the elbow
2. Understand the relevant anatomy of the posterior approach to the elbow
3. Discuss in detail the posterior approach to the elbow, including:
a. Patient positioning
b. Landmarks for incision
c. Relevant internervous planes
d. Sequence of the superficial and deep dissection
Indications
Indications for a Posterior Approach to the Elbow
1. Open reduction internal fixation of supracondylar and intercondylar fractures of the distal humerus
2. Total elbow arthroplasty for intercondylar distal humerus fractures or arthritis
Anatomy
Internervous Plane:
The posterior approach to the elbow does not use an internervous interval. The primary muscle encountered during this approach is the triceps and all three of this muscle's heads (long, lateral, and medial/deep) are innervated by the radial nerve. Access to the distal humerus is achieved by either working around the triceps on its medial and lateral sides (para-tricepital approach) or by reflecting the entire triceps proximally along with its insertion into the proximal ulna through an olecranon osteotomy.
Muscular Anatomy:
As stated above the triceps is the primary muscle encountered during this approach. The triceps, as its name implies, has three heads. The Long head arises off the infra-glenoid tubercle. The Lateral head arises of the posterior humeral shaft, proximal to the spiral groove. The Medial/Deep head arises from the posterior humeral shaft also, but distal to the spiral groove. These three heads do not exist in a single plain. Rather the long and lateral heads, which arise proximally, come together to form a superficial layer of the triceps. This superficial layer passes over and combines with the Medial/Deep head distally to then insert as a single tendon onto the olecranon of the ulna.
Unlike an exposure of the humeral shaft through a posterior approach, most approaches to the elbow through a posterior approach are not extended proximally enough that the radial nerve is at great risk and requires formal exposure. That said, if extending this approach more than 8cm proximal to the lateral epicondyle, it is imperative to expose the radial nerve just as if performing a humeral shaft exposure.
Also distinguishing a posterior approach to the elbow from that of the humeral shaft is the necessity to work on both sides of the triceps. While a humeral shaft fracture can typically be reduced and fixed through an exposure that reflects the triceps from lateral to medial, supracondylar and intercondylar fractures require fixation placed on both the medial and lateral columns of the distal humerus. As such, for the posterior approach to the elbow dissection takes places both medial and lateral to the triceps. The medial portion of the dissection requires complete visualization of the ulnar nerve, which lies on the medial intermuscular septum in the posterior compartment of the arm before passing around the medial epicondyle and through the two heads of the flexor carpi ulnaris in the proximal forearm.
Triceps:
Origin:
Long head: Infra-glenoid tubercle
Lateral head: Posterior humeral shaft proximal to the spiral groove
Medial/Deep head: Posterior humeral shaft distal to the spiral groove
Insertion: Olecranon of the ulna
Innervation: Radial nerve
Action: Elbow extension, shoulder extension (long head only)
INSERT PICTURE
Anconeus:
Origin: Lateral epicondyle of the distal humerus
Insertion: Radial side of the crest of the proximal ulna and olecranon
Innervation: Radial nerve
Action: Elbow extension
INSERT PICTURE
Vascular Anatomy:
There are no major vessels that are routinely exposed during the posterior approach to the elbow. Vessels along the cut surface of the skin and perforating vessels exposed during the elevation of the triceps from the medial and lateral intermuscular septums should be coagulated as they are encounters, however, to maintain a dry surgical field.
INSERT PICTURE
Nervous Anatomy:
The ulnar nerve requires exposure and careful handling during the posterior approach to the elbow to avoid post-operative palsy. The ulnar nerve is a terminal brach off the medial cord of the brachial plexus. It runs medially in the anterior compartment of the brachium along with the median nerve and brachial artery before piercing the medial intermuscular septum and entering the posterior compartment of the brachium. It then runs along this septum in intimate association with the medial/deep head of the triceps. It passes into the cubital tunnel posterior to the medial epicondyle running on top of the posterior bundle of the medial collateral ligament of the elbow and sends a sensory branch to the elbow joint. It then passes through the two heads of the flexor carpi ulnaris, providing a motor branch to this muscle, before passing further down into the forearm.
Position & Markings
Patient Positioning:
The patient may either be positioned lateral or prone. Lateral positioning avoids the hazards of pressure points on the face, chest, pelvis, knees, and feet seen with prone positioning and also provides easier access to the airway. The operative extremity, however, can be brought further from the table in the prone position, which may simplify intra-operative imaging.
For lateral positioning the patient is placed on a reversed cantilever table with the operative extremity up. The patient's head is brought to the cephalad extent of the table and head/torso are also shifted towards the operative field, leaving only enough room for rolled blankets to be used to help hold the patient in position. An axillary roll is placed and the down lower extremity should be padded to avoid pressure on the peroneal nerve at the knee and lateral malleoli at the ankle. Pillows or blankets may be placed between the legs. Rolled towels are placed on either side of the patient's torso and along with tape are used to maintain the patient in the lateral position throughout the case. The head should be elevated from the bed with folded sheets or a blanket so the neck is in line with the remainder of the spine. The non-operative, down extremity is flexed to 90 degrees at the shoulder and elbow such that the hand is resting just in front of the patient's face. This extremity should be rested on a radiolucent arm board which extends only 8-10cm from the operating table. This non-operative extremity should not be allow to fully externally rotate until it is parallel to the floor, but rather be elevated at the hand/wrist to reduce the external rotation stress that might otherwise be felt at the shoulder. The operative extremity is placed over a radiolucent, L-shaped arm board which is secured to the head of the bed and runs parallel with the operating table. The bed should be turned 90 degrees to the standard position such that the operative extremity is positioned coming out towards the surgeon and away from the anesthesiologist.
For the prone position the patient is placed on a reversed cantilever table. The head is placed in a well padded head-holder with a well secured airway. The chest/torso lies on rolls made from blankets or gel pads. The knees should be well padded to avoid pressure on the patellas and the lower legs placed on pillows to avoid pressure on the shins and feet. The non-operative extremity may be positioned next to the patient in a fully adducted position or placed on a prone positioning arm board with the shoulder flexed just less that 90 degrees and slightly internal rotated (arms headed down towards the floor relative to the torso) and the elbow flexed at 90 degrees. The operative extremity is outstretched on a radiolucent arm board which extends ~15cm away from the operating table. This arm board is padded with blankets until the arm rests at the level of the shoulder. The shoulder is abducted just less that 90 degrees and the elbow is allowed to flex over the end of the radiolucent arm board. The bed should be turned 90 degrees to the standard position such that the operative extremity is positioned coming out towards the surgeon and away from the anesthesiologist.
Intra-op Imaging:
The fluoroscopy unit should come in from the patient's head. An AP image is simply taken by positioning the fluoroscopy unit over the desired portion of the humeral shaft or elbow. A lateral image is obtained by rolling the fluoroscopy unit to a true lateral position, parallel with the operating table. As the operative extremity has been positioned on an arm board that runs parallel to, but just away from, the operating table, there is room to place the fluoroscopy unit just along the edge of the operating table to capture the needed lateral images. It is important to make sure adequate lateral images can be obtained prior to prepping and draping the limb; positioning of the table, patient, arm boards for the operative and non-operative extremity, and fluoroscopy unit all have to be quite precise to allow for adequate images in this position.
Marking the Incision:
The incision is made longitudinally directly over the posterior aspect of the elbow centered in line with the humeral shaft. Its length is determined by the exposure needed for reduction and fixation, but is frequently 15-20cm in length, extending 5cm past the tip of the olecranon. The incision is frequently curved around the tip of the olecranon along the radial side, rather than placing the incision over this prominent landmark.
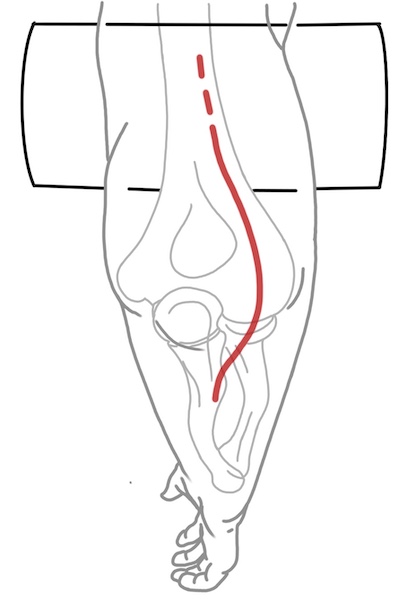
Posterior Approach to the Elbow
Superficial dissection:
A knife is used to make the incision as previously described over the posterior surface of the elbow centered at the fracture site and extending several centimeters past the tip of the olecranon. There are no significant neurovascular structures, or even large superficial veins, on the posterior surface of the arm, and as such a knife or cautery may be used to cleanly dissect down to the level of the fascia over the triceps muscle.
The fascia over the triceps muscle should then be incised in line with the skin incision, exposing the muscle belly. Over the tip of the olecranon there is significant bursa tissue that must be incised in order to expose the tendon of the triceps distally. Coming through the fascia over the triceps, rather than staying superficial to it, is a critical step. The remainder of the dissection essentially involves elevating the triceps off the medial and lateral intermuscular septums as well as the posterior surface of the humerus itself. If the surgeon stays superficial to the fascia of the triceps while dissecting medially or laterally the intermuscular septum will not be encountered; instead the surgeon will pass over it and onto the fascia of the anterior compartment of the arm. This is because the fascia of the posterior and anterior compartments is continuous and the intermuscular septums originates off the deep surface of this fascia and then extends down to the humerus, separating the anterior and posterior compartment musculature.
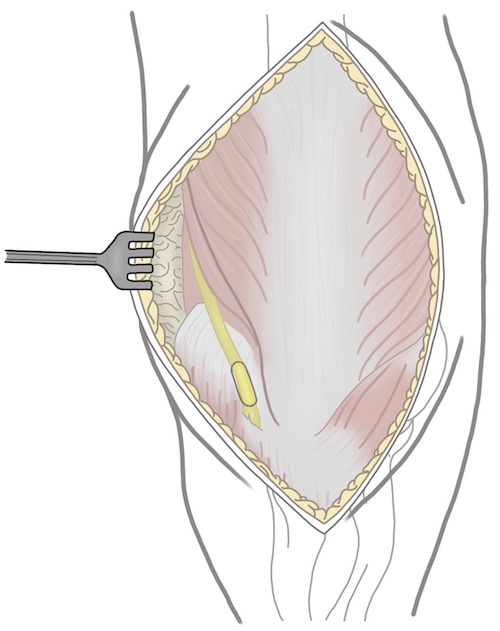
Deep dissection:
Once through the fascia full thickness flaps are raised medially and laterally. The fascia and the medial/deep head of the triceps muscle may be separated from each other bluntly using an elevator. The medial/deep head of the triceps is retracted centrally while the tissue/fascial flaps are retracted peripherally.
Most surgeons choose to dissect medially first so as to identify the ulnar nerve and allow for its protection throughout the remainder of the case. The ulnar nerve lies on the posterior aspect of the medial intermuscular septum. The nerve may often be felt prior to being visualized. The triceps muscle is gently and bluntly dissected away from the medial septum until a portion of the ulnar nerve is visualized. A penrose drain may then be passed around the nerve and used to manipulate it as the nerve is dissected out along its length. The nerve should be freed from the proximal extent of the incision all the way until it passes between the two heads of the flexor carpi ulnaris. It must be free from the cubital tunnel to allow for plating around the medial epicondyle. Rather than dissecting all soft tissue away from the nerve during its mobilization, it is frequently possible to leave associated vessels which accompany the nerve running along side it in a small sleeve of tissue.
Once the ulnar nerve is dissected free the triceps may be elevated off the posterior surface of the humeral shaft and medial column/metaphysis of the humerus using a periosteal elevator or knife. As this dissection continues distally the posterior elbow capsule will be divided exposing the ulno-humeral joint.
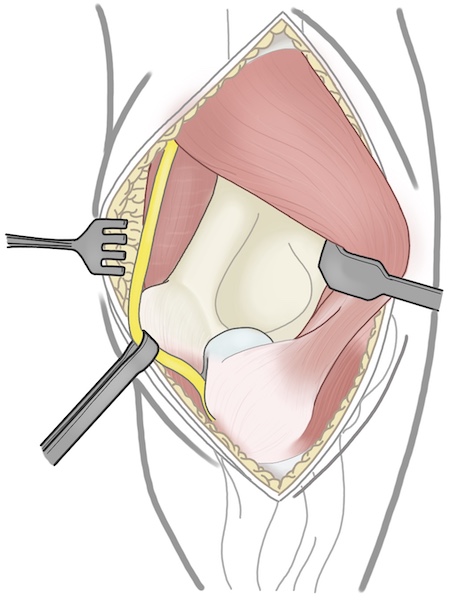
One the medial dissection is complete dissection is then continued on the opposite side of the triceps. Blunt dissection is carried down to the level of the lateral intermuscular septum just proximal to the lateral epicondyle. From here the medial/deep head of the triceps is gently elevated in a distal to proximal progression off the lateral intermuscular septum. When dissection begins to proceed more than 8cm proximal to the lateral epicondyle the surgeon must then begin to seek the radial nerve. As was performed on the medial side, dissecting along the lateral intermuscular septum will lead to the humeral shaft and lateral column/metaphysis which can then be exposed in a subperiosteal fashion using an elevator. As dissection progresses distally the lateral joint capsule will incised.
When performing the dissection around the epicondyles it is of course critical not to simple remove all soft tissues from these structures in a subperiosteal fashion. The anterior band of the medial collateral ligament, which arises from the junction of the inferior portion of the medial epicondyle and the trochlea, should be left intact on the medial side. The lateral ulnar collateral ligament and radial collateral ligament, which arise from the lateral epicondyle, should similarly have their origins left intact. Both on the medial and lateral sides this is accomplished by avoiding subperiosteal dissections in these areas and instead keeping subperiosteal exposure of the distal humerus limited to the posterior surface of the columns.
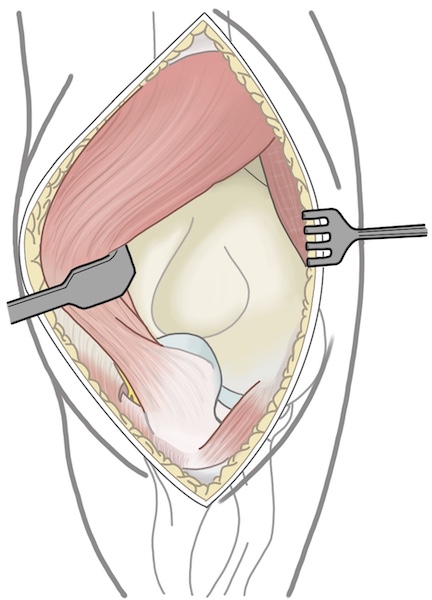
For supracondylar distal humerus fractures or intercondylar intercondylar distal humerus fractures with a simple split into the articular surface the above exposure (para-triceptial approach) is often all the is required for reduction and fixation. When fracture patterns become more complex at the level of the joint, reduction can often not be achieved reliably with this more limited exposure. When this is the case additional exposure of the joint surface can be achieved in a dramatic fashion with an olecranon osteotomy. This extension of the approach reflects the entire triceps and the most proximal portion of the ulna (olecranon) away from the operative field and provides exposure of the entire posterior and distal portions of the distal humerus articular surface.
The position of the osteotomy may be judged using fluoroscopy. On a lateral view the nadir of the ulno-humeral joint can be identified and marked on the posterior surface of the ulna. The previously developed paratricepital approach can then be extended to this point on the medial and lateral sides of the olecranon. On the medial side this extension is typically through periosteum of the olecranon only, as the flexor carpi ulnaris does not extend more proximally. However, on the lateral side, the extension of the lateral portion of the paratricepital approach invariably goes through a portion of the anconeus muscle.
The osteotomy site should be cleared of periosteum long the planned path of the osteotomy. Traditionally the osteotomy was made in a chevron shape, with the tip of the chevron pointed distally. This increased the inherent stability of the osteotomy and increased the surface area for healing, as non-union was a historic concern. If tension band plating is the planned fixation strategy for the osteotomy then a chevron osteotomy perhaps remains advisable. If pre-contoured plates designed for fixation of the olecranon are available this arguably makes the non-union risk negligible, and a simple transverse osteotomy can be made.
Regardless of osteotomy shape, the osteotomy should be begun with a narrow saw blade, removing as little bone as feasible. Once the surgeon has reached the level of the joint it is common practice to complete the osteotomy with an osteotome rather than a saw. This hopefully avoids any damage to the articular surface of the distal humerus that passing a saw blade might create and may also produce a more jagged edge to allow for a simpler and more stable reduction at the conclusion of the case.
Once the osteotomy is made any final soft tissue attachments are incised with a knife and the olecranon and attached triceps are reflected proximally, exposing the distal humeral shaft, columns, and articular surface.

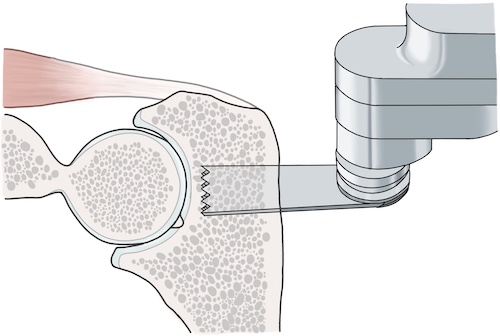
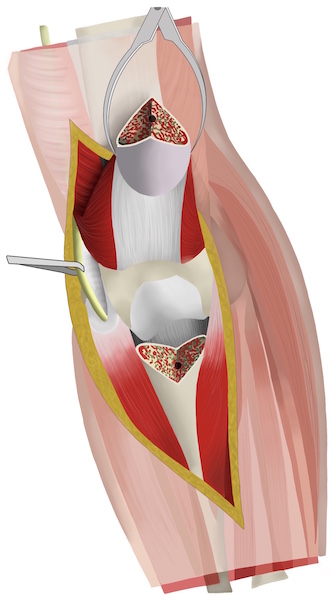
Tips, Tricks & Precautions
Precautions:
The ulnar nerve should be identified early in the course of the dissection and carefully protected throughout the case. It is often palpable before it is visible, which may aid in finding it. It may be retracted during the case with an elastic penrose drain to avoid manipulation with metallic instruments. Both during medial and lateral fixation the nerve's position must be carefully monitored. An errant drill bit passed from the lateral side through the medial cortex is in an excellent position to wrap up the nerve!
The radial nerve may less commonly be at risk during an approach to the distal humerus. If the fracture extends proximally enough however, safe reduction and fixation may require this nerve's identification also. If working more proximally than 8cm to the lateral epicondyle the nerve should be looked for on the lateral intermuscular septum and posterior humeral shaft to avoid incarceration under the proximal extension of a plate.
Tips:
Although an olecranon osteotomy seems a dramatic and morbid way to access the distal humerus, the exposure it provides frequently justifies its use for complex intra-articular fractures of the distal humerus. Rather than extending the length of the case by several hours or accepting a low quality reduction at the joint surface, an olecranon osteotomy is often a less morbid tactic.
If a pre-contoured plate is to be used for olecranon fixation this plate can be quickly applied and fixed to the proximal ulna prior to performing the actual osteotomy. The hardware is then removed and the osteotomy performed. At the conclusion of the case the pre-drills holes for the previously placed plate can serve as a secondary check on the reduction of the osteotomy and also speed its definitive fixation.
Objectives
At the end of this module, the learner should be able to:
1. List the indications for a posterior approach to the elbow
2. Understand the relevant anatomy of the posterior approach to the elbow
3. Discuss in detail the posterior approach to the elbow, including:
a. Patient positioning
b. Landmarks for incision
c. Relevant internervous planes
d. Sequence of the superficial and deep dissection
Indications
Indications for a Posterior Approach to the Elbow
1. Open reduction internal fixation of supracondylar and intercondylar fractures of the distal humerus
2. Total elbow arthroplasty for intercondylar distal humerus fractures or arthritis
Anatomy
Internervous Plane:
The posterior approach to the elbow does not use an internervous interval. The primary muscle encountered during this approach is the triceps and all three of this muscle's heads (long, lateral, and medial/deep) are innervated by the radial nerve. Access to the distal humerus is achieved by either working around the triceps on its medial and lateral sides (para-tricepital approach) or by reflecting the entire triceps proximally along with its insertion into the proximal ulna through an olecranon osteotomy.
Muscular Anatomy:
As stated above the triceps is the primary muscle encountered during this approach. The triceps, as its name implies, has three heads. The Long head arises off the infra-glenoid tubercle. The Lateral head arises of the posterior humeral shaft, proximal to the spiral groove. The Medial/Deep head arises from the posterior humeral shaft also, but distal to the spiral groove. These three heads do not exist in a single plain. Rather the long and lateral heads, which arise proximally, come together to form a superficial layer of the triceps. This superficial layer passes over and combines with the Medial/Deep head distally to then insert as a single tendon onto the olecranon of the ulna.
Unlike an exposure of the humeral shaft through a posterior approach, most approaches to the elbow through a posterior approach are not extended proximally enough that the radial nerve is at great risk and requires formal exposure. That said, if extending this approach more than 8cm proximal to the lateral epicondyle, it is imperative to expose the radial nerve just as if performing a humeral shaft exposure.
Also distinguishing a posterior approach to the elbow from that of the humeral shaft is the necessity to work on both sides of the triceps. While a humeral shaft fracture can typically be reduced and fixed through an exposure that reflects the triceps from lateral to medial, supracondylar and intercondylar fractures require fixation placed on both the medial and lateral columns of the distal humerus. As such, for the posterior approach to the elbow dissection takes places both medial and lateral to the triceps. The medial portion of the dissection requires complete visualization of the ulnar nerve, which lies on the medial intermuscular septum in the posterior compartment of the arm before passing around the medial epicondyle and through the two heads of the flexor carpi ulnaris in the proximal forearm.
Triceps:
Origin:
Long head: Infra-glenoid tubercle
Lateral head: Posterior humeral shaft proximal to the spiral groove
Medial/Deep head: Posterior humeral shaft distal to the spiral groove
Insertion: Olecranon of the ulna
Innervation: Radial nerve
Action: Elbow extension, shoulder extension (long head only)
INSERT PICTURE
Anconeus:
Origin: Lateral epicondyle of the distal humerus
Insertion: Radial side of the crest of the proximal ulna and olecranon
Innervation: Radial nerve
Action: Elbow extension
INSERT PICTURE
Vascular Anatomy:
There are no major vessels that are routinely exposed during the posterior approach to the elbow. Vessels along the cut surface of the skin and perforating vessels exposed during the elevation of the triceps from the medial and lateral intermuscular septums should be coagulated as they are encounters, however, to maintain a dry surgical field.
INSERT PICTURE
Nervous Anatomy:
The ulnar nerve requires exposure and careful handling during the posterior approach to the elbow to avoid post-operative palsy. The ulnar nerve is a terminal brach off the medial cord of the brachial plexus. It runs medially in the anterior compartment of the brachium along with the median nerve and brachial artery before piercing the medial intermuscular septum and entering the posterior compartment of the brachium. It then runs along this septum in intimate association with the medial/deep head of the triceps. It passes into the cubital tunnel posterior to the medial epicondyle running on top of the posterior bundle of the medial collateral ligament of the elbow and sends a sensory branch to the elbow joint. It then passes through the two heads of the flexor carpi ulnaris, providing a motor branch to this muscle, before passing further down into the forearm.
Position & Markings
Patient Positioning:
The patient may either be positioned lateral or prone. Lateral positioning avoids the hazards of pressure points on the face, chest, pelvis, knees, and feet seen with prone positioning and also provides easier access to the airway. The operative extremity, however, can be brought further from the table in the prone position, which may simplify intra-operative imaging.
For lateral positioning the patient is placed on a reversed cantilever table with the operative extremity up. The patient's head is brought to the cephalad extent of the table and head/torso are also shifted towards the operative field, leaving only enough room for rolled blankets to be used to help hold the patient in position. An axillary roll is placed and the down lower extremity should be padded to avoid pressure on the peroneal nerve at the knee and lateral malleoli at the ankle. Pillows or blankets may be placed between the legs. Rolled towels are placed on either side of the patient's torso and along with tape are used to maintain the patient in the lateral position throughout the case. The head should be elevated from the bed with folded sheets or a blanket so the neck is in line with the remainder of the spine. The non-operative, down extremity is flexed to 90 degrees at the shoulder and elbow such that the hand is resting just in front of the patient's face. This extremity should be rested on a radiolucent arm board which extends only 8-10cm from the operating table. This non-operative extremity should not be allow to fully externally rotate until it is parallel to the floor, but rather be elevated at the hand/wrist to reduce the external rotation stress that might otherwise be felt at the shoulder. The operative extremity is placed over a radiolucent, L-shaped arm board which is secured to the head of the bed and runs parallel with the operating table. The bed should be turned 90 degrees to the standard position such that the operative extremity is positioned coming out towards the surgeon and away from the anesthesiologist.
For the prone position the patient is placed on a reversed cantilever table. The head is placed in a well padded head-holder with a well secured airway. The chest/torso lies on rolls made from blankets or gel pads. The knees should be well padded to avoid pressure on the patellas and the lower legs placed on pillows to avoid pressure on the shins and feet. The non-operative extremity may be positioned next to the patient in a fully adducted position or placed on a prone positioning arm board with the shoulder flexed just less that 90 degrees and slightly internal rotated (arms headed down towards the floor relative to the torso) and the elbow flexed at 90 degrees. The operative extremity is outstretched on a radiolucent arm board which extends ~15cm away from the operating table. This arm board is padded with blankets until the arm rests at the level of the shoulder. The shoulder is abducted just less that 90 degrees and the elbow is allowed to flex over the end of the radiolucent arm board. The bed should be turned 90 degrees to the standard position such that the operative extremity is positioned coming out towards the surgeon and away from the anesthesiologist.
Intra-op Imaging:
The fluoroscopy unit should come in from the patient's head. An AP image is simply taken by positioning the fluoroscopy unit over the desired portion of the humeral shaft or elbow. A lateral image is obtained by rolling the fluoroscopy unit to a true lateral position, parallel with the operating table. As the operative extremity has been positioned on an arm board that runs parallel to, but just away from, the operating table, there is room to place the fluoroscopy unit just along the edge of the operating table to capture the needed lateral images. It is important to make sure adequate lateral images can be obtained prior to prepping and draping the limb; positioning of the table, patient, arm boards for the operative and non-operative extremity, and fluoroscopy unit all have to be quite precise to allow for adequate images in this position.
Marking the Incision:
The incision is made longitudinally directly over the posterior aspect of the elbow centered in line with the humeral shaft. Its length is determined by the exposure needed for reduction and fixation, but is frequently 15-20cm in length, extending 5cm past the tip of the olecranon. The incision is frequently curved around the tip of the olecranon along the radial side, rather than placing the incision over this prominent landmark.
Posterior Approach to the Elbow
Superficial dissection:
A knife is used to make the incision as previously described over the posterior surface of the elbow centered at the fracture site and extending several centimeters past the tip of the olecranon. There are no significant neurovascular structures, or even large superficial veins, on the posterior surface of the arm, and as such a knife or cautery may be used to cleanly dissect down to the level of the fascia over the triceps muscle.
The fascia over the triceps muscle should then be incised in line with the skin incision, exposing the muscle belly. Over the tip of the olecranon there is significant bursa tissue that must be incised in order to expose the tendon of the triceps distally. Coming through the fascia over the triceps, rather than staying superficial to it, is a critical step. The remainder of the dissection essentially involves elevating the triceps off the medial and lateral intermuscular septums as well as the posterior surface of the humerus itself. If the surgeon stays superficial to the fascia of the triceps while dissecting medially or laterally the intermuscular septum will not be encountered; instead the surgeon will pass over it and onto the fascia of the anterior compartment of the arm. This is because the fascia of the posterior and anterior compartments is continuous and the intermuscular septums originates off the deep surface of this fascia and then extends down to the humerus, separating the anterior and posterior compartment musculature.
Deep dissection:
Once through the fascia full thickness flaps are raised medially and laterally. The fascia and the medial/deep head of the triceps muscle may be separated from each other bluntly using an elevator. The medial/deep head of the triceps is retracted centrally while the tissue/fascial flaps are retracted peripherally.
Most surgeons choose to dissect medially first so as to identify the ulnar nerve and allow for its protection throughout the remainder of the case. The ulnar nerve lies on the posterior aspect of the medial intermuscular septum. The nerve may often be felt prior to being visualized. The triceps muscle is gently and bluntly dissected away from the medial septum until a portion of the ulnar nerve is visualized. A penrose drain may then be passed around the nerve and used to manipulate it as the nerve is dissected out along its length. The nerve should be freed from the proximal extent of the incision all the way until it passes between the two heads of the flexor carpi ulnaris. It must be free from the cubital tunnel to allow for plating around the medial epicondyle. Rather than dissecting all soft tissue away from the nerve during its mobilization, it is frequently possible to leave associated vessels which accompany the nerve running along side it in a small sleeve of tissue.
Once the ulnar nerve is dissected free the triceps may be elevated off the posterior surface of the humeral shaft and medial column/metaphysis of the humerus using a periosteal elevator or knife. As this dissection continues distally the posterior elbow capsule will be divided exposing the ulno-humeral joint.
One the medial dissection is complete dissection is then continued on the opposite side of the triceps. Blunt dissection is carried down to the level of the lateral intermuscular septum just proximal to the lateral epicondyle. From here the medial/deep head of the triceps is gently elevated in a distal to proximal progression off the lateral intermuscular septum. When dissection begins to proceed more than 8cm proximal to the lateral epicondyle the surgeon must then begin to seek the radial nerve. As was performed on the medial side, dissecting along the lateral intermuscular septum will lead to the humeral shaft and lateral column/metaphysis which can then be exposed in a subperiosteal fashion using an elevator. As dissection progresses distally the lateral joint capsule will incised.
When performing the dissection around the epicondyles it is of course critical not to simple remove all soft tissues from these structures in a subperiosteal fashion. The anterior band of the medial collateral ligament, which arises from the junction of the inferior portion of the medial epicondyle and the trochlea, should be left intact on the medial side. The lateral ulnar collateral ligament and radial collateral ligament, which arise from the lateral epicondyle, should similarly have their origins left intact. Both on the medial and lateral sides this is accomplished by avoiding subperiosteal dissections in these areas and instead keeping subperiosteal exposure of the distal humerus limited to the posterior surface of the columns.
For supracondylar distal humerus fractures or intercondylar intercondylar distal humerus fractures with a simple split into the articular surface the above exposure (para-triceptial approach) is often all the is required for reduction and fixation. When fracture patterns become more complex at the level of the joint, reduction can often not be achieved reliably with this more limited exposure. When this is the case additional exposure of the joint surface can be achieved in a dramatic fashion with an olecranon osteotomy. This extension of the approach reflects the entire triceps and the most proximal portion of the ulna (olecranon) away from the operative field and provides exposure of the entire posterior and distal portions of the distal humerus articular surface.
The position of the osteotomy may be judged using fluoroscopy. On a lateral view the nadir of the ulno-humeral joint can be identified and marked on the posterior surface of the ulna. The previously developed paratricepital approach can then be extended to this point on the medial and lateral sides of the olecranon. On the medial side this extension is typically through periosteum of the olecranon only, as the flexor carpi ulnaris does not extend more proximally. However, on the lateral side, the extension of the lateral portion of the paratricepital approach invariably goes through a portion of the anconeus muscle.
The osteotomy site should be cleared of periosteum long the planned path of the osteotomy. Traditionally the osteotomy was made in a chevron shape, with the tip of the chevron pointed distally. This increased the inherent stability of the osteotomy and increased the surface area for healing, as non-union was a historic concern. If tension band plating is the planned fixation strategy for the osteotomy then a chevron osteotomy perhaps remains advisable. If pre-contoured plates designed for fixation of the olecranon are available this arguably makes the non-union risk negligible, and a simple transverse osteotomy can be made.
Regardless of osteotomy shape, the osteotomy should be begun with a narrow saw blade, removing as little bone as feasible. Once the surgeon has reached the level of the joint it is common practice to complete the osteotomy with an osteotome rather than a saw. This hopefully avoids any damage to the articular surface of the distal humerus that passing a saw blade might create and may also produce a more jagged edge to allow for a simpler and more stable reduction at the conclusion of the case.
Once the osteotomy is made any final soft tissue attachments are incised with a knife and the olecranon and attached triceps are reflected proximally, exposing the distal humeral shaft, columns, and articular surface.
Tips, Tricks & Precautions
Precautions:
The ulnar nerve should be identified early in the course of the dissection and carefully protected throughout the case. It is often palpable before it is visible, which may aid in finding it. It may be retracted during the case with an elastic penrose drain to avoid manipulation with metallic instruments. Both during medial and lateral fixation the nerve's position must be carefully monitored. An errant drill bit passed from the lateral side through the medial cortex is in an excellent position to wrap up the nerve!
The radial nerve may less commonly be at risk during an approach to the distal humerus. If the fracture extends proximally enough however, safe reduction and fixation may require this nerve's identification also. If working more proximally than 8cm to the lateral epicondyle the nerve should be looked for on the lateral intermuscular septum and posterior humeral shaft to avoid incarceration under the proximal extension of a plate.
Tips:
Although an olecranon osteotomy seems a dramatic and morbid way to access the distal humerus, the exposure it provides frequently justifies its use for complex intra-articular fractures of the distal humerus. Rather than extending the length of the case by several hours or accepting a low quality reduction at the joint surface, an olecranon osteotomy is often a less morbid tactic.
If a pre-contoured plate is to be used for olecranon fixation this plate can be quickly applied and fixed to the proximal ulna prior to performing the actual osteotomy. The hardware is then removed and the osteotomy performed. At the conclusion of the case the pre-drills holes for the previously placed plate can serve as a secondary check on the reduction of the osteotomy and also speed its definitive fixation.
Elbow - Lateral Approaches
- Read Full Text
-
Objectives
At the end of this module, the learner should be able to:
1. List the indications for a lateral approach to the elbow
2. Understand the relevant anatomy of the lateral approach to the elbow
3. Discuss in detail the lateral approach to the elbow, including:
a. Patient positioning
b. Landmarks for incision
c. Relevant internervous plains
d. Sequence of the superficial and deep dissection
Indications
Indications for a Lateral Approach to the Elbow
1. Open reduction internal fixation of radial head fractures
2. Radial head arthroplasty for un-reconstructable radial head fractures
3. Lateral ulnar collateral ligament (LUCL) repair or reconstruction for the acute or chronic unstable elbow
4. Terrible Triad Injuries (elbow dislocation, radial head fracture, coronoid fracture): Radial head fracture, LUCL, and coronoid fixation/repair/reconstruction
5. Open reduction internal fixation of capitellum fractures
Anatomy
Internervous Plain:
A large proportion of the muscles on the dorsal surface of the forearm take their origin on or near the lateral epicondyle. Progressing from radial to ulnar, the first three muscles, the brachioradialis, the extensor carpi radials longus (ECRL), and the extensor carpi radials brevis (ECRB), are frequently grouped together as the "mobile wad". This group of three muscles receives its innervation directly from the radial nerve (though some sources will suggest the ECRB is innervated by a named branch from the radial nerve). The next group of muscles originating from the lateral epicondyle are the extensor digitorum comminus (EDC), the extensor digiti minimi (EDM), and the extensor carpi ulnaris (ECU). These muscles, and those which originate beneath this group further down the forearm (abductor pollicus longus (APL), extensor pollicus brevis (EPB), the extensor pollicus longus (EPL), the extensor indicis proprius (EIP)) are all innervated by the posterior interosseous nerve (PIN). The posterior interosseous nerve is a terminal branch of the radial nerve, the other branch being the sensory branch of the radial nerve. The final, most ulnar muscle originating from the lateral epicondyle is the anconeus. This muscle is also innervated by the radial nerve proper.
Given the above anatomy, there exists two internervous planes on the lateral side of the elbow for use during surgical approaches. One, frequently termed Kocher's interval, lies between the ECU (innervated by the PIN) and the anconeus (innervated by the radial nerve). The second, frequently termed Kaplan's interval, lies between the mobile wad (more specifically the ECRB, innervated by the radial nerve) and the EDC (innervated by the PIN).
Since both intervals are internervous planes, either can be safely used to access the lateral side of the elbow without deinnervation of major muscles. The touted advantage of Kocher's interval is it places the surgeon further away from the PIN during the deep portion of the dissection. The proposed advantage of Kaplan's interval is that it takes the incision through the joint capsule more anteriorly and so further away from the LUCL, an important static stabilizer of the lateral side of the elbow.
Muscular Anatomy:
During the superficial portion of the dissection the primary muscular relationships that need to be understood are those just discussed above. To reiterate, the lateral side of the elbow is covered by the origins of many of the muscles on the dorsal surface of the forearm. These muscles can be grossly placed into three groups based upon their innervation. The mobile wad (brachioradialis, ECRL, ECRB) innervated by the radial nerve, the muscles in the middle of the dorsal forearm (EDC, EDM, ECU, APL, EPB, EPL, EIP) innervated by the PIN, and the anconeus innervated by the radial nerve.
The only deep muscle that is encountered during an approach to the lateral side of the elbow is the supinator. This muscle is intimately associated with the radial neck and proximal shaft, which it wraps around. The radial nerve divides in the antecubital fossa into the PIN and its terminal sensory branch and sends the PIN under the proximal extent of the supinator (arcade of Frohse). The PIN then travels deep to the supinator muscle directly adjacent to the proximal radial shaft before piercing the mid substance of the supinator muscle further down the forearm on its way to innervating the majority of muscles in the dorsal forearm as previously described. Understanding of the close relationship of the supinator and the PIN is critical to accessing the lateral elbow safely. An errant retractor or clamp can easily injury the PIN and cause a devastating palsy. The PIN can be drawn away from the lateral side of the radius, and so the operative field, by pronating the forearm. Even with this maneuver, only the proximal 15mm of radial neck/shaft should be exposed through this approach.
Brachioradialis:
Origin: Proximal 2/3rds of the lateral supracondylar ridge of the humerus
Insertion: Radial aspect of the distal radius
Innervation: Radial nerve
Action: Elbow flexion
Extensor Carpi Radialis Longus (ECRL):
Origin: Distal 1/3rd of the lateral supracondylar ridge of the humerus
Insertion: 2nd metacarpal base
Innervation: Radial nerve
Action: Wrist extension and radial deviation
Extensor Carpi Radialis Brevis (ECRB):
Origin: Lateral epicondyle
Insertion: 3rd metacarpal base
Innervation: Radial nerve
Action: Wrist extension
Extensor Digitorum Comminus (EDC):
Origin: Lateral epicondyle
Insertion: Extensor hoods of the 2nd-5th digits
Innervation: PIN
Action: Extension of the 2nd-5th digits at the distal interphalangeal (DIP), proximal interphalangeal (PIP), and metacarpal phalangeal (MCP) joints. This muscle is also the only muscle which can hyperextend these digits past neutral; the lumbricals also being able to extend the digits at the DIP and PIP joint, but flexing the digits at the MCP joints. As it crosses the wrist, it also assists with wrist extension.
Extensor Digiti Minimi (EDM):
Origin: Lateral epicondyle
Insertion: Extensor hood of 5th digit
Innervation: PIN
Action: Similar to the EDC but limited to the 5th digit, this muscle extends the small finger at the DIP, PIP, and MCP joints.
Extensor Carpi Ulnaris (ECU):
Origin: Lateral epicondyle and posterior border of the ulna
Insertion: 5th metacarpal base
Innervation: PIN
Action: Wrist extension and ulnar deviation
Abductor Pollicis Longus (APL):
Origin: Posterior ulna, interosseous membrane, and radius
Insertion: 1st metacarpal base
Innervation: PIN
Action: Thumb Abduction
Extensor Pollicis Brevis (EPB):
Origin: Posterior radius and interosseous membrane
Insertion: Base of proximal phalanx of the thumb
Innervation: PIN
Action: Extension of MCP joint of thumb
Extensor Pollicis Longus (EPL):
Origin: Posterior ulna and interosseous membrane
Insertion: Base of distal phalanx of the thumb
Innervation: PIN
Action: Extension of interphalangeal joint of thumb
Extensor Indicis Proprius (EIP):
Origin: Posterior ulna and interosseous membrane
Insertion: Extensor hood of 2nd digit
Innervation: PIN
Action: Extension of DIP, PIP, and MCP joints of the 2nd digit
Anconeus:
Origin: Lateral epicondyle
Insertion: Proximal ulna and olecranon
Innervation: Radial nerve
Action: Extension elbow
Ligamentous Anatomy:
The stability of the elbow is imparted by a combination of bony congruence, ligaments which span the articulations, and the muscles which cross from the arm to the forearm. The ligaments on medial and lateral sides of the elbow provide a critical static stability while allowing for motion at the ulnohumeral, radiocapitellar, and proximal radioulnar joints. During any lateral approach to the elbow the anatomy of the lateral ligaments must be understood and appreciated for its contribution to elbow stability.
The capsule which surrounds the lateral side of the elbow has three primary thickenings, or ligaments: the lateral or radial collateral ligament, the lateral ulnar collateral ligament, and the annular ligament. The radial collateral ligament arises from the lateral epicondyle and inserts on the annular ligament, which is surrounding the radial head/neck. It is a relatively broad, triangular shaped ligament. The lateral ulnar collateral ligament, considered by many to be the ligament of prime importance for lateral sided elbow stability, arises from a point that is at the center of rotation of the radiocapitellar joint and inserts on the supinator crest of the proximal ulna. It is a narrow band which travels just posterior to the radial collateral ligament. The annular ligament surrounds the radial head and neck, and encircles it from its attachments along the ulna at the anterior and posterior extents of the proximal radial ulnar joint.
Vascular Anatomy:
There are no major vascular structures that should be encountered during a lateral approach to the elbow.
Nervous Anatomy:
The only nerve that must be understood during a lateral approach to the elbow is the PIN. While not exposed during this approach its close relationship with the supinator muscle and proximal radial shaft must be understood to safely access the lateral side of the elbow. The radial nerve divides in the antecubital fossa into the PIN and its terminal sensory branch and sends the PIN under the proximal extent of the supinator (arcade of Frohse). The PIN then travels deep to the supinator muscle directly adjacent to the proximal radial shaft before piercing the mid substance of the supinator muscle further down the forearm on its way to innervating the majority of muscles in the dorsal forearm as previously described.
Position & Markings
Patient Positioning:
The patient is typically placed on a regular operating table in the supine position with the operative upper extremity placed out stretched onto a hand table which is connected to the main table. To bring more of the operative extremity onto the hand table the patient should be brought toward the hand table such that the head and torso are along the edge of the main operating table. Securing the head and torso so they don't unintentionally fall from the table is critical. The operating table is turned 90 degrees to place the upper extremity extending out into the room. A small bump of towels under the elbow will elevate the operative field away from the table to allow for easier dissection and instrumentation. In cases of trauma requiring lateral ligament repair it is critical not to allow the arm to internally rotate after completion of the repair and so apply a varus force to the ligamentous repair.
Intra-op Imaging:
AP and lateral views are required to access reduction, stability, and congruence of the elbow. The AP may simply be obtained in various degrees of elbow flexion by leveling the brachium to the floor and shooting through the hand table. A lateral should be obtained by rolling the fluoroscopy unit into a lateral position an shooting across the hand table. While it is tempting to keep the fluoroscopy unit in the AP position and instead internally rotate the elbow to allow for a lateral image this places a varus stress on the elbow and may disrupt a lateral ligament repair.
Markings the incision:
There are two skin incisions that may be used, based upon how the surgeon likes to approach both the lateral and medial sides of the elbow. Some surgeons prefer to use a single incision over the posterior aspect of the elbow which allows for the development of flaps laterally and medially if needed to address elbow instability. Other surgeons prefer separate medial and lateral incisions. This avoids the development of large flaps and possible seromas, but of course requires two separate incisions to address elbow pathology.
If a single posterior incision is chosen a ~15 incision is marked along the posterior border of the elbow, 5cm of which is proximal and 10 cm of which is distal to the olecranon.
If a dual incision approach to the elbow is preferred then a 6-8cm incision is marked along the lateral border of the elbow beginning at the lateral epicondyle and extending towards the lateral border of the ulna in an oblique fashion. This incision can be placed over the potentially palpable interval between the anconeus and ECU (Kocher interval) or between the mobile wad and EDC (Kaplan interval). The radial head should be palpable and the incision should cross over this landmark.
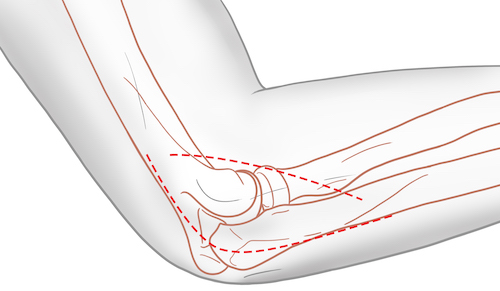
Lateral Approaches to the Elbow
Superficial dissection:
As discussed under positioning and markings, either a posterior midline skin incision or a more lateral oblique incision can be made through the skin based on surgeon preference. Regardless, the dissection may be safely taken down to fascia sharply. Once at the fascia dissection should be carried towards the intended interval of use.
Kocher Interval:
If the interval between the anconeus and ECU is to be used the first step is to dissect along the level of the fascia until the ulnar border is visible and palpable. The muscle belly visible through the fascia just radial to the ulnar border is the anconeus. There is a subtle oblique linear streak in the fascia that separates the anconeus from the ECU. This interval is often not immediately obvious. As such, progressing from the ulnar border (obvious) to the anconeus (obvious) to the interval between the anconeus and the ECU (subtle) may aid in its proper identification.

Kaplan Interval:
The interval between the mobile wad and the EDC can be challenging to detect also. It is perhaps best discovered during this limited approach by trying to identify vessels perforating the fascia along the anterior edge of the EDC. If for some reason this approach is expanded down the forearm until the APL/EPB are visualized passing through this interval this is a definitive method for identifying the borders of the ECRB and EDC; this is not typical, however, for an isolated approach to the lateral side of the elbow.
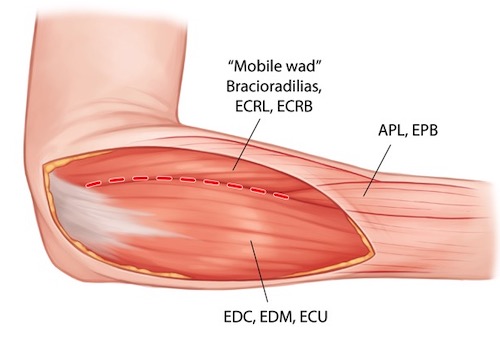
Deep dissection:
Kocher Interval:
The fascia in the interval between the anconeus and ECU is incised with a knife. Frequently rather than being precise between these two muscles, the surgeon will come down slightly to one side of the fascial division between them. As such, after incising fascia, muscle fibers are often seen just below fascia. Time should be spent determining whether the anconeus or ECU has been encountered; this allows the surgeon to draw the muscle either ulnarly (Anconeus) or radially (ECU) to expose the underlying capsule.

The lateral epicondyle and radial head should be palpable through the capsule. The capsule can then be incised from along the supracondylar ridge proximally, over the radial head, and towards the ulnar border. The annular ligament, part of the capsular complex, will be incised when dividing the capsule. If the surgeon stays anterior to the mid-portion of the radial head the LUCL should remain intact. This should expose the radial head and the most proximal portion of the supinator muscle wrapped around the proximal radius. More exposure can be gained by continuing this dissection along the lateral supracondylar ridge of the distal humerus elevating capsule and portions of the common extensor origin and brachioradialis.
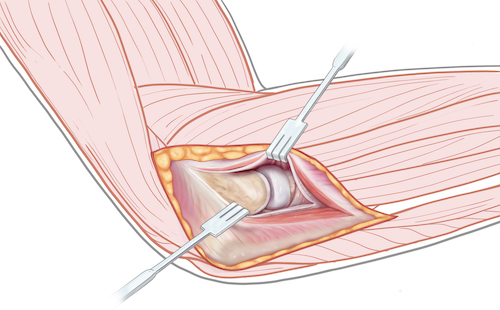
Kaplan Interval:
The fascia between the ECRB and EDC is incised with a knife. These two muscles are bluntly separated and retracted revealing the underlying capsule. The lateral epicondyle and radial head should be palpable through the capsule.

The capsule can then be incised from along the supracondylar ridge proximally, over the radial head, and towards the ulnar border. The annular ligament, part of the capsular complex, will be incised when dividing the capsule. The LUCL should be spared by this more anterior dissection through the capsule. This capsular incision should expose the radial head and the most proximal portion of the supinator muscle wrapped around the proximal radius. More exposure can be gained by continuing this dissection along the lateral supracondylar ridge of the distal humerus elevating capsule and portions of the common extensor origin and brachioradialis.
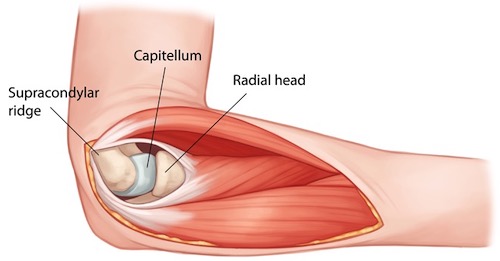
Tips, Tricks & Precautions
Tips:
Identifying the muscular intervals on the lateral side of the elbow can be challenging. The Kocher interval is between the anconeus and ECU. This interval is sometimes marked with an obvious oblique white streak in the fascia. If this interval is not immediately obvious, the interval may become more clear to the surgeon's eye by starting at a more obvious landmark. The subcutaneous border of the ulna should be quite clear both visually and by palpation in almost all patients. The muscle which lies directly adjacent to this bony border on the dorsal lateral side of the elbow is the anconeus. The next muscle more radial is the ECU. Using this consistent relationship (ulnar border, then anconeus, then ECU) may help the surgeon's eye identify Kocher's interval if a clear white streak in the fascia does not immediately present itself.
Kaplan's interval between the ECRB and EDC can be equally challenging to confidently identify. Small vessels perforating the fascia along the anterior edge of the EDC may assist in locating this interval.
Precautions:
The posterior interosseous nerve (PIN) is located beneath the supinator muscle, wrapping around the proximal radius. Dissection of the radial neck should not be performed beyond the distal extent of the annular ligament to avoid potential injury to this important nerve.
Elbow - Medial Approach
- Read Full Text
-
Objectives
At the end of this module, the learner should be able to:
1. List the indications for a medial approach to the elbow
2. Understand the relevant anatomy of the medial approach to the elbow
3. Discuss in detail the medial approach to the elbow, including:
a. Patient positioning
b. Landmarks for incision
c. Relevant internervous planes
d. Sequence of the superficial and deep dissection
Indications
Indications for a Medial Approach to the Elbow
1. Open reduction internal fixation of medial condyle or epicondyle fractures
2. Open reduction internal fixation of coronoid fractures
3. Medial collateral ligament (MCL) repair or reconstruction for the acute or chronic unstable elbow
4. Terrible Triad Injuries (elbow dislocation, radial head fracture, coronoid fracture): MCL repair/reconstruction and/or coronoid fixation/repair/reconstruction
5. Ulnar nerve decompression (cubital tunnel syndrome)
Anatomy
Internervous Plane:
Proximal:
Above the elbow, and the origin of the flexor-pronator mass from the epicondyle, the brachium is divided simply into anterior and posterior compartments. The anterior compartment contains the biceps brachii, brachialis, and coracobrachialis. The posterior compartment contains the three heads of the triceps (long, lateral, and medial/deep). The muscles of the anterior compartment are all innervated by the musculocutaneous nerve with the exception of the brachialis, which can receive dual innervation from the radial nerve. On the medial side of the brachium, however, the brachialis that will be encountered will receive it innervation exclusively from the musculocutaneous nerve. As such, all muscles in the anterior brachium approached from the medial side can be considered as receiving their innervation exclusively from the musculocutaneous nerve. The triceps in the posterior compartment is innervated by the radial nerve. As such there is a natural internervous plain between the anterior and posterior compartments of the arm. This plain is also delineated by an intermuscular septum which divides these two compartments.
Distal:
More distally, in the proximal forearm, there are two available internervous intervals and one intermuscular interval available for use:
1. Brachialis/Pronator Teres: The most anterior interval lies between the distal extent of the brachialis (musculocutaneous nerve) muscle as it inserts on the proximal anterior ulna and the proximal origin of the pronator teres (median nerve).
2. Palmaris Longus/Flexor Carpi Ulnaris: Passing more posteriorly, there is a second potential internervous plain between the palmaris longus (median nerve) and the flexor carpi ulnaris (ulnar nerve). Though this is a true internervous interval, it is not easily identified in the proximal medial forearm, where the muscle bellies of the palmaris longus and flexor carpi ulnaris blend together and take rise from a common origin.
3. Humeral and Ulnar Heads of the Flexor Carpi Ulnaris: The two heads of the flexor carpi ulnaris are separated proximally by the ulnar nerve, which passes directly between them on the medial side of the elbow. While both heads are innervated by the ulnar nerve, these two heads can be bluntly separated, exposing progressively more of the ulnar nerve and the medial elbow, until the first motor branch to the flexor carpi ulnaris is exposed. This intermuscular plain allows for visualization of much of the medial elbow (coronoid, MCL) in a readily identifiable interval marked by the ulnar nerve.
Muscular Anatomy:
The medial elbow contains the distal insertions of the primary flexors and supinators of the elbow (biceps brachii and brachialis) located relatively centrally in the antecubital fossa. More medially is the origin of the flexor-pronator mass (pronator teres, flexor carpi radialis, palmaris longus, and flexor carpi ulnaris). This confluence of muscular origins arises primarily from the medial epicondyle. A major neuromuscular bundle (brachial artery and median nerve) runs essentially between these two groups of muscular insertions and origins.
Biceps Brachii:
Origin:
Long head: Supraglenoid tubercle
Short head: Coracoid process of the scapula
Insertion: The primary tendon inserts onto the biceps tuberosity on the proximal radius. An aponeurosis also forms from this muscle distally in the antecubital fossa which spreads out and inserts superficial on the muscles of the flexor pronator mass of the proximal medial forearm.
Innervation: Musculocutaneous nerve
Action: Forearm supination, elbow flexion, shoulder flexion
INSERT PICTURE
Brachialis:
Origin: Distal half of the anterior shaft of the humerus
Insertion: Coronoid and tuberosity of the ulna
Innervation: Musculocutaneous nerve, Radial nerve
Action: Elbow flexion
INSERT PICTURE
Triceps:
Origin:
Long head: Infra-glenoid tubercle
Lateral head: Posterior humeral shaft proximal to the spiral groove
Medial/Deep head: Posterior humeral shaft distal to the spiral groove
Insertion: Olecranon of the ulna
Innervation: Radial nerve
Action: Elbow extension, shoulder extension (long head only)
INSERT PICTURE
Pronator Teres (PT):
Origin:
Humeral head: Just proximal to medial epicondyle
Ulnar head: Medial coronoid process of the ulna
Insertion: Radial aspect of the mid-radial shaft
Innervation: Median nerve
Action: Forearm pronation
Flexor Carpi Radialis (FCR):
Origin: Medial epicondyle
Insertion: Bases of the second and third metacarpals
Innervation: Median nerve
Action: Wrist flexion and radial deviation
Palmaris Longus (PL):
Origin: Medial epicondyle
Insertion: Palmar aponerosis
Innervation: Median nerve
Action: Wrist flexion
Flexor Carpi Ulnaris (FCU):
Origin:
Humeral head: Medial epicondyle
Ulnar head: Olecranon and posterior ulnar border of the ulna
Insertion: Pisiform, hook of the hamate, and 5th metacarpal base
Innervation: Ulnar nerve
Action: Wrist flexion and ulnar deviation
Ligamentous Anatomy:
The stability of the elbow is imparted by a combination of bony congruence, ligaments which span the articulations, and the muscles which cross from the arm to the forearm. The ligaments on medial and lateral sides of the elbow provide a critical static stability while allowing for motion at the ulnohumeral, radiocapitellar, and proximal radioulnar joints. During any medial approach to the elbow the anatomy of the lateral ligaments must be understood and appreciated for its contribution to elbow stability.
The capsule which surrounds the medial side of the elbow has three primary thickenings, or ligaments, all of which are considered portions of the medial collateral ligament (MCL): the anterior, posterior, and transverse bands of the MCL. The anterior band arises from the distal aspect of the medial epicondyle near the junction of the epicondyle and the medial aspect of the humeral trochlea and inserts on the medial coronoid at the sublime tubercle. It is the primary static restraints to values stress. The posterior band, also arises from the distal aspect of the medial epicondyle near the junction of the epicondyle and the medial aspect of the humeral trochlea and inserts along the medial aspect of the olecranon. It travels along the floor of the cubital tunnel. It provides much less stability to values stress than the anterior band, and in fact may be resected as part of a contracture release if necessary. The transverse band originates off the olecranon proximally and spans the medial side of the trochlear notch on its way to inserting on the medial coronoid. As it spans two potions of the same bone it has no major role in stabilization of the medial elbow.
Vascular Anatomy:
Most approaches to the medial elbow do not require exposure of any major vascular structures. The exception to this would be if the surgeon chose to use the most anterior of the discussed intervals, between the pronator teres and the distal portion of the brachialis muscle. Lying directly in this interval is the distal extent of the brachial artery, accompanied by the median nerve. These two structures course together in the medial aspect of the anterior compartment of the brachium between the biceps brachii and brachialis muscle bellies. In the antecubital fosse they lie just deep to the lacertus fibrosis (distal, broad aponeurosis of the biceps brachii), just medial to the primary biceps tendon, just superficial to the distal extent of the brachialis, and just lateral to the pronator teres. The median nerve continues distally and passes into the forearm between the two heads of the pronator teres. The brachial artery divides into the radial and ulnar arteries. The radial artery stays superficial, passing radially into the interval between the brachioradialis and pronator teres. The ulnar artery remains more medial and passes deep to the pronator teres.
INSERT PICTURE
Nervous Anatomy:
As discussed above in the vascular anatomy section, rarely the median nerve may be encountered during an approach to the medial side of the elbow. It runs in the anterior brachium between the biceps brachii and brachialis muscle bellies and then passes into the antecubital fossa between the lacertus fibrosis (superficial) and brachialis (deep) and medial to the primary biceps brachii tendon before passing between the two heads of the pronator teres.
The ulnar nerve, however, may frequently be exposed, and its position should be understood in any medial approach to the elbow. The ulnar nerve originates from the medial cord of the brachial plexus and runs in the anterior compartment of the brachium proximally. About half way down the arm the ulnar nerve pierces through the medial intermuscular septum of the arm to run along the posterior portion of the septum beneath a portion of the medial/deep head of the triceps. It then passes behind the medial epicondyle in the cubital tunnel and passes into the forearm between the two heads of the flexor carpi ulnaris.
Position & Markings
Patient Positioning:
The patient is typically placed on a regular operating table in the supine position with the operative upper extremity placed out stretched onto a hand table which is connected to the main table. To bring more of the operative extremity onto the hand table the patient should be brought toward the hand table such that the head and torso are along the edge of the main operating table. Securing the head and torso so they don't unintentionally fall from the table is critical. The operating table is turned 90 degrees to place the upper extremity extending out into the room. A small bump of towels under the elbow will elevate the operative field away from the table to allow for easier dissection and instrumentation. The patients motion at the shoulder should be checked to make sure there is enough external rotation to allow for comfortable medial access during the case.
Intra-op Imaging:
AP and lateral views are required to access reduction, stability, and congruence of the elbow. The AP may simply be obtained in various degrees of elbow flexion by leveling the brachium to the floor and shooting through the hand table. A lateral should be obtained by rolling the fluoroscopy unit into a lateral position an shooting across the hand table.
Markings the incision:
The skin incision used to access the medial elbow varies depending on surgeon preference and the anticipated need to access the lateral side of the elbow during the same procedure. Some surgeons prefer a 10-15cm single posterior midline approach that allows both medial and lateral access through a single incision via the elevation of medial and lateral skin flaps at the level of the fascia. Other surgeons prefer dual medial and lateral incisions, in which case the medial incision would be placed over the medial aspect of the elbow, centered at the palpable medial epicondyle.
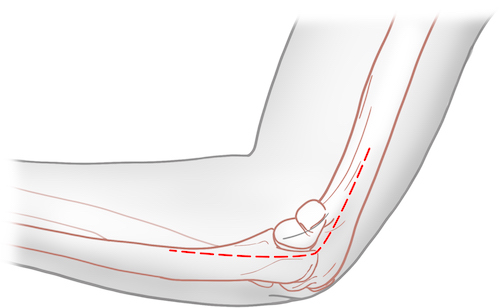
Medial Approach to the Elbow
Superficial Dissection:
The incision through skin is made sharply with a knife. Proximally the dissection may be continued down to the level of the fascia with a knife. Distally, small branches of the medial ante brachial cutaneous nerve may be encountered; as such dissection with scissors may prevent injury to these cutaneous nerves during dissection down to the level of the fascia.
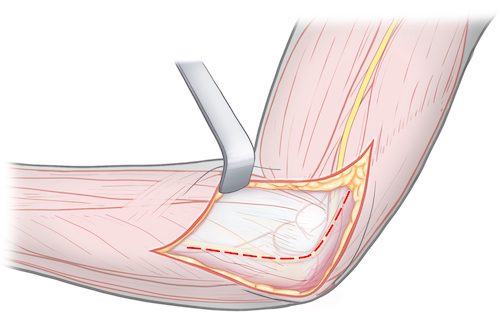
Deep Dissection:
Once down to fascia the ulnar nerve should be palpated as it courses behind the medial epicondyle. The fascia over the nerve should be carefully incised and the ulnar nerve dissected out along the length of the incision. This nerve has no major branches in the brachium and sends only a sensory nerve to the elbow joint, which can be sacrificed. Distally the first and only branch that needs identification is the first motor branch to the flexor carpi ulnaris. This can be found by bluntly dissecting between the two heads of the flexor carpi ulnaris after the fascia over this muscle has been split.
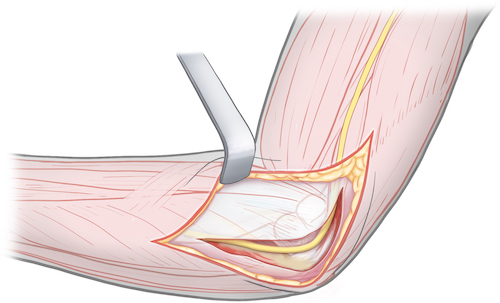
Using the interval between the two heads of the flexor carpi ulnaris, these two muscle bellies can be elevated epi-periosteally to expose the coronoid and medial olecranon. Care should be taken not to dissect the anterior band of the MCL from the coronoid.
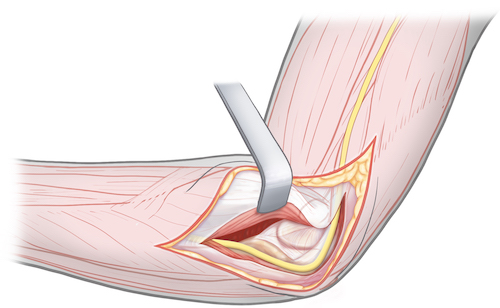
Radius - Volar Approach
Volar Approach to the Radius - Dr. Toogood
- Read Full Text
-
Objectives
At the end of this module, the learner should be able to:
1. List the indications for a volar approach to the radius
2. Understand the relevant anatomy of the volar approach to the radius
3. Discuss in detail the volar approach to the radius, including:
a. Patient positioning
b. Landmarks for incision
c. Relevant internervous plains
d. Sequence of the superficial and deep dissection
Indications
Indications for a Volar Approach to the Radius
1. Open reduction internal fixation of any portion of the radius
Distal radius fractures
Radial shaft fracture portion of a both bone (radius and ulna) forearm fracture
Galeazzi fractures (Radial shaft combined with distal radial ulnar joint injury)
2. Volar muscle compartment pressure release during fasciotomy of the forearm
3. Biceps tendon repair
Anatomy
Internervous Plain:
The volar approach to the radius uses a plain between the radial nerve and median nerve and the median nerve's terminal branch, the anterior interosseous nerve (AIN). The radial border of the plain is the brachioradialis muscle, innervated by the radial nerve. The ulnar border of the plain is made by a series of muscles all innervated by the median nerve (flexor carpi radialis, flexor digitorum superficialis, pronator teres) itself or the AIN (flexor pollicis longus, pronator quadratus).
Muscular Anatomy:
The volar forearm can be conceptualized as four muscular layers:
Layer 1) Brachioradialis, Pronator Teres, Flexor Carpi Radialis, Palmaris Longus, and Flexor Carpi Ulnaris
Layer 2) Flexor Digitorum Superficialis
Layer 3) Flexor Pollicis Longus, Flexor Digitorum Profundus
Layer 4) Pronator Quadratus, Supinator
The muscles in layer 1 are innervated by the median nerve, expect for the two muscles that frame this layer most radially and ulnarly. The radial brachioradialis is innervated by the radial nerve. The ulnar flexor carpi ulnaris is innervated by the ulnar nerve. The three muscles in the middle of this layer (pronator trees, flexor carpi radialis, and palmaris longus) are innervated by the median nerve.
Layer two is made up by a single muscle, the flexor digitorum superficialis, innervated also by the median nerve proper.
The deeper layers 3 and 4 have muscles primarily innervated by the terminal branch of the median nerve, the AIN. The exception to this is the ulnar half of the flexor digitorum profundus, which is innervated by the ulnar nerve, and the supinator, which is innervated by the posterior interosseous nerve.
Brachioradialis (BR):
Origin: Proximal 2/3rds of the lateral supracondylar ridge of the humerus
Insertion: Radial aspect of the distal radius
Innervation: Radial nerve
Action: Elbow flexion
Pronator Teres (PT):
Origin:
Humeral head: Just proximal to medial epicondyle
Ulnar head: Medial coronoid process of the ulna
Insertion: Radial aspect of the mid-radial shaft
Innervation: Median nerve
Action: Forearm pronation
Flexor Carpi Radialis (FCR):
Origin: Medial epicondyle
Insertion: Bases of the second and third metacarpals
Innervation: Median nerve
Action: Wrist flexion and radial deviation
Palmaris Longus (PL):
Origin: Medial epicondyle
Insertion: Palmar aponerosis
Innervation: Median nerve
Action: Wrist flexion
Flexor Carpi Ulnaris (FCU):
Origin:
Humeral head: Medial epicondyle
Ulnar head: Olecranon and posterior ulnar border of the ulna
Insertion: Pisiform, hook of the hamate, and 5th metacarpal base
Innervation: Ulnar nerve
Action: Wrist flexion and ulnar deviation
Flexor Digitorum Superficialis (FDS):
Origin:
Humeral-ulnar head: Medial epicondyle, medial elbow joint capsule, coronoid process of the ulna
Radial head: Proximal half of the anterior aspect of the radius
Insertion: Middle phalanx of digits 2-5
Innervation: Median nerve
Action: Flexion of the proximal interphalangeal joints of digits 2-5, flexion of metacarpal phalangeal joints of digits 2-5, wrist flexion.
Flexor Pollicis Longus (FPL):
Origin: Anterior aspect of the radius and interosseous membrane
Insertion: Base of the distal phalanx of the thumb
Innervation: Anterior interosseous nerve
Action: Flexion of the thumb interphalangeal joint and metacarpal phalangeal joint
Flexor Digitorum Profundus (FDP):
Origin: Proximal 3/4ths of the anterior ulna and interosseous membrane
Insertion: Bases of the distal phalanges of digits 2-5
Innervation:
Ulnar half (small and ring fingers): Ulnar nerve
Radial half (middle and index fingers): Anterior interosseous nerve
Action: Flexion of digits 2-5 at distal interphalangeal joint, proximal interphalangeal joint, metacarpal phalangeal joint, and wrist.
Pronator Quadratus (PQ):
Origin: Ulnar/anterior aspect of the distal 1/4th of the ulna
Insertion: Radial/anterior aspect of the distal 1/4th of the radius
Innervation: Anterior interosseous nerve
Action: Forearm pronation
Supinator:
Origin: Lateral epicondyle, lateral elbow capsule, supinator crest of the ulna
Insertion: Proximal 1/3rd of the radius
Innervation: Posterior interosseous nerve
Action: Forearm supination
Vascular Anatomy:
The radial artery is the primary vascular structure at risk during the volar approach to the radius and runs within the internervous plain used during the course of the dissection. It is dissected out along its length and retracted ulnarly during an exposure of the radius. Numerous branches of the artery and its accompanying veins must be ligated along its radial side to allow for this retraction. Proximally, at the level of the radial neck, once such group of vessels, the leash of Henry, is a particularly sizeable branching which becomes the radial recurrent artery to the elbow. Its identification and control is critical to safe dissection in the very proximal portion of the approach.
The radial artery is one of the two primary branches of the brachial artery in the antecubital fossa of the elbow, the other being the ulnar artery. The brachial artery runs just medial to the biceps tendon insertion on the radius. After the bifurcation of the brachial artery the ulnar artery passes medially and travels beneath the edge of the flexor digitorum superficialis, traveling between layers two and three of the forearm. The radial artery remains superficial, traveling first between the brachioradialis and pronator teres, then more distally between the brachioradialis and flexor carpi radialis.
Nervous Anatomy:
The radial nerve bifricates in the antecubital fossa into its two terminal branches, the superficial branch of the radial nerve and the posterior interosseous nerve (PIN). Both of these nerves are at risk during the volar approach to the radius.
The superficial branch of the radial nerve travels on the undersurface of the brachioradialis on its way down the forearm. ~7cm proximal to the wrist joint it passes completely under the brachioradialis tendon, piercing the dorsal forearm fascia to then supply sensation to the dorsum of the thumb, index, and middle fingers. The nerve is routinely identified during the volar approach to the radius on the undersurface of the brachioradialis to allow for its protection and also to help identify the correct interval; if the surgeon believes they have found the brachioradialis but no nerve is identified on its undersurface it is likely they have strayed into the wrong interval, such as that between the flexor carpi radialis and palmaris longus.
After branching off the radial nerve proper the PIN passes immediately under the proximal border of the supinator muscle (Arcade of Froshe), where it then lies directly between this muscle and the bone of the proximal radial shaft. At about the mid-point of the supinator muscle the PIN passes into and then through the muscle itself on its way to the posterior compartment of the forearm where it innervates most of the muscles of the posterior compartment. The PIN is not directly visualized during a typical volar approach to the proximal radial shaft. Instead the supinator muscle is elevated off the radius in a subperiosteal fashion, bringing the nerve with it as the muscle is retracted from the bone.
Position & Markings
Patient Positioning:
The patient is placed on a regular operating table with the operative limb outstretched on a hand table. The patient's torso should be brought to the edge of the main operating table so that as much of the operative extremity as possible is on the hand table and easily available to the surgeon. The main operating table it turned 90 degrees such that the hand table projects into the room and away from anesthesia.
Tourniquet use:
Although tourniquets keep the operative field dry during dissection, there are several advantages to not using one during the volar approach to the radius. The first is that it makes identification of the radial artery easier. If no tourniquet is inflated the pulse can both be seen and felt during the course of the dissection, making the correct interval easier to identify. Additionally, numerous small branches of the radial artery and its accompanying veins must be ligated long their radial edge during the course of the dissection to allow for retraction of the artery ulnarly. These small branches are also visually more apparent with the tourniquet down. And, if one of these branches is accidentally crossed inadvertently, the immediate bleeding will be noted by the surgeon and allow for its control.
Intra-op Imaging:
An AP view of the radius can be obtained by simply placing the radius in anatomic position (forearm fully supinated) on the hand table and obtaining an image with a c-arm that has its beam perpendicular with the hand table. A lateral image can be obtained by having the c-arm come in from the patient's head and positioning the c-arm such that the beam is parallel with the floor. Alternatively, if the radius is stable after provisional or definitive fixation, pronating the forearm 90 degrees from the fully supinated position into a neutral position will allow for a lateral view of the radius (though not of the ulna) while keeping the c-arm in the same position as used to obtain the AP view (beam perpendicular with the floor).
Markings the incision:
Distally the incision is placed over the volar aspect of the radial styloid, just radial to the palpable flexor carpi radialis tendon and directly over the palpable radial pulse at the wrist. Proximally the incision is placed just lateral to the palpable biceps tendon insertion on the radius. These two points at opposite ends of of the forearm are the joined by a straight linear incision. Proximally in the forearm this may appear surprisingly midline for an approach to a radial bone. The brachioradialis, however, comes deceivingly far across the volar forearm, and so this relatively midline incision is appropriate.
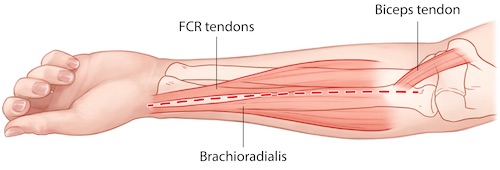
Volar (Henry) Approach to the Forearm
Superficial dissection:
The incision is made through skin only with a knife. Dissection through the variable amount of subcutaneous tissue should be performed with scissors. This allows for the gradual and safe exposure of often numerous and sizable superficial veins in the volar forearm that must be ligated or retracted out of the path of the dissection. Novice surgeons frequently identify a large superficial vessel and mistakenly believe they have come across the radial artery, an anatomic lighthouse and source of anxiety during the approach. If a large vessel is found in the subcutaneous tissue ABOVE fascia, however, this is not the radial artery; it is merely a superficial vein and the radial artery must still be sought deeper in the dissection.
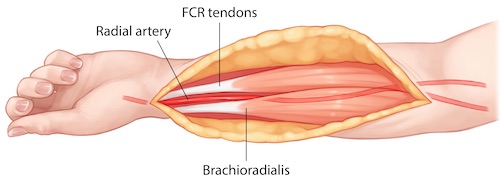
Deep dissection:
The details of the distal, mid-forearm, and proximal dissections to the radius are dicussed below. Before mastering the details of the approach at each level, it is useful to simply understand the direction each muscle encountered during the dissection is mobilized and retracted. All muscles, with the except of two, are dissected and retracted ulnarly. The only two muscles retracted radially are the brachioradialis superficially and the supinator deep and proximally. The mobilization of the supinator muscle in the radial direction is of particular importance, as it is required to keep the PIN unharmed. Although all other muscles taken down from the radial bone (pronator quadratus, flexor pollicis longus, flexor digitorum superficialis, flexor digitorum profundus, and pronator teres) are taken from their radial sides are retracted ulnarly, the final muscle, the supinator, must be taken down from its ulnar edge and moved in the opposite, radial, direction.
Distal dissection:
Once through the subcutaneous tissue the surgeon comes down on the fascia which surrounds the muscles of the anterior compartment. Distally, the tendons of the flexor carpi radialis and palmaris longus are easily palpable and visualized through this fascia. Just to the radial side of the flexor carpi radialis tendon is the radial artery, also just deep to the fascia and often palpable. The brachioradialis tendon lies just radial to the artery, though its tendon is less palpable than those of the flexor carpi radials and palmaris longus, as rather than crossing the wrist as a distinct tendon, it inserts on the radial side of the distal radius. The fascia over the radial artery should be opened with great care using scissors. The fascia is then longitudinally incised in the interval between the flexor carpi radialis and brachioradialis gradually exposing additional amounts of the radial artery.
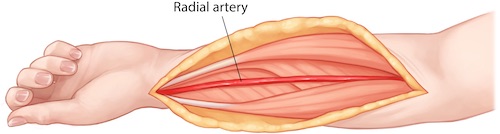
The brachioradialis can be elevated and retracted radially, exposing the underlying superficial branch of the radial nerve. The radial artery can be gradually mobilized with dissection along its radial border. Numerous venous and arterial connections along its radial side will be encountered and should be ligated to allow for the gradual retraction of the radial artery (along with the flexor carpi radialis) ulnarly. This exposes the flexor pollicis longus tendon and muscle belly. The tendon of the flexor policies longus (along with those of the flexor digitorum superficialis and profundus) can be bluntly swept and retracted ulnarly. The muscle belly of the flexor pollicis longus, which originates of the radial shaft, requires sharp dissection off the bone along its radial edge. The flexor pollicis longus can then be retracted ulnarly exposing the underlying pronator quadratus.
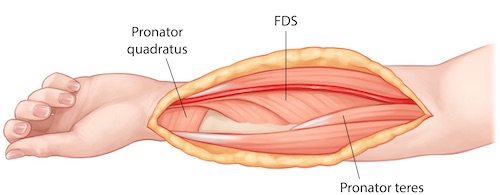
The pronator quadratus can then be elevated off the volar aspect of the distal radius. This is done by incising its insertion from the radius in the shape of an inverted "L". The longitudinal portion of the "L" is created by incising the radial aspect of the muscle off the volar/radial edge of the radius. Care must be taken when doing this to not inadvertently injure the tendons running in the first dorsal compartment of the wrist (abductor pollicis longus and extensor pollicis brevis). Though described as a dorsal compartment of the wrist, these tendons run along the radial surface of the radius at this level of the forearm and are put at risk by an errant pass with a knife. The horizontal limb of the "L" used to take down the pronator quadratus is made along this muscle's distal insertion. Care must be taken to identify the joint capsule just distal to the extent of the pronator quadratus. The incision along the distal aspect of the radius should not violate this capsule and the volar radiocarpal ligaments, which can lead to instability of the carpus on the distal radius. The joint can be identified with palpation with the tip of an elevator or by placement of a needle into the radiocarpal joint. Once the two limbs of the "L" have been made sharply, the pronator quadrates muscle can be elevated off the volar surface of the distal radius in a subperiosteal fashion using a knife or periosteal elevator.
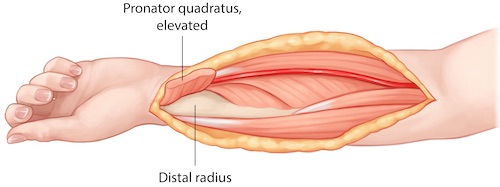
Mid-forearm dissection:
Accessing the mid-shaft of the radius involves dissection through the same fascia and a similar interval superficially as that of the distal dissection. Specifically, once down through the subcutaneous, the fascia is opened longitudinally between the brachioradialis and flexor carpi radialis exposing the radial artery. Unfortunately, unlike at the wrist, the position of this interval is not as readily apparent. The tendon of the flexor carpi radialis is replaced with less distinct muscle belly further up the forearm and the radial artery is usually not palpable, being covered by a portion of the brachioradialis and its fascia. If the distal dissection has been performed first this of course can guide the dissection as it proceeds more proximally. If the dissection is limited to the middle portion of the radial shaft greater care must be taken when identifying the superficial interval between the brachioradialis and flexor carpi radialis. If a muscular interval is developed and the radial artery is not found and the superficial branch of the radial nerve is not located under what is believed to be the brachioradialis the surgeon should seek a different interval and get properly oriented rather than simply proceeding deeper in the wrong interval. It is worth emphasizing again that the brachioradialis spans almost half way across the volar forearm; recalling this may aide in locating its ulnar edge.
Once the radial artery is located and dissected along its radial side, again ligating any branches of the artery or its accompanying veins, it can be retracted ulnarly with the flexor carpi radialis while the brachioradilis is retracted radially. Proximal portions of the muscular origins of the flexor pollicis longus and flexor digitorum superficialis can then be dissected from the radial portion of the volar radius and these muscles can be retracted ulnarly.
Image

As dissection continues proximally along the radial shaft the surgeon will then come across and distinct, robust, oblique tendonous insertion of the pronator teres onto the mid-radial shaft. The radial extent of this tendon's insertion is exposed by pronating the radius to neutral, allowing it to be taken down from the radial aspect of the radius, rather then cutting through the tendon on its volar surface. Once the pronator teres has been taken off the radial shaft and retracted ulnarly the only remaining muscle left more proximally on the radius is the supinator muscle.
Image
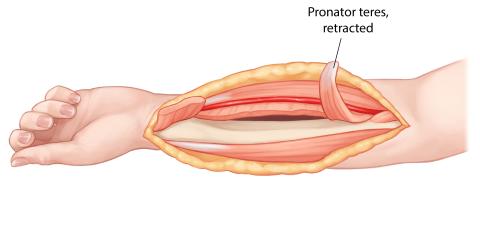
Proximal dissection:
The approach to the proximal portion of the radius of course begins similarly to that of the distal and mid-radius. Dissection is carried down through subcutaneous tissue to fascia. The fascia is divided longitudinally and the correct interval between the brachioradialis and flexor carpi radialis & pronator teres is identified and confirmed by the presence of the radial artery. The pronator teres is dissected off the radial aspect of the radius as a robust, oblique tendon. The muscle belly lying on the radius proximal to the pronator teres tendon is the distal extent of the supinator muscle. The proximal extent of the supinator muscle can be identified by finding the biceps tendon's insertion on the proximal radius. Just radial to the biceps tendon is the proximal extent of the supinator. Once the proximal and distal extents of the supinator muscle have been identified the remainder of its ulnar edge can be visualized with confidence. The supinator can then be removed from the proximal radius in a strictly subperiosteal fashion from ulnar to radial to reveal the proximal most portion of the radius.
Image
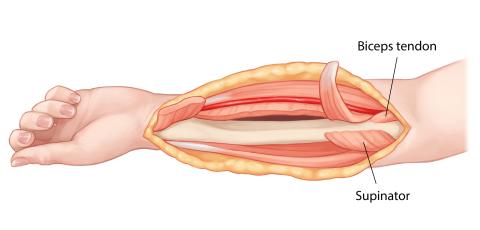
Image
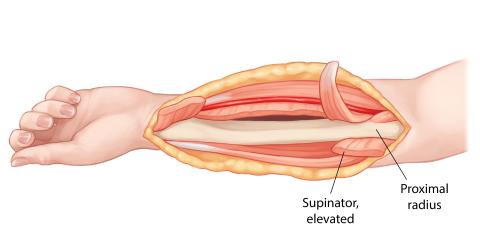
Tips, Tricks & Precautions
Tips:
The interval between the flexor carpi radials and brachioradialis, where the radial artery runs, is most easily identified in the distal aspect of the forearm. If dissecting further proximally and difficulty is had identifying the appropriate muscular interval extending the dissection distally may aide in finding the appropriate intermuscular and internervous plain. Palpation of the radial artery will also help with identification of the correct plain of dissection.
Performing the dissection without the use of a tourniquet allows for more ready identification of the radial artery and its branches.
When dissecting proximally in the forearm it is critical to recall which direction the supinator muscle is to be elevated off the bone. All muscles taken off the radius are dissected along their radial sides and retracted ulnarly with the exception of the supinator. This muscle must be taken the opposite direction off the radial shaft in a suberiosteal fashion, from ulnar to radial.
Precautions:
The radial artery is exposed and retracted during the course of the volar approach to the radius. If the artery is injured and not repairable it frequently acceptable to simply ligate the artery, rather than attempt a heroic repair. Recall that the ulnar, not the radial, artery is the dominant arterial supply to the forearm and hand in most individuals. This can be confirmed pre-operatively by having the patient clench their fist tightly and then manually compressing both arteries at the wrist. When the patient relaxes their fist the palm of the hand will appear white. Releasing the ulnar artery at the wrist while maintaining pressure on the radial artery will allow for a visual test of the ulnar artery's flow and dominance. If the hand immediately pinks after release of the ulnar artery then this artery can be assumed to supply adequate flow to the hand. Alternatively, if this test was not performed pre-optatively (such as with intolerance by the patient due pain from a fracture) then the injured radial artery can be temporarily ligated with a vascular clamp and adequate flow to the hand insured prior to definitive ligation of the radial artery with suture.
Dissection of the proximal radius puts the PIN at risk. It is critical to identify the proximal and distal extents of the supinator as well as its ulnar edge prior to elevating this muscle off the radius is a subperiosteal fashion. The distal extent of the muscle is marked by the end of the robust pronator teres insertion on the radial shaft. The proximal extent is identified by finding the edge of the supinator just radial to the biceps insertion on the radius.
Objectives
At the end of this module, the learner should be able to:
1. List the indications for a volar approach to the radius
2. Understand the relevant anatomy of the volar approach to the radius
3. Discuss in detail the volar approach to the radius, including:
a. Patient positioning
b. Landmarks for incision
c. Relevant internervous plains
d. Sequence of the superficial and deep dissection
Indications
Indications for a Volar Approach to the Radius
1. Open reduction internal fixation of any portion of the radius
Distal radius fractures
Radial shaft fracture portion of a both bone (radius and ulna) forearm fracture
Galeazzi fractures (Radial shaft combined with distal radial ulnar joint injury)
2. Volar muscle compartment pressure release during fasciotomy of the forearm
3. Biceps tendon repair
Anatomy
Internervous Plain:
The volar approach to the radius uses a plain between the radial nerve and median nerve and the median nerve's terminal branch, the anterior interosseous nerve (AIN). The radial border of the plain is the brachioradialis muscle, innervated by the radial nerve. The ulnar border of the plain is made by a series of muscles all innervated by the median nerve (flexor carpi radialis, flexor digitorum superficialis, pronator teres) itself or the AIN (flexor pollicis longus, pronator quadratus).
Muscular Anatomy:
The volar forearm can be conceptualized as four muscular layers:
Layer 1) Brachioradialis, Pronator Teres, Flexor Carpi Radialis, Palmaris Longus, and Flexor Carpi Ulnaris
Layer 2) Flexor Digitorum Superficialis
Layer 3) Flexor Pollicis Longus, Flexor Digitorum Profundus
Layer 4) Pronator Quadratus, Supinator
The muscles in layer 1 are innervated by the median nerve, expect for the two muscles that frame this layer most radially and ulnarly. The radial brachioradialis is innervated by the radial nerve. The ulnar flexor carpi ulnaris is innervated by the ulnar nerve. The three muscles in the middle of this layer (pronator trees, flexor carpi radialis, and palmaris longus) are innervated by the median nerve.
Layer two is made up by a single muscle, the flexor digitorum superficialis, innervated also by the median nerve proper.
The deeper layers 3 and 4 have muscles primarily innervated by the terminal branch of the median nerve, the AIN. The exception to this is the ulnar half of the flexor digitorum profundus, which is innervated by the ulnar nerve, and the supinator, which is innervated by the posterior interosseous nerve.
Brachioradialis (BR):
Origin: Proximal 2/3rds of the lateral supracondylar ridge of the humerus
Insertion: Radial aspect of the distal radius
Innervation: Radial nerve
Action: Elbow flexion
Pronator Teres (PT):
Origin:
Humeral head: Just proximal to medial epicondyle
Ulnar head: Medial coronoid process of the ulna
Insertion: Radial aspect of the mid-radial shaft
Innervation: Median nerve
Action: Forearm pronation
Flexor Carpi Radialis (FCR):
Origin: Medial epicondyle
Insertion: Bases of the second and third metacarpals
Innervation: Median nerve
Action: Wrist flexion and radial deviation
Palmaris Longus (PL):
Origin: Medial epicondyle
Insertion: Palmar aponerosis
Innervation: Median nerve
Action: Wrist flexion
Flexor Carpi Ulnaris (FCU):
Origin:
Humeral head: Medial epicondyle
Ulnar head: Olecranon and posterior ulnar border of the ulna
Insertion: Pisiform, hook of the hamate, and 5th metacarpal base
Innervation: Ulnar nerve
Action: Wrist flexion and ulnar deviation
Flexor Digitorum Superficialis (FDS):
Origin:
Humeral-ulnar head: Medial epicondyle, medial elbow joint capsule, coronoid process of the ulna
Radial head: Proximal half of the anterior aspect of the radius
Insertion: Middle phalanx of digits 2-5
Innervation: Median nerve
Action: Flexion of the proximal interphalangeal joints of digits 2-5, flexion of metacarpal phalangeal joints of digits 2-5, wrist flexion.
Flexor Pollicis Longus (FPL):
Origin: Anterior aspect of the radius and interosseous membrane
Insertion: Base of the distal phalanx of the thumb
Innervation: Anterior interosseous nerve
Action: Flexion of the thumb interphalangeal joint and metacarpal phalangeal joint
Flexor Digitorum Profundus (FDP):
Origin: Proximal 3/4ths of the anterior ulna and interosseous membrane
Insertion: Bases of the distal phalanges of digits 2-5
Innervation:
Ulnar half (small and ring fingers): Ulnar nerve
Radial half (middle and index fingers): Anterior interosseous nerve
Action: Flexion of digits 2-5 at distal interphalangeal joint, proximal interphalangeal joint, metacarpal phalangeal joint, and wrist.
Pronator Quadratus (PQ):
Origin: Ulnar/anterior aspect of the distal 1/4th of the ulna
Insertion: Radial/anterior aspect of the distal 1/4th of the radius
Innervation: Anterior interosseous nerve
Action: Forearm pronation
Supinator:
Origin: Lateral epicondyle, lateral elbow capsule, supinator crest of the ulna
Insertion: Proximal 1/3rd of the radius
Innervation: Posterior interosseous nerve
Action: Forearm supination
Vascular Anatomy:
The radial artery is the primary vascular structure at risk during the volar approach to the radius and runs within the internervous plain used during the course of the dissection. It is dissected out along its length and retracted ulnarly during an exposure of the radius. Numerous branches of the artery and its accompanying veins must be ligated along its radial side to allow for this retraction. Proximally, at the level of the radial neck, once such group of vessels, the leash of Henry, is a particularly sizeable branching which becomes the radial recurrent artery to the elbow. Its identification and control is critical to safe dissection in the very proximal portion of the approach.
The radial artery is one of the two primary branches of the brachial artery in the antecubital fossa of the elbow, the other being the ulnar artery. The brachial artery runs just medial to the biceps tendon insertion on the radius. After the bifurcation of the brachial artery the ulnar artery passes medially and travels beneath the edge of the flexor digitorum superficialis, traveling between layers two and three of the forearm. The radial artery remains superficial, traveling first between the brachioradialis and pronator teres, then more distally between the brachioradialis and flexor carpi radialis.
Nervous Anatomy:
The radial nerve bifricates in the antecubital fossa into its two terminal branches, the superficial branch of the radial nerve and the posterior interosseous nerve (PIN). Both of these nerves are at risk during the volar approach to the radius.
The superficial branch of the radial nerve travels on the undersurface of the brachioradialis on its way down the forearm. ~7cm proximal to the wrist joint it passes completely under the brachioradialis tendon, piercing the dorsal forearm fascia to then supply sensation to the dorsum of the thumb, index, and middle fingers. The nerve is routinely identified during the volar approach to the radius on the undersurface of the brachioradialis to allow for its protection and also to help identify the correct interval; if the surgeon believes they have found the brachioradialis but no nerve is identified on its undersurface it is likely they have strayed into the wrong interval, such as that between the flexor carpi radialis and palmaris longus.
After branching off the radial nerve proper the PIN passes immediately under the proximal border of the supinator muscle (Arcade of Froshe), where it then lies directly between this muscle and the bone of the proximal radial shaft. At about the mid-point of the supinator muscle the PIN passes into and then through the muscle itself on its way to the posterior compartment of the forearm where it innervates most of the muscles of the posterior compartment. The PIN is not directly visualized during a typical volar approach to the proximal radial shaft. Instead the supinator muscle is elevated off the radius in a subperiosteal fashion, bringing the nerve with it as the muscle is retracted from the bone.
Position & Markings
Patient Positioning:
The patient is placed on a regular operating table with the operative limb outstretched on a hand table. The patient's torso should be brought to the edge of the main operating table so that as much of the operative extremity as possible is on the hand table and easily available to the surgeon. The main operating table it turned 90 degrees such that the hand table projects into the room and away from anesthesia.
Tourniquet use:
Although tourniquets keep the operative field dry during dissection, there are several advantages to not using one during the volar approach to the radius. The first is that it makes identification of the radial artery easier. If no tourniquet is inflated the pulse can both be seen and felt during the course of the dissection, making the correct interval easier to identify. Additionally, numerous small branches of the radial artery and its accompanying veins must be ligated long their radial edge during the course of the dissection to allow for retraction of the artery ulnarly. These small branches are also visually more apparent with the tourniquet down. And, if one of these branches is accidentally crossed inadvertently, the immediate bleeding will be noted by the surgeon and allow for its control.
Intra-op Imaging:
An AP view of the radius can be obtained by simply placing the radius in anatomic position (forearm fully supinated) on the hand table and obtaining an image with a c-arm that has its beam perpendicular with the hand table. A lateral image can be obtained by having the c-arm come in from the patient's head and positioning the c-arm such that the beam is parallel with the floor. Alternatively, if the radius is stable after provisional or definitive fixation, pronating the forearm 90 degrees from the fully supinated position into a neutral position will allow for a lateral view of the radius (though not of the ulna) while keeping the c-arm in the same position as used to obtain the AP view (beam perpendicular with the floor).
Markings the incision:
Distally the incision is placed over the volar aspect of the radial styloid, just radial to the palpable flexor carpi radialis tendon and directly over the palpable radial pulse at the wrist. Proximally the incision is placed just lateral to the palpable biceps tendon insertion on the radius. These two points at opposite ends of of the forearm are the joined by a straight linear incision. Proximally in the forearm this may appear surprisingly midline for an approach to a radial bone. The brachioradialis, however, comes deceivingly far across the volar forearm, and so this relatively midline incision is appropriate.
Volar (Henry) Approach to the Forearm
Superficial dissection:
The incision is made through skin only with a knife. Dissection through the variable amount of subcutaneous tissue should be performed with scissors. This allows for the gradual and safe exposure of often numerous and sizable superficial veins in the volar forearm that must be ligated or retracted out of the path of the dissection. Novice surgeons frequently identify a large superficial vessel and mistakenly believe they have come across the radial artery, an anatomic lighthouse and source of anxiety during the approach. If a large vessel is found in the subcutaneous tissue ABOVE fascia, however, this is not the radial artery; it is merely a superficial vein and the radial artery must still be sought deeper in the dissection.
Deep dissection:
The details of the distal, mid-forearm, and proximal dissections to the radius are dicussed below. Before mastering the details of the approach at each level, it is useful to simply understand the direction each muscle encountered during the dissection is mobilized and retracted. All muscles, with the except of two, are dissected and retracted ulnarly. The only two muscles retracted radially are the brachioradialis superficially and the supinator deep and proximally. The mobilization of the supinator muscle in the radial direction is of particular importance, as it is required to keep the PIN unharmed. Although all other muscles taken down from the radial bone (pronator quadratus, flexor pollicis longus, flexor digitorum superficialis, flexor digitorum profundus, and pronator teres) are taken from their radial sides are retracted ulnarly, the final muscle, the supinator, must be taken down from its ulnar edge and moved in the opposite, radial, direction.
Distal dissection:
Once through the subcutaneous tissue the surgeon comes down on the fascia which surrounds the muscles of the anterior compartment. Distally, the tendons of the flexor carpi radialis and palmaris longus are easily palpable and visualized through this fascia. Just to the radial side of the flexor carpi radialis tendon is the radial artery, also just deep to the fascia and often palpable. The brachioradialis tendon lies just radial to the artery, though its tendon is less palpable than those of the flexor carpi radials and palmaris longus, as rather than crossing the wrist as a distinct tendon, it inserts on the radial side of the distal radius. The fascia over the radial artery should be opened with great care using scissors. The fascia is then longitudinally incised in the interval between the flexor carpi radialis and brachioradialis gradually exposing additional amounts of the radial artery.
The brachioradialis can be elevated and retracted radially, exposing the underlying superficial branch of the radial nerve. The radial artery can be gradually mobilized with dissection along its radial border. Numerous venous and arterial connections along its radial side will be encountered and should be ligated to allow for the gradual retraction of the radial artery (along with the flexor carpi radialis) ulnarly. This exposes the flexor pollicis longus tendon and muscle belly. The tendon of the flexor policies longus (along with those of the flexor digitorum superficialis and profundus) can be bluntly swept and retracted ulnarly. The muscle belly of the flexor pollicis longus, which originates of the radial shaft, requires sharp dissection off the bone along its radial edge. The flexor pollicis longus can then be retracted ulnarly exposing the underlying pronator quadratus.
The pronator quadratus can then be elevated off the volar aspect of the distal radius. This is done by incising its insertion from the radius in the shape of an inverted "L". The longitudinal portion of the "L" is created by incising the radial aspect of the muscle off the volar/radial edge of the radius. Care must be taken when doing this to not inadvertently injure the tendons running in the first dorsal compartment of the wrist (abductor pollicis longus and extensor pollicis brevis). Though described as a dorsal compartment of the wrist, these tendons run along the radial surface of the radius at this level of the forearm and are put at risk by an errant pass with a knife. The horizontal limb of the "L" used to take down the pronator quadratus is made along this muscle's distal insertion. Care must be taken to identify the joint capsule just distal to the extent of the pronator quadratus. The incision along the distal aspect of the radius should not violate this capsule and the volar radiocarpal ligaments, which can lead to instability of the carpus on the distal radius. The joint can be identified with palpation with the tip of an elevator or by placement of a needle into the radiocarpal joint. Once the two limbs of the "L" have been made sharply, the pronator quadrates muscle can be elevated off the volar surface of the distal radius in a subperiosteal fashion using a knife or periosteal elevator.
Mid-forearm dissection:
Accessing the mid-shaft of the radius involves dissection through the same fascia and a similar interval superficially as that of the distal dissection. Specifically, once down through the subcutaneous, the fascia is opened longitudinally between the brachioradialis and flexor carpi radialis exposing the radial artery. Unfortunately, unlike at the wrist, the position of this interval is not as readily apparent. The tendon of the flexor carpi radialis is replaced with less distinct muscle belly further up the forearm and the radial artery is usually not palpable, being covered by a portion of the brachioradialis and its fascia. If the distal dissection has been performed first this of course can guide the dissection as it proceeds more proximally. If the dissection is limited to the middle portion of the radial shaft greater care must be taken when identifying the superficial interval between the brachioradialis and flexor carpi radialis. If a muscular interval is developed and the radial artery is not found and the superficial branch of the radial nerve is not located under what is believed to be the brachioradialis the surgeon should seek a different interval and get properly oriented rather than simply proceeding deeper in the wrong interval. It is worth emphasizing again that the brachioradialis spans almost half way across the volar forearm; recalling this may aide in locating its ulnar edge.
Once the radial artery is located and dissected along its radial side, again ligating any branches of the artery or its accompanying veins, it can be retracted ulnarly with the flexor carpi radialis while the brachioradilis is retracted radially. Proximal portions of the muscular origins of the flexor pollicis longus and flexor digitorum superficialis can then be dissected from the radial portion of the volar radius and these muscles can be retracted ulnarly.
As dissection continues proximally along the radial shaft the surgeon will then come across and distinct, robust, oblique tendonous insertion of the pronator teres onto the mid-radial shaft. The radial extent of this tendon's insertion is exposed by pronating the radius to neutral, allowing it to be taken down from the radial aspect of the radius, rather then cutting through the tendon on its volar surface. Once the pronator teres has been taken off the radial shaft and retracted ulnarly the only remaining muscle left more proximally on the radius is the supinator muscle.
Proximal dissection:
The approach to the proximal portion of the radius of course begins similarly to that of the distal and mid-radius. Dissection is carried down through subcutaneous tissue to fascia. The fascia is divided longitudinally and the correct interval between the brachioradialis and flexor carpi radialis & pronator teres is identified and confirmed by the presence of the radial artery. The pronator teres is dissected off the radial aspect of the radius as a robust, oblique tendon. The muscle belly lying on the radius proximal to the pronator teres tendon is the distal extent of the supinator muscle. The proximal extent of the supinator muscle can be identified by finding the biceps tendon's insertion on the proximal radius. Just radial to the biceps tendon is the proximal extent of the supinator. Once the proximal and distal extents of the supinator muscle have been identified the remainder of its ulnar edge can be visualized with confidence. The supinator can then be removed from the proximal radius in a strictly subperiosteal fashion from ulnar to radial to reveal the proximal most portion of the radius.
Tips, Tricks & Precautions
Tips:
The interval between the flexor carpi radials and brachioradialis, where the radial artery runs, is most easily identified in the distal aspect of the forearm. If dissecting further proximally and difficulty is had identifying the appropriate muscular interval extending the dissection distally may aide in finding the appropriate intermuscular and internervous plain. Palpation of the radial artery will also help with identification of the correct plain of dissection.
Performing the dissection without the use of a tourniquet allows for more ready identification of the radial artery and its branches.
When dissecting proximally in the forearm it is critical to recall which direction the supinator muscle is to be elevated off the bone. All muscles taken off the radius are dissected along their radial sides and retracted ulnarly with the exception of the supinator. This muscle must be taken the opposite direction off the radial shaft in a suberiosteal fashion, from ulnar to radial.
Precautions:
The radial artery is exposed and retracted during the course of the volar approach to the radius. If the artery is injured and not repairable it frequently acceptable to simply ligate the artery, rather than attempt a heroic repair. Recall that the ulnar, not the radial, artery is the dominant arterial supply to the forearm and hand in most individuals. This can be confirmed pre-operatively by having the patient clench their fist tightly and then manually compressing both arteries at the wrist. When the patient relaxes their fist the palm of the hand will appear white. Releasing the ulnar artery at the wrist while maintaining pressure on the radial artery will allow for a visual test of the ulnar artery's flow and dominance. If the hand immediately pinks after release of the ulnar artery then this artery can be assumed to supply adequate flow to the hand. Alternatively, if this test was not performed pre-optatively (such as with intolerance by the patient due pain from a fracture) then the injured radial artery can be temporarily ligated with a vascular clamp and adequate flow to the hand insured prior to definitive ligation of the radial artery with suture.
Dissection of the proximal radius puts the PIN at risk. It is critical to identify the proximal and distal extents of the supinator as well as its ulnar edge prior to elevating this muscle off the radius is a subperiosteal fashion. The distal extent of the muscle is marked by the end of the robust pronator teres insertion on the radial shaft. The proximal extent is identified by finding the edge of the supinator just radial to the biceps insertion on the radius.
Radius - Dorsal Approach
- Read Full Text
-
Objectives
At the end of this module, the learner should be able to:
1. List the indications for a dorsal approach to the radius
2. Understand the relevant anatomy of the dorsal approach to the radius
3. Discuss in detail the dorsal approach to the radius, including:
a. Patient positioning
b. Landmarks for incision
c. Relevant internervous plains
d. Sequence of the superficial and deep dissection
Indications
Indications for a Dorsal Approach to the Radius
1. Open reduction internal fixation of any portion of the radius
Distal radius fractures
Radial shaft fracture portion of a both bone (radius and ulna) forearm fracture
Galeazzi fractures (Radial shaft combined with distal radial ulnar joint injury)
2. Radial head arthroplasty
3. Dorsal muscle compartment pressure release during fasciotomy of the forearm
Anatomy
Internervous Plain:
A large proportion of the muscles on the dorsal surface of the forearm take their origin on or near the lateral epicondyle. Progressing from radial to ulnar, the first three muscles, the brachioradialis, the extensor carpi radials longus (ECRL), and the extensor carpi radials brevis (ECRB), are frequently grouped together as the "mobile wad". This group of three muscles receives its innervation directly from the radial nerve (though some sources will suggest the ECRB is innervated by a named branch from the radial nerve). The next group of muscles originating from the lateral epicondyle are the extensor digitorum comminus (EDC), the extensor digiti minimi (EDM), and the extensor carpi ulnaris (ECU). These muscles, and those which originate beneath this group further down the forearm (abductor pollicus longus (APL), extensor pollicus brevis (EPB), the extensor pollicus longus (EPL), the extensor indicis proprius (EIP)) are all innervated by the posterior interosseous nerve (PIN). The posterior interosseous nerve is a terminal branch of the radial nerve, the other branch being the sensory branch of the radial nerve. The final, most ulnar muscle originating from the lateral epicondyle is the anconeus. This muscle is also innervated by the radial nerve proper.
Given the above anatomy, there exists an internervous plain on the dorsal side of the forearm for use during surgical approaches to the radius. This interval lies between the mobile wad (more specifically the ECRB, innervated by the radial nerve) and the EDC (innervated by the PIN) proximally and the ECRB and EPL distally. In the mid-portion of the approach the APL and EPB emerge from beneath the EDC to cross over the dorsal radius and distal tendons of the ECRB and ECRL. The APL and EPB thus serve as a primary marker for the relevant internervous plain.
Muscular Anatomy:
During the superficial portion of the dissection the primary muscular relationships that need to be understood are those just discussed above. To reiterate, the dorsal forearm is covered with a series of muscles that can be grossly placed into three groups based upon their innervation. The mobile wad (brachioradialis, ECRL, ECRB) innervated by the radial nerve, the muscles in the middle of the dorsal forearm (EDC, EDM, ECU, APL, EPB, EPL, EIP) innervated by the PIN, and the anconeus innervated by the radial nerve.
The above muscles exist in two layers. The superficial layer, from radial to ulnar, consists of the brachioradialis, the ECRL, the ECRB, the EDC, the EDM, and the ECU. Beneath this first layer is a deeper layer of muscles which originates off the dorsal surfaces of the radius, ulna, and interosseous membrane in-between. This layer consists of three muscles which controls the abduction and extension of the thumb (APL, EPB, EPL), one muscle which contributes to the independent extension of the index finer (EIP), and one muscle which contributes to supination of the forearm (supinator). Of these deep muscles, it is management of the supinator which is of prime concern during proximal exposure of the radial shaft. This muscle is intimately associated with the radial neck and proximal shaft, which it wraps around. The radial nerve divides in the antecubital fossa into the PIN and its terminal sensory branch and sends the PIN under the proximal extent of the supinator (arcade of Frohse). The PIN then travels deep to the supinator muscle directly adjacent to the proximal radial shaft before piercing the mid substance of the supinator muscle further down the forearm on its way to innervating the majority of muscles in the dorsal forearm as previously described. Understanding the close relationship of the supinator and the PIN is critical to accessing the proximal radius. Unlike during a volar approach to the radius, where the PIN is not directly visualized, in a dorsal approach this nerve is dissected out, visualized, and directly manipulated in an effort to protect it and preserve its function.
Brachioradialis:
Origin: Proximal 2/3rds of the lateral supracondylar ridge of the humerus
Insertion: Radial aspect of the distal radius
Innervation: Radial nerve
Action: Elbow flexion
Extensor Carpi Radialis Longus (ECRL):
Origin: Distal 1/3rd of the lateral supracondylar ridge of the humerus
Insertion: 2nd metacarpal base
Innervation: Radial nerve
Action: Wrist extension and radial deviation
Extensor Carpi Radialis Brevis (ECRB):
Origin: Lateral epicondyle
Insertion: 3rd metacarpal base
Innervation: Radial nerve
Action: Wrist extension
Extensor Digitorum Comminus (EDC):
Origin: Lateral epicondyle
Insertion: Extensor hoods of the 2nd-5th digits
Innervation: PIN
Action: Extension of the 2nd-5th digits at the distal interphalangeal (DIP), proximal interphalangeal (PIP), and metacarpal phalangeal (MCP) joints. This muscle is also the only muscle which can hyperextend these digits past neutral; the lumbricals also being able to extend the digits at the DIP and PIP joint, but flexing the digits at the MCP joints. As it crosses the wrist, it also assists with wrist extension.
Extensor Digiti Minimi (EDM):
Origin: Lateral epicondyle
Insertion: Extensor hood of 5th digit
Innervation: PIN
Action: Similar to the EDC but limited to the 5th digit, this muscle extends the small finger at the DIP, PIP, and MCP joints.
Extensor Carpi Ulnaris (ECU):
Origin: Lateral epicondyle and posterior border of the ulna
Insertion: 5th metacarpal base
Innervation: PIN
Action: Wrist extension and ulnar deviation
Abductor Pollicis Longus (APL):
Origin: Posterior ulna, interosseous membrane, and radius
Insertion: 1st metacarpal base
Innervation: PIN
Action: Thumb Abduction
Extensor Pollicis Brevis (EPB):
Origin: Posterior radius and interosseous membrane
Insertion: Base of proximal phalanx of the thumb
Innervation: PIN
Action: Extension of MCP joint of thumb
Extensor Pollicis Longus (EPL):
Origin: Posterior ulna and interosseous membrane
Insertion: Base of distal phalanx of the thumb
Innervation: PIN
Action: Extension of interphalangeal joint of thumb
Extensor Indicis Proprius (EIP):
Origin: Posterior ulna and interosseous membrane
Insertion: Extensor hood of 2nd digit
Innervation: PIN
Action: Extension of DIP, PIP, and MCP joints of the 2nd digit
Anconeus:
Origin: Lateral epicondyle
Insertion: Proximal ulna and olecranon
Innervation: Radial nerve
Action: Extension elbow
Vascular Anatomy:
There are no major vascular structures that should be encountered during a dorsal approach to the forearm.
Nervous Anatomy:
The only nerve that must be understood during a dorsal approach to the forearm is the PIN. This nerve arises as a terminal branch from the radial nerve in the antecubital fossa. It then passes beneath the proximal margin of the supinator muscle (Arcade of Froshe), runs adjacent to and wraps around the proximal radial shaft for several cm and then emerges dorsally in the mid substance of the supinator muscle. From there it arborizes to provide motor function to the majority of muscles in the dorsal forearm. It passes along the posterior surface of the interosseous membrane, as its name implies, to finally provide sensation to the dorsal capsule capsule of the wrist.
Position & Markings
Patient Positioning:
The patient is placed on a regular operating table with the operative limb outstretched on a hand table. The patient's torso should be brought to the edge of the main operating table so that as much of the operative extremity as possible is on the hand table and easily available to the surgeon. The main operating table it turned 90 degrees such that the hand table projects into the room and away from anesthesia.
Intra-op Imaging:
An AP view of the radius can be obtained by simply placing the radius in anatomic position (forearm fully supinated) on the hand table and obtaining an image with a c-arm that has its beam perpendicular with the hand table. A lateral image can be obtained by having the c-arm come in from the patient's head and positioning the c-arm such that the beam is parallel with the floor. Alternatively, if the radius is stable after provisional or definitive fixation, pronating the forearm 90 degrees from the fully supinated position into a neutral position will allow for a lateral view of the radius (though not of the ulna) while keeping the c-arm in the same position as use to obtain the AP view (beam perpendicular with the floor).
Markings the incision:
Distally the incision is placed over Lister's tubercle. This is a palpable bony prominence on the dorsal distal radius that the EPL uses as a pulley to re-direct its line of pull as it heads towards the thumb. Proximally the incision is placed over the lateral epicondyle. These two points at opposite ends of of the forearm are then joined by a straight linear incision.
The entire incision (and approach) does not need to be made if only a portion of the radius requires exposure. Marking the entire incision, however, allows for extension of the incision as needed during the case and helps insure the correctly placement of the incision using the palpable distal and proximal landmarks.
Image
Dorsal (Thompson) Approach to the Radius
Superficial Dissection:
The portion of the skin incision needed for the approach is made sharply with a knife and this can be continued down through subcutaneous tissue to the level of the fascia over the superficial layer of muscles in the dorsal forearm. There are relatively few superficial veins in the dorsal subcutaneous tissue, relative to the volar surface, however any veins encountered should be retracted or ligated. The interval between the ECRB and EDC needs to be identified. This is most readily apparent in the distal portion of the forearm where the APL and EPB emerge from beneath the EDC to course superficial to the ECRB and ECRL.
Image
Deep Dissection:
Proximal:
The fascia between the ECRB and EDC is incised and the plain between these two muscles is developed bluntly. Once these superficial muscles are parted they expose the underlying supinator muscle, laying directly on the proximal radial shaft. At this point the PIN must be identified prior to continuing with the dissection. This nerve pierces the supinator muscle in its mid-substance and can be identified at this point. The PIN should be dissected out through the supinator muscle from distal to proximal. Once the nerve is fully exposed the proximal radius can be exposed in a subperiosteal fashion.
Image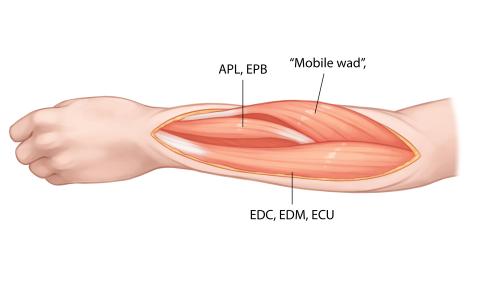 Image
Image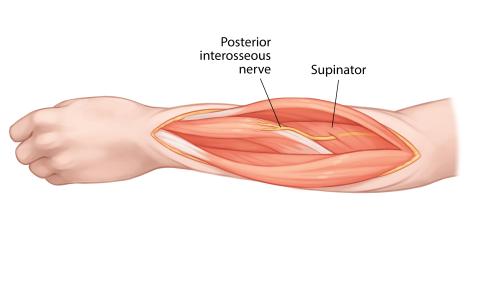 Image
Image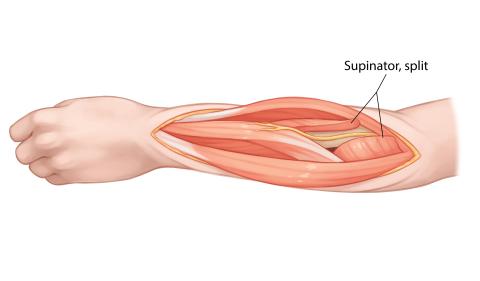
Middle:
The middle portion of the dissection consists of gently mobilizing the APL and EPB off the dorsal surface of the radius. These two muscles are mobilized, but their origins ulnar to the radial shaft are not taken down from the interosseous membrane and ulna. As such these two muscles continue to cloak the middle portion of the radius during the course of the dissection. They can be manipulated proximally and distally to see the entire shaft and fixation slid underneath, however.
Image Image
Image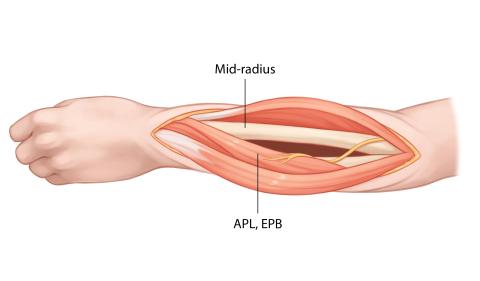
Distal:
Lister's tubercle continues to be a lighthouse in the distal portion of the dissection. Just ulnar to this landmark the tendon of the EPL passes. Just radial to this landmark the distal tendons of the ECRL and ECRB pass towards there insertions on the bases of the second and 3rd metacarpals. The EPL can be release from its tendon sheath. The EPL and the EDC can then be dissected subperiosteally from radial to ulnar off the dorsal surface of the radius. Similarly, the ECRL and ECRB can be subperiosteally dissected from ulnar to radial, exposing the remaining radial portion of the distal radius.
Image
Tips, Tricks & Precautions
Tips & Precautions:
Both the volar and dorsal approaches to the radius allow for exposure of the entire bone. The primary difference is how the PIN is handled. In the volar approach the PIN is not dissected out, but instead is swept aside with the supinator muscle. In the dorsal approach the PIN is exposed and dissected along its course. If the radius and the PIN both require visualization, the dorsal approach allows access to both structures.
Identifying the interval between the ECRB and the EDC can be challenging proximally. Extension of the approach distally, to where the APL and EPB emerge between the ECRB and EDC, simplifies the identification of this interval, which can then be tracked proximally as needed.
Ulna - Dorsal Approach
- Read Full Text
-
Objectives
At the end of this module, the learner should be able to:
1) List the indications for a dorsal approach to the ulna
2) Understand the relevant anatomy of the dorsal approach to the ulna
3) Discuss in detail the dorsal approach to the ulna, including:
a. Patient positioning
b. Landmarks for incision
c. Relevant internervous planes
d. Sequence of the superficial and deep dissection
Indications
Indications for a Dorsal Approach to the Ulna
1) Open reduction internal fixation of any portion of the ulna
Isolated ulnar shaft fractures with > 50% displacement or > 10 degrees angulation
Ulnar portion of a both bone (radius and ulna) fractures
Monteggia fracture (ulnar shaft fracture associated with a proximal radio-ulnar dislocation)
Olecranon fracture
Anatomy
Internervous Plane:
The entire dorsal subcutaneous border of the ulna, from the tip of the olecranon to the distal ulnar styloid, defines an internervous plane between the ulnar nerve and the radial nerve/PIN. The dorsal-radial surface of the ulna serves as the origin for the anconeus muscle (radial nerve) proximally and the extensor carpi ulnaris (PIN) muscle over the middle and distal thirds. The dorsal-ulnar surface serves as the origin for the ulnar head of the flexor carpi ulnaris (ulnar nerve). The palpable junction of these two surfaces, the dorsal subcutaneous border, thus serves as readily identifiable internervous plain.
Muscular Anatomy:
As described above, unlike the radius, which has a complex series of muscular layers covering its dorsal surface, the dorsal approach to the ulna requires an understanding of only three muscles in a single layer. The anconeus and ECU originate just radial to the dorsal border of the ulna. The FCU originates just ulnar to the dorsal border of the ulna.
Flexor Carpi Ulnaris (FCU):
Origin:
Humeral head: Medial epicondyle
Ulnar head: Olecranon and posterior ulnar border of the ulna
Insertion: Pisiform, hook of the hamate, and 5th metacarpal base
Innervation: Ulnar nerve
Action: Wrist flexion and ulnar deviation
Extensor Carpi Ulnaris (ECU):
Origin: Lateral epicondyle and posterior border of the ulna
Insertion: 5th metacarpal base
Innervation: PIN
Action: Wrist extension and ulnar deviation
Anconeus:
Origin: Lateral epicondyle
Insertion: Proximal ulna and olecranon
Innervation: Radial nerve
Action: Elbow extension
Vascular Anatomy:
There are no major vascular structures that should be encountered during a dorsal approach to the forearm.
INSERT PICTURE
Nervous Anatomy:
There majority of the subcutaneous border of the ulna has no major nerves which cross it. The exception is distally, where the dorsal cutaneous branch of the ulnar nerve may be encountered. This nerve branches from the ulnar nerve in the volar forearm, passes beneath the tendon of the FCU, emerges through the dorsal forearm fascia between the FCU and ECU around 5cm proximal to the wrist, and then passes onto the dorsum of the hand where it arborizes. It provides sensation over the dorsal/ulnar aspect of the hand, the dorsal 5th digit, and portions of the dorsal 3rd and 4th digits. Exposures of the distal ulna may put this cutaneous nerve at risk.
Position & Markings
Depending on the location of the ulnar fracture and associated injuries in the wrist, forearm, or elbow (radius fractures, injuries to the proximal radio-ulnar joint) the surgeon may choose between one of two basic positions for the patient and forearm:
1) Patient supine, forearm outstretched on a hand table:
This position is most common, and best suited for ulnar fractures that are in the distal 3/4ths of the ulna or associated with combined injuries to the radius or proximal radio-ulnar joint (classic Monteggia fractures).
Patient Positioning:
The patient is placed on a regular operating table with the operative limb outstretched on a hand table. The patient's torso should be brought to the edge of the main operating table so that as much of the operative extremity as possible is on the hand table and easily available to the surgeon. The main operating table it turned 90 degrees such that the hand table projects into the room and away from anesthesia.
Intra-op Imaging:
An AP view of the radius can be obtained by simply placing the radius in anatomic position (forearm fully supinated) on the hand table and obtaining an image with a c-arm that has its beam perpendicular with the hand table. A lateral image can be obtained by having the c-arm come in from the patient's head and positioning the c-arm such that the beam is parallel with the floor. Alternatively, if the ulna is stable after provisional or definitive fixation, internal rotation of the shoulder may allow for a lateral view of the ulna while keeping the c-arm in the same position as use to obtain the AP view (beam perpendicular with the floor).
2) Patient lateral or prone, forearm drapped over an arm board:
This position is primarily used for isolated proximal ulnar fractures (Olecranon fractures, proximal Monteggia variants)
Patient Positioning:
The patient may either be positioned lateral or prone. Lateral positioning avoids the hazards of pressure points on the face, chest, pelvis, knees, and feet seen with prone positioning and also provides easier access to the airway. The operative extremity, however, can be brought further from the table in the prone position, which may simplify intra-operative imaging.
For lateral positioning the patient is placed on a reversed cantilever table with the operative extremity up. The patient's head is brought to the cephalad extent of the table and head/torso are also shifted towards the operative field, leaving only enough room for rolled blankets to be used to help hold the patient in position. An axillary roll is placed and the down lower extremity should be padded to avoid pressure on the peroneal nerve at the knee and lateral malleoli at the ankle. Pillows or blankets may be placed between the legs. Rolled towels are placed on either side of the patient's torso and along with tape are used to maintain the patient in the lateral position throughout the case. The head should be elevated from the bed with folded sheets or a blanket so the neck is in line with the remainder of the spine. The non-operative, down extremity is flexed to 90 degrees at the shoulder and elbow such that the hand is resting just in front of the patient's face. This extremity should be rested on a radiolucent arm board which extends only 8-10cm from the operating table. This non-operative extremity should not be allow to fully externally rotate until it is parallel to the floor, but rather be elevated at the hand/wrist to reduce the external rotation stress that might otherwise be felt at the shoulder. The operative extremity is placed over a radiolucent, L-shaped arm board which is secured to the head of the bed and runs parallel with the operating table. The bed should be turned 90 degrees to the standard position such that the operative extremity is positioned coming out towards the surgeon and away from the anesthesiologist.
For the prone position the patient is placed on a reversed cantilever table. The head is placed in a well padded head-holder with a well secured airway. The chest/torso lies on rolls made from blankets or gel pads. The knees should be well padded to avoid pressure on the patellas and the lower legs placed on pillows to avoid pressure on the shins and feet. The non-operative extremity may be positioned next to the patient in a fully adducted position or placed on a prone positioning arm board with the shoulder flexed just less that 90 degrees and slightly internal rotated (arms headed down towards the floor relative to the torso) and the elbow flexed at 90 degrees. The operative extremity is outstretched on a radiolucent arm board which extends ~15cm away from the operating table. This arm board is padded with blankets until the arm rests at the level of the shoulder. The shoulder is abducted just less that 90 degrees and the elbow is allowed to flex over the end of the radiolucent arm board. The bed should be turned 90 degrees to the standard position such that the operative extremity is positioned coming out towards the surgeon and away from the anesthesiologist.
Intra-op Imaging:
The fluoroscopy unit should come in from the patient's head. An AP image is simply taken by positioning the fluoroscopy unit over the desired portion of the humeral shaft or elbow. A lateral image is obtained by rolling the fluoroscopy unit to a true lateral position, parallel with the operating table. As the operative extremity has been positioned on an arm board that runs parallel to, but just away from, the operating table, there is room to place the fluoroscopy unit just along the edge of the operating table to capture the needed lateral images. It is important to make sure adequate lateral images can be obtained prior to prepping and draping the limb; positioning of the table, patient, arm boards for the operative and non-operative extremity, and fluoroscopy unit all have to be quite precise to allow for adequate images in this position.
Marking the Incision:
The subcutaneous border of the ulna is often palpable along its entire length. However, in the setting or trauma or obesity, this landmark may be less obvious. The tip olecranon proximally and the ulnar head distally may serve as more precise landmarks in these circumstances. The dorsal ulnar border can then be marked out between these two points.
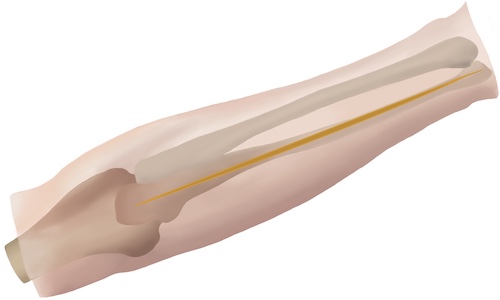
Dorsal Approach to the Ulna
Superficial Dissection:
The portion of the incision between the ulnar head and olecranon tip required for reduction and fixation of the fracture is made sharply with a knife. There are relatively few dorsal veins, however those that are come across should be retracted or ligated. Dissection can be continued down sharply through subcutaneous tissue to the level of the fascia over the ECU and FCU. The exception to this strict sharply dissection down to fascia is when dissection is required within 5-7cm of the wrist. This distally the dorsal cutaneous nerve of the ulna should be sought, and so dissection should proceed with scissors.
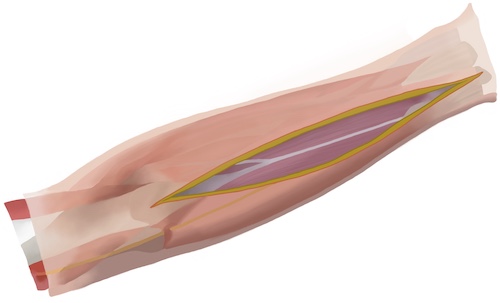
Deep Dissection:
Once down at the level of the fascia small full thickness flaps should be raised radially and ulnarly to expose small portions of the ECU/Anconeus and FCU, respectfully. Between these muscles lies the periosteum over the dorsal border of the ulna. The bone should be palpated and an effort should be made to sharply incise the periosteum between the ECU/Anconeus and FCU. Frequently, rather than coming down precisely between these muscles, the surgeon will find they have instead entered the edge of one of the compartments that contains either the ECU/Anconeus or FCU. It should be determined which compartment has been entered, and then the muscle dissected off and retracted the appropriate direction revealing the underlying bone. While either the dorsal-radial or dorsal-ulnar surface requires exposure for plating, if possible the surgeon should avoid stripping muscle off both surfaces in an effort to retain the blood supply to the ulna. In the setting of fracture the injury may have stripped tissue preferentially from one surface or the other; this trauma induced stripping may suggest the best surface for additional exposure, depending on fracture pattern.
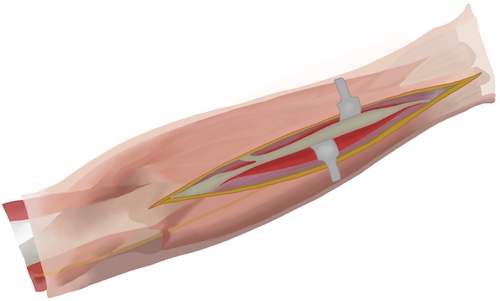
Tips, Tricks & Precautions
Precautions:
The dorsal approach to the ulna is in general a very safe approach that may be performed rapidly with a knife. The exception to this is when the dissection must be carried out within 5-7cm of the wrist. At this level the dorsal cutaneous nerve of the ulna emerges from the dorsal fascia between the ECU and FCU and if cut may lead to sensory loss on the dorsum of the hand and 3-5th digits or a painful neuroma at the site of nerve laceration.
Pelvis - Approach to the Pubic Symphysis
Approach to the Pubic Symphysis
- Read Full Text
-
Objectives
At the end of this module, the learner should be able to:
1) List the indications for an approach to the pubic symphysis
2) Understand the relevant anatomy of the approach to the pubic symphysis
3) Discuss in detail the approach to the pubic symphysis:
-Patient positioning
-Landmarks for incision
-Relevant internervous planes
-Sequence of the superficial and deep dissection
Indications
Indications for an Approach to the Pubic Symphysis
1) Open reduction internal fixation of a disrupted pubic symphysis as part of care of a pelvic ring injury
Anatomy
Internervous Plane:
The approach to the pubic symphysis is performed in the anatomic midline of the patient, between the right and left halves of the rectus abdominis muscles. These muscles are segmentally innervated by the intercostal and subcostal nerves (T7-T12).
Muscular Anatomy:
The rectus abdominis consists of eight individual muscles. The rectus is divided into a left and right halves by the longitudinal lines alba. Each half is then further divided into four individual muscles by a series of three transverse tendinous intersections. The rectus abdominis spans the central portion of the abdomen from the xyphoid process and costal cartilages of the anterior inferior rib cage to the superior and anterior portions of the pubic bodies.
While the rectus abdominis makes up the central portion of the muscular covering of the abdomen, the periphery is composed of a series of three layered muscles. From superficial to deep these three muscles are the external abdominal oblique, the internal abdominal oblique, and the transversus abdominis. While the muscular portions of these three muscles cover the periphery of the right and left sides of the abdomen, the broad aponeuroses of these three muscles continue on centrally to enclose the rectus abdominis muscles by creating the rectus sheath. The direction and way these muscles' aponeuroses combine to enclose the rectus abdominis muscles varies depending on their position relative to the arcuate line. This line is a horizontal line located variably between the umbilicus and iliac crest. Above the arcuate line the rectus abdominis muscles are surrounded by an anterior and posterior recuts sheath. Below the arcuate line the rectus abdominis muscles are only covered by an anterior rectus sheath. Above the arcuate line the anterior rectus sheath consists of the aponeurosis of the external abdominal oblique and the aponeurosis of anterior lamina of the internal abdominal oblique, while the posterior rectus sheath consists of the aponeurosis of posterior lamina of the internal abdominal oblique and the entire aponeurosis of the transverses abdominis muscle. Below the arcuate line the internal abdominal oblique no longer divides into anterior and posterior lamina and the entire aponeuroses off all three muscles pass anterior to the rectus and contribute only to the anterior rectus sheath. As such, below the arcuate line there is no posterior rectus sheath.
In addition to the muscular contributions of the abdominal wall just described, there are additional layers superficially and deep that must be understood when approaching the pubic symphysis:
1) Skin
2) Subcutaneous tissue (Camper's fascia)
3) Superficial fascia (Scarpa's fascia)
4) Anterior rectus sheath
5) Rectus Abdominis
6) Posterior rectus sheath (if above arcuate line)
7) Transversalis fascia
8) Extraperitoneal fat
9) Peritoneum
Rectus Abdominis:
Origin: Xyphoid process and costal cartilage of rib cage
Insertion: Anterior and superior surfaces of the pubic bodies
Innervation: Segmental innervation from intercostal and subcostal nerves (T7-T12)
Action: Lumbar spine flexion
External Abdominal Oblique:
Origin: Ribs 5-12
Insertion: Iliac crest, inguinal ligament, pubic tubercles, linea alba
Innervation: Segmental innervation from intercostal and subcostal nerves (T7-T12)
Action: Rotation of the torso, compression of the abdominal contents
Internal Abdominal Oblique:
Origin: Inguinal ligament, iliac crest
Insertion: Linea alba, pectin pubis (conjoint tendon), ribs 10-12
Innervation: Segmental innervation from intercostal and subcostal nerves (T7-T12), as well as the iliohypogastric and ilioinguinal nerves (L1)
Action: Rotation of the torso, compression of the abdominal contents
Transverse Abdominis:
Origin: Inguinal ligament, iliac crest, thoracolumbar fascia, costal cartilages
Insertion: Xyphoid, Linea alba, pectin pubis (conjoint tendon)
Innervation: Segmental innervation from intercostal and subcostal nerves (T7-T12), as well as the iliohypogastric and ilioinguinal nerves (L1)
Action: Compression of the abdominal contents
Vascular Anatomy:
There are no vascular structures in the midline during the course of the dissection. Both superficially and deep, however, there are vessels that may be encountered when the the dissection is carried a few centimeters away from the midline. Superficially, the superficial epigastric arteries may be encountered running between Camper's and Scarpa's fascia. This artery originates from the femoral artery about 1cm distal to the inguinal ligament, crosses over the inguinal ligament, and then travels between the two layers of the superficial fascia as it ascends roughly parallel to the linea alba on each side. It anastomoses with the inferior epigastric artery (traveling with the rectus muscles after arising from the external iliac artery) after piercing the anterior rectus sheath.
During the deep portion of the dissection the surgeon should be aware of a critical anastomosis between the obturator vessels and the external iliac vessels, the corona mortis. While the exposure needed to reduce and internally fix the pubic symphysis rarely requires dissection much beyond the pubic tubercles, if such dissection is required this vascular structure must be sought and controlled. Serious, deep bleeding in the pelvis that can be hard to control can result if the corona mortis is unintentionally injured. The corona mortis may be an arterial or veinous connection. It is identified as a vascular structure which crosses the pelvic brim from the false to the true pelvis. It runs essentially perpendicularly to the two major vascular systems it connects, the external iliac and the obturator systems.
INSERT PICTURE
Nervous Anatomy:
There are no major nerves that are typically encountered during a standard approach to the pubic symphysis.
Position & Markings
Patient Positioning:
The patient is placed supine on a radiolucent, flat-top operating table that has its supports at its ends rather than its middle. Imaging of the pelvic ring with a c-arm is not possible if the table has its base in the middle of the table. The arms are abducted at the shoulders to 90 degrees and secured to the arm boards. If instrumentation of the posterior pelvic ring (ill-sacral or sacral screws) is planned for the same operation, as is frequently the case, the pelvis and torso should be elevated from the bed with a midline sacral bump. The bump allows for the surgeon's hand to drop towards the floor when trying to obtain the necessary trajectory for these percutaneous screws.
A urinary catheter should be placed prior to prepping and draping to decompress the bladder.
Intra-op Imaging:
An AP, inlet, and outlet views are required to judge the reduction and positioning of the fixation on the pubic symphysis. For the purposes of plating the symphysis itself the c-arm can come in perpendicular to the operating table from either the right or left side. However, if posterior instrumentation is planned during the same operation, the c-arm should be positioned on the opposite side of the intended posterior fixation. For example, if planning for symphysis ORIF and left sided ill-sacral screws, then the c-arm should come in from the right side of the operating table.
An AP view is simply obtained by having the c-arm positioned with its beam perpendicular to the ground. A caveat to this is that patients may frequently be slightly tilted to the right or left, often due to not being placed centrally on the sacral bump. The best way to judge the quality of an AP image it to obtain a view of the lumbar spine and to insure the spinous processes are centered between the two pedicles. If the spinous processes are not centered, then the c-arm may need to roll slightly back or over the top to generate a high quality AP image.
Inlet and outlet views are obtained by tilting the c-arm such that the beam is aimed cephalad or caudad respectively. The inlet view is frequently defined as the view in which the anterior aspects of the S1 and S2 bodies perfectly overlap. With respect to the anterior ring, the obturator foramen will appears as only small slits between the superior and inferior pubic rami. The inlet view allows the surgeon to judge the adequacy of the symphyseal reduction in terms of anterior-posterior translation and internal-external rotation.
The outlet view is frequently defined as the view in which the pubic symphysis overlies the middle of the S2 body. With respect to the anterior ring, the obturator foramen will appear maximally large and circular. The outlet view allow the surgeon to judge the adequacy of the symphyseal reduction in terms of superior-inferiors translation and flexion-extension.
Marking the incision:
The incision through the skin may be performed in one of two ways: Pfannenstiel or midline longitudinal. A Pfannenstiel incision is marked 1-2cm proximal to the palpable pubic symphysis. This incision is centered at the midline, and then gently curves towards the anterior superior iliac spines (ASIS) on each side for a distance of 3-4cm. A longitudinal incision is placed in the anatomic midline, starting inferiorly at the palpable pubic symphysis and extending proximally for 6-8cm.

Approach to the Pubic Symphysis
Superficial Dissection:
The skin incision is made sharply with a knife. Dissection is then continued down through the subcutaneous tissue with a knife or caughtery. In cases of severe pelvic injury the subcutaneous tissue may be stained a deep red due to collected hematoma. Its appearance may even be concerning to a novice surgeon, who may confuse it for muscle tissue and be concerned they have strayed too deeply into the rectus abdominis. Carefully dissection through this tissue will eventually reveal a more substantial anterior rectus sheath, recognizable by its white color and pattern of oblique fibers passing from superior-lateral to inferior-medial on each side.
If a longitudinal incision is used then small full thickness flaps are raised to the right and left of the midline linea alba. If a Pfannenstiel incision is made significant proximal and distal flaps must be raised to expose the needed 6-8cm of linea alba.
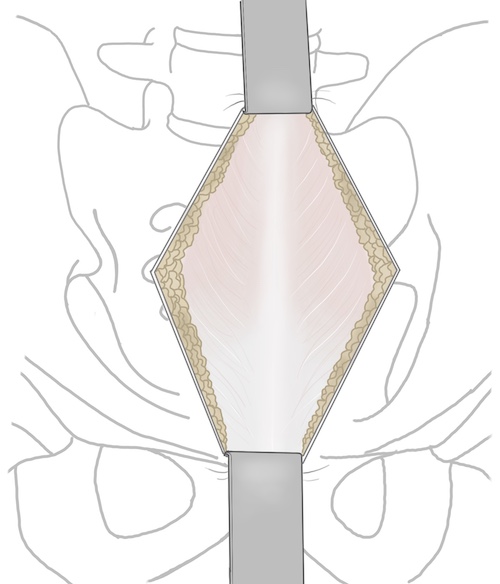
Deep Dissection:
The deep portion of the dissection is initiated by splitting the linea alba longitudinally from the pubic symphysis proximally for 6-8cm. Though often drawn as a clear, white, longitudinal line in anatomic texts, the linea alba is frequently less obvious in actually dissections. Rather than a clear white line, the linea alba is more accurately the midline junction of the right and left peripheral abdominal muscles (external abdominal oblique, internal abdominal oblique, transverses abdominis). As such, it is appreciated as the point where the descending fibers of the right and left external abdominal oblique, the most superficial of the muscles, blend together. Additionally, the linea may be better appreciate by palpation rather than just visually. Pressure applied to the anterior rectus sheath will reveal a firm midline cord (linea alba) flanked by a softer, board, white anterior rectus sheath.
The surgeon should use a knife or caughtery to make a 5mm incision through the linea alba, with care to not carry the incision too deep, as only the thin transversalis fascia, extraperitoneal fat, and peritoneum separate the incision from the underlying bladder. Once this 5mm incision has been made a blunt instrument, such as a clamp, may have it tip passed through it to allow the surgeon to extend the incision proximally and distally on top of this clamp, which serves to protect the underlying structures.
Very frequently, when this incision through linea alba is made, the surgeon will see a small portion of the rectus muscle. This is because rather than staying in the true anatomic midline, the linea alba, either the right or left rectus sheath has instead been entered. If this is the case it should be determined which rectus has been entered to allow the muscle to be retracted appropriately towards its side of origin. This determination can be made by passing a blunt instrument between the anterior rectus sheath and the rectus muscle to the right and left of the incision through anterior rectus sheath. In one of these directions the linea alba will be rapidly encountered and the blunt instrument will no longer be able to pass. The rectus muscle should be drawn away from this direction.
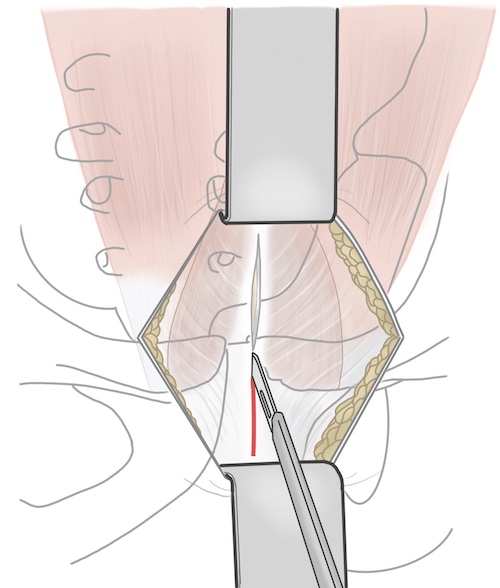
Once the linea alba has been split (or more likely the anterior rectus sheath has been split and the right or left rectus retracted aside) the underlying transversalis fascia will be exposed. This is a weak layer of tissue that can and should be split longitudinally bluntly, often with just the surgeon's finger. Recall that deep the transversalis fascia is only the extraperitoneal fat and peritoneum covering the bladder. With the splitting of the transversalis fascia the surgeon has now entered the Space of Retzius between the posterior pubic symphysis and the bladder and its peritoneal covering. A finger can be used to gently develop this space posterior the palpable pubic bodies.
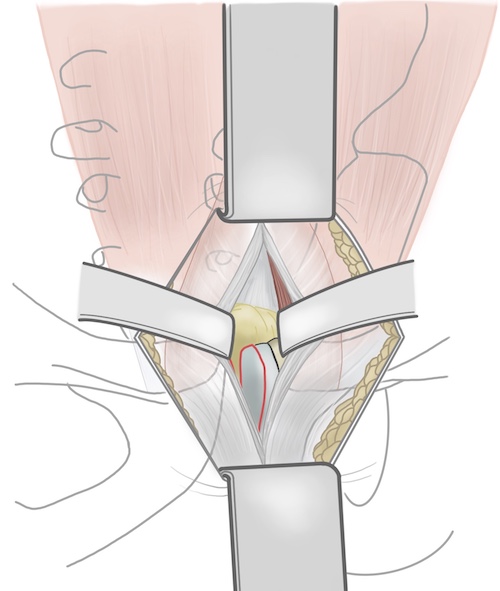
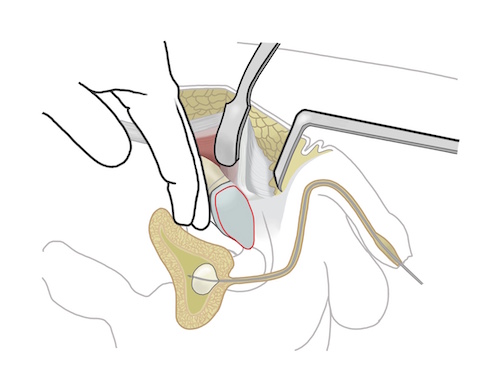
Once space behind the pubic bodies has been developed a malleable retractor should be placed and used to retract and protect the bladder. Even with a urinary catheter in place the bladder will tend to expand around the malleable retractor and care will need to be taken throughout the case to protect it.
The rectus is next sequentially elevated of the right and left pubic bodies. The malleable retractor should be turned such that its deep portion is toward the side being dissected and its superficial portion protruding out from the incision is tilted away from the side being dissected. An L-shaped retractor should be used to retract and tension the rectus to be dissected. Both the malleable and L-shaped retractor should be handled by an assistant on the same side as the rectus to be dissected. The surgeon should stand on the contralateral side to allow for visualization along the pubic body and pelvic brim.
The insertion of the rectus should dissected from the pubic bodies starting from the midline and heading laterally along the palpable pelvic brim. Rather than transecting the insertion of the rectus onto the superior pubic bodies, the rectus should be elevated as a sleeve from the superior and then anterior surface of the pubic bodies, leaving its most anterior and distal insertion intact.
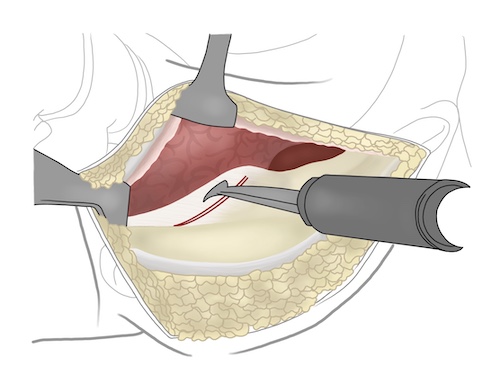
This dissection can be safely carried out in a subperiosteal fashion along the superior pelvic brim up to the level of the pubic tubercles. A combination of sharply dissection and elevation with periosteal elevator is safe and effective. The proximity of the external iliac vessels, passing along the pelvic brim and under the inguinal ligament in the lacuna vasorum should be recalled during this dissection; dissection in a subperiosteal fashion along the brim is quite safe, straying even slightly cepahald puts the external iliac system at considerable risk. Retractors can be equally as hazardous and should be placed by the surgeon, who has a full view of the anatomy, rather than blindly by the assistant. Once just past the pubic tubercle a Hohmann retractor can be placed over the tubercle in exchange of the L-shaped retractor, which requires more effort from the assistant.
If dissection is required along the brim more posterior than the tubercle it is critical for the surgeon to seek and control the corona mortis prior to continuing the dissection. This is an arterial or venous anastomosis of variable size that exists in most individuals between the external iliac and obtrutator systems. Inadvertent transection can lead to serious hemorrhage. The corona mortis will be seen as a vascular structure enclosed in variable amounts of adipose and areolar tissue that crosses perpendicular to the pelvic brim. It should be identified and ligated prior to more posterior dissection along the brim of the pelvis.
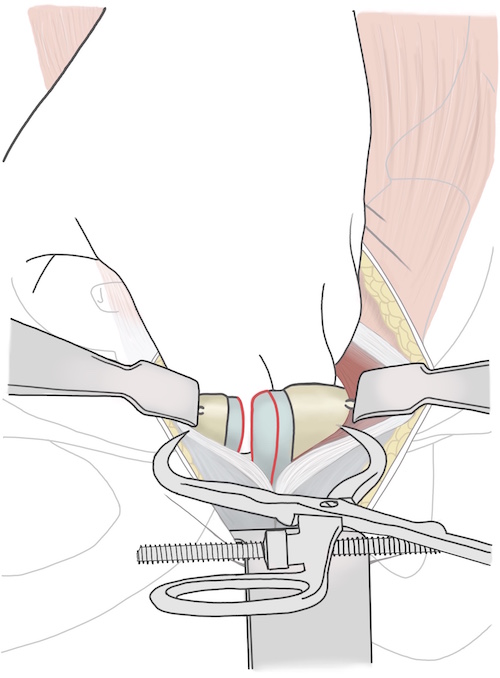
Tips, Tricks & Precautions
Tips:
The linea alba is not often an obvious white longitudinal line. It is more frequently seen as the simple junction of the right and left external abdominal oblique fibers descending towards the midline from each side. Finding the linea may also be aided by palpation, as it will be noticeably firmer than the rectus muscle and sheath to each side.
Careful and precise retractor placement is critical to safe exposure of the symphysis. Once the space of Retzius is entered a malleable retractor should be used to retract and protect the bladder. As the dissection is carried along the pelvic brim this retractor should be turned, rather than simply left in the midline, to help with exposure. Placement of an L-shaped retractor to elevate the tense the rectus muscles will also aide in visualization of the pelvic brim and dissection of the rectus from the superior pelvic brim.
Precautions:
If dissection is required more posteriorly than the pubic tubercles then the surgeon must stop and identify the corona mortis prior to proceeding along the pelvic brim. This connection between the external iliac and obturator systems must be ligated to avoid unintended hemorrhage.
Objectives
At the end of this module, the learner should be able to:
1) List the indications for an approach to the pubic symphysis
2) Understand the relevant anatomy of the approach to the pubic symphysis
3) Discuss in detail the approach to the pubic symphysis:
-Patient positioning
-Landmarks for incision
-Relevant internervous planes
-Sequence of the superficial and deep dissection
Indications
Indications for an Approach to the Pubic Symphysis
1) Open reduction internal fixation of a disrupted pubic symphysis as part of care of a pelvic ring injury
Anatomy
Internervous Plane:
The approach to the pubic symphysis is performed in the anatomic midline of the patient, between the right and left halves of the rectus abdominis muscles. These muscles are segmentally innervated by the intercostal and subcostal nerves (T7-T12).
Muscular Anatomy:
The rectus abdominis consists of eight individual muscles. The rectus is divided into a left and right halves by the longitudinal lines alba. Each half is then further divided into four individual muscles by a series of three transverse tendinous intersections. The rectus abdominis spans the central portion of the abdomen from the xyphoid process and costal cartilages of the anterior inferior rib cage to the superior and anterior portions of the pubic bodies.
While the rectus abdominis makes up the central portion of the muscular covering of the abdomen, the periphery is composed of a series of three layered muscles. From superficial to deep these three muscles are the external abdominal oblique, the internal abdominal oblique, and the transversus abdominis. While the muscular portions of these three muscles cover the periphery of the right and left sides of the abdomen, the broad aponeuroses of these three muscles continue on centrally to enclose the rectus abdominis muscles by creating the rectus sheath. The direction and way these muscles' aponeuroses combine to enclose the rectus abdominis muscles varies depending on their position relative to the arcuate line. This line is a horizontal line located variably between the umbilicus and iliac crest. Above the arcuate line the rectus abdominis muscles are surrounded by an anterior and posterior recuts sheath. Below the arcuate line the rectus abdominis muscles are only covered by an anterior rectus sheath. Above the arcuate line the anterior rectus sheath consists of the aponeurosis of the external abdominal oblique and the aponeurosis of anterior lamina of the internal abdominal oblique, while the posterior rectus sheath consists of the aponeurosis of posterior lamina of the internal abdominal oblique and the entire aponeurosis of the transverses abdominis muscle. Below the arcuate line the internal abdominal oblique no longer divides into anterior and posterior lamina and the entire aponeuroses off all three muscles pass anterior to the rectus and contribute only to the anterior rectus sheath. As such, below the arcuate line there is no posterior rectus sheath.
In addition to the muscular contributions of the abdominal wall just described, there are additional layers superficially and deep that must be understood when approaching the pubic symphysis:
1) Skin
2) Subcutaneous tissue (Camper's fascia)
3) Superficial fascia (Scarpa's fascia)
4) Anterior rectus sheath
5) Rectus Abdominis
6) Posterior rectus sheath (if above arcuate line)
7) Transversalis fascia
8) Extraperitoneal fat
9) Peritoneum
Rectus Abdominis:
Origin: Xyphoid process and costal cartilage of rib cage
Insertion: Anterior and superior surfaces of the pubic bodies
Innervation: Segmental innervation from intercostal and subcostal nerves (T7-T12)
Action: Lumbar spine flexion
External Abdominal Oblique:
Origin: Ribs 5-12
Insertion: Iliac crest, inguinal ligament, pubic tubercles, linea alba
Innervation: Segmental innervation from intercostal and subcostal nerves (T7-T12)
Action: Rotation of the torso, compression of the abdominal contents
Internal Abdominal Oblique:
Origin: Inguinal ligament, iliac crest
Insertion: Linea alba, pectin pubis (conjoint tendon), ribs 10-12
Innervation: Segmental innervation from intercostal and subcostal nerves (T7-T12), as well as the iliohypogastric and ilioinguinal nerves (L1)
Action: Rotation of the torso, compression of the abdominal contents
Transverse Abdominis:
Origin: Inguinal ligament, iliac crest, thoracolumbar fascia, costal cartilages
Insertion: Xyphoid, Linea alba, pectin pubis (conjoint tendon)
Innervation: Segmental innervation from intercostal and subcostal nerves (T7-T12), as well as the iliohypogastric and ilioinguinal nerves (L1)
Action: Compression of the abdominal contents
Vascular Anatomy:
There are no vascular structures in the midline during the course of the dissection. Both superficially and deep, however, there are vessels that may be encountered when the the dissection is carried a few centimeters away from the midline. Superficially, the superficial epigastric arteries may be encountered running between Camper's and Scarpa's fascia. This artery originates from the femoral artery about 1cm distal to the inguinal ligament, crosses over the inguinal ligament, and then travels between the two layers of the superficial fascia as it ascends roughly parallel to the linea alba on each side. It anastomoses with the inferior epigastric artery (traveling with the rectus muscles after arising from the external iliac artery) after piercing the anterior rectus sheath.
During the deep portion of the dissection the surgeon should be aware of a critical anastomosis between the obturator vessels and the external iliac vessels, the corona mortis. While the exposure needed to reduce and internally fix the pubic symphysis rarely requires dissection much beyond the pubic tubercles, if such dissection is required this vascular structure must be sought and controlled. Serious, deep bleeding in the pelvis that can be hard to control can result if the corona mortis is unintentionally injured. The corona mortis may be an arterial or veinous connection. It is identified as a vascular structure which crosses the pelvic brim from the false to the true pelvis. It runs essentially perpendicularly to the two major vascular systems it connects, the external iliac and the obturator systems.
INSERT PICTURE
Nervous Anatomy:
There are no major nerves that are typically encountered during a standard approach to the pubic symphysis.
Position & Markings
Patient Positioning:
The patient is placed supine on a radiolucent, flat-top operating table that has its supports at its ends rather than its middle. Imaging of the pelvic ring with a c-arm is not possible if the table has its base in the middle of the table. The arms are abducted at the shoulders to 90 degrees and secured to the arm boards. If instrumentation of the posterior pelvic ring (ill-sacral or sacral screws) is planned for the same operation, as is frequently the case, the pelvis and torso should be elevated from the bed with a midline sacral bump. The bump allows for the surgeon's hand to drop towards the floor when trying to obtain the necessary trajectory for these percutaneous screws.
A urinary catheter should be placed prior to prepping and draping to decompress the bladder.
Intra-op Imaging:
An AP, inlet, and outlet views are required to judge the reduction and positioning of the fixation on the pubic symphysis. For the purposes of plating the symphysis itself the c-arm can come in perpendicular to the operating table from either the right or left side. However, if posterior instrumentation is planned during the same operation, the c-arm should be positioned on the opposite side of the intended posterior fixation. For example, if planning for symphysis ORIF and left sided ill-sacral screws, then the c-arm should come in from the right side of the operating table.
An AP view is simply obtained by having the c-arm positioned with its beam perpendicular to the ground. A caveat to this is that patients may frequently be slightly tilted to the right or left, often due to not being placed centrally on the sacral bump. The best way to judge the quality of an AP image it to obtain a view of the lumbar spine and to insure the spinous processes are centered between the two pedicles. If the spinous processes are not centered, then the c-arm may need to roll slightly back or over the top to generate a high quality AP image.
Inlet and outlet views are obtained by tilting the c-arm such that the beam is aimed cephalad or caudad respectively. The inlet view is frequently defined as the view in which the anterior aspects of the S1 and S2 bodies perfectly overlap. With respect to the anterior ring, the obturator foramen will appears as only small slits between the superior and inferior pubic rami. The inlet view allows the surgeon to judge the adequacy of the symphyseal reduction in terms of anterior-posterior translation and internal-external rotation.
The outlet view is frequently defined as the view in which the pubic symphysis overlies the middle of the S2 body. With respect to the anterior ring, the obturator foramen will appear maximally large and circular. The outlet view allow the surgeon to judge the adequacy of the symphyseal reduction in terms of superior-inferiors translation and flexion-extension.
Marking the incision:
The incision through the skin may be performed in one of two ways: Pfannenstiel or midline longitudinal. A Pfannenstiel incision is marked 1-2cm proximal to the palpable pubic symphysis. This incision is centered at the midline, and then gently curves towards the anterior superior iliac spines (ASIS) on each side for a distance of 3-4cm. A longitudinal incision is placed in the anatomic midline, starting inferiorly at the palpable pubic symphysis and extending proximally for 6-8cm.
Approach to the Pubic Symphysis
Superficial Dissection:
The skin incision is made sharply with a knife. Dissection is then continued down through the subcutaneous tissue with a knife or caughtery. In cases of severe pelvic injury the subcutaneous tissue may be stained a deep red due to collected hematoma. Its appearance may even be concerning to a novice surgeon, who may confuse it for muscle tissue and be concerned they have strayed too deeply into the rectus abdominis. Carefully dissection through this tissue will eventually reveal a more substantial anterior rectus sheath, recognizable by its white color and pattern of oblique fibers passing from superior-lateral to inferior-medial on each side.
If a longitudinal incision is used then small full thickness flaps are raised to the right and left of the midline linea alba. If a Pfannenstiel incision is made significant proximal and distal flaps must be raised to expose the needed 6-8cm of linea alba.
Deep Dissection:
The deep portion of the dissection is initiated by splitting the linea alba longitudinally from the pubic symphysis proximally for 6-8cm. Though often drawn as a clear, white, longitudinal line in anatomic texts, the linea alba is frequently less obvious in actually dissections. Rather than a clear white line, the linea alba is more accurately the midline junction of the right and left peripheral abdominal muscles (external abdominal oblique, internal abdominal oblique, transverses abdominis). As such, it is appreciated as the point where the descending fibers of the right and left external abdominal oblique, the most superficial of the muscles, blend together. Additionally, the linea may be better appreciate by palpation rather than just visually. Pressure applied to the anterior rectus sheath will reveal a firm midline cord (linea alba) flanked by a softer, board, white anterior rectus sheath.
The surgeon should use a knife or caughtery to make a 5mm incision through the linea alba, with care to not carry the incision too deep, as only the thin transversalis fascia, extraperitoneal fat, and peritoneum separate the incision from the underlying bladder. Once this 5mm incision has been made a blunt instrument, such as a clamp, may have it tip passed through it to allow the surgeon to extend the incision proximally and distally on top of this clamp, which serves to protect the underlying structures.
Very frequently, when this incision through linea alba is made, the surgeon will see a small portion of the rectus muscle. This is because rather than staying in the true anatomic midline, the linea alba, either the right or left rectus sheath has instead been entered. If this is the case it should be determined which rectus has been entered to allow the muscle to be retracted appropriately towards its side of origin. This determination can be made by passing a blunt instrument between the anterior rectus sheath and the rectus muscle to the right and left of the incision through anterior rectus sheath. In one of these directions the linea alba will be rapidly encountered and the blunt instrument will no longer be able to pass. The rectus muscle should be drawn away from this direction.
Once the linea alba has been split (or more likely the anterior rectus sheath has been split and the right or left rectus retracted aside) the underlying transversalis fascia will be exposed. This is a weak layer of tissue that can and should be split longitudinally bluntly, often with just the surgeon's finger. Recall that deep the transversalis fascia is only the extraperitoneal fat and peritoneum covering the bladder. With the splitting of the transversalis fascia the surgeon has now entered the Space of Retzius between the posterior pubic symphysis and the bladder and its peritoneal covering. A finger can be used to gently develop this space posterior the palpable pubic bodies.
Once space behind the pubic bodies has been developed a malleable retractor should be placed and used to retract and protect the bladder. Even with a urinary catheter in place the bladder will tend to expand around the malleable retractor and care will need to be taken throughout the case to protect it.
The rectus is next sequentially elevated of the right and left pubic bodies. The malleable retractor should be turned such that its deep portion is toward the side being dissected and its superficial portion protruding out from the incision is tilted away from the side being dissected. An L-shaped retractor should be used to retract and tension the rectus to be dissected. Both the malleable and L-shaped retractor should be handled by an assistant on the same side as the rectus to be dissected. The surgeon should stand on the contralateral side to allow for visualization along the pubic body and pelvic brim.
The insertion of the rectus should dissected from the pubic bodies starting from the midline and heading laterally along the palpable pelvic brim. Rather than transecting the insertion of the rectus onto the superior pubic bodies, the rectus should be elevated as a sleeve from the superior and then anterior surface of the pubic bodies, leaving its most anterior and distal insertion intact.
This dissection can be safely carried out in a subperiosteal fashion along the superior pelvic brim up to the level of the pubic tubercles. A combination of sharply dissection and elevation with periosteal elevator is safe and effective. The proximity of the external iliac vessels, passing along the pelvic brim and under the inguinal ligament in the lacuna vasorum should be recalled during this dissection; dissection in a subperiosteal fashion along the brim is quite safe, straying even slightly cepahald puts the external iliac system at considerable risk. Retractors can be equally as hazardous and should be placed by the surgeon, who has a full view of the anatomy, rather than blindly by the assistant. Once just past the pubic tubercle a Hohmann retractor can be placed over the tubercle in exchange of the L-shaped retractor, which requires more effort from the assistant.
If dissection is required along the brim more posterior than the tubercle it is critical for the surgeon to seek and control the corona mortis prior to continuing the dissection. This is an arterial or venous anastomosis of variable size that exists in most individuals between the external iliac and obtrutator systems. Inadvertent transection can lead to serious hemorrhage. The corona mortis will be seen as a vascular structure enclosed in variable amounts of adipose and areolar tissue that crosses perpendicular to the pelvic brim. It should be identified and ligated prior to more posterior dissection along the brim of the pelvis.
Tips, Tricks & Precautions
Tips:
The linea alba is not often an obvious white longitudinal line. It is more frequently seen as the simple junction of the right and left external abdominal oblique fibers descending towards the midline from each side. Finding the linea may also be aided by palpation, as it will be noticeably firmer than the rectus muscle and sheath to each side.
Careful and precise retractor placement is critical to safe exposure of the symphysis. Once the space of Retzius is entered a malleable retractor should be used to retract and protect the bladder. As the dissection is carried along the pelvic brim this retractor should be turned, rather than simply left in the midline, to help with exposure. Placement of an L-shaped retractor to elevate the tense the rectus muscles will also aide in visualization of the pelvic brim and dissection of the rectus from the superior pelvic brim.
Precautions:
If dissection is required more posteriorly than the pubic tubercles then the surgeon must stop and identify the corona mortis prior to proceeding along the pelvic brim. This connection between the external iliac and obturator systems must be ligated to avoid unintended hemorrhage.
Pelvis - Approach to the Sacroiliac Joint
- Read Full Text
-
Objectives
At the end of this module, the learner should be able to:
1) List the indications for an anterior approach to the sacroiliac joint
2) Understand the relevant anatomy of the anterior approach to the sacroiliac joint
3) Discuss in detail the anterior approach to the sacroiliac joint:
-Patient positioning
-Landmarks for incision
-Relevant internervous planes
-Sequence of the superficial and deep dissection
Indications
Indications for an Anterior Approach to the Sacroiliac Joint
1) Open reduction internal fixation of a disrupted sacroiliac as part of the care of a pelvic ring injury
Disruptions of the sacroiliac joint occur as a continuum. In their mildest forms, anterior posterior compression (APC) injuries of the pelvis will disrupt the pubic symphysis and only a small portion of the sacroiliac joint ligaments (APC 1). In the most severe forms all ligamentous attachments of the sacroiliac joint may be torn (APC 3).
It is important to determine pre-operatively whether only a portion (APC 1 and 2) or all (APC 3) of the sacroiliac ligaments have been disrupted. This is perhaps best done by evaluating the axial views of the sacroiliac joint on a CT scan. If the sacroiliac joint is rotated open but contact remains between the posterior aspects of the ilium and sacrum then it can be assumed that a portion of the posterior sacroiliac ligaments remains intact. Conversely, if the entire ilium is translated away from the sacrum, it can be assumed no ligamentous attachments remain between the two bones.
This distinction is critical because it is predictive of whether closure of the anterior ring injury (frequently at the pubic symphysis) will result in a reliable reduction of the posterior ring injury at the sacroiliac joint. APC 1 and 2 injuries, which have some posterior sacroiliac ligament remaining, will reliably have the sacroiliac joint reduce acceptably with reduction of the anterior symphysis; the posterior ligaments acting like a hinge for the sacroiliac joint the rotate around and reduce. Conversely, APC 3 injuries, which have no such hinge, will often not be reliably reduced posteriorly at the sacroiliac joint after reduction of the pubic symphysis. As such, APC 3 injuries, where all posterior ligaments are disrupted, are the typical injury patterns requiring an open reduction of the sacroiliac joint. APC 1 and 2 injuries can instead frequently have the sacroiliac joints reduced just through reduction of the anterior pubic symphysis. Percutaneous screw fixation of the sacroiliac joint can be achieved for all APC injuries once the sacroiliac joint is reduced by closed or open means.
Anatomy
Internervous Plain:
The iliac crest is the superior most extent of the iliac wing. Although numerous muscles originate or insert on the crest or the inner or outer tables of the ilium, no muscles actually cross the crest. This allows the crest be a point of access to the ilium and the sacroiliac joint.
The peripheral abdominal muscles, (external abdominal oblique, internal abdominal oblique, and transversus abdominis, all innervated by the ventral rami of T7-L1) all originate or insert in part on the iliac crest. The iliacus muscle (innervated by the femoral nerve) originates below the iliac crest on the inner table of the iliac wing within the false pelvis. The gluteus medius muscle (innervated by the superior gluteal nerve) originates from the outer table of the ilium just below the iliac crest. Using the crest to access the superior portion of the ilium thus utilizes the internervous plain between the superior gluteal nerve and the ventral rami which segmentally innervate the muscles of the peripheral abdominal wall.
Muscular Anatomy:
The approach to the sacroiliac joint elevates the peripheral abdominal muscles from the crest and the iliacus from the inner table of the ilium. These muscles' origins on the ilium are in close proximity, allowing them to be elevated from the ilium as a continuous sleeve.
External Abdominal Oblique:
Origin: Ribs 5-12
Insertion: Iliac crest, inguinal ligament, pubic tubercles, linea alba
Innervation: Segmental innervation from intercostal and subcostal nerves (T7-T12)
Action: Rotation of the torso, compression of the abdominal contents
Internal Abdominal Oblique:
Origin: Inguinal ligament, iliac crest
Insertion: Linea alba, pectin pubis (conjoint tendon), ribs 10-12
Innervation: Segmental innervation from intercostal and subcostal nerves (T7-T12), as well as the iliohypogastric and ilioinguinal nerves (L1)
Action: Rotation of the torso, compression of the abdominal contents
Transverse Abdominis:
Origin: Inguinal ligament, iliac crest, thoracolumbar fascia, costal cartilages
Insertion: Xyphoid, Linea alba, pectin pubis (conjoint tendon)
Innervation: Segmental innervation from intercostal and subcostal nerves (T7-T12), as well as the iliohypogastric and ilioinguinal nerves (L1)
Action: Compression of the abdominal contents
Iliopsoas:
Origin: The iliac portion arises from the internal iliac fossa of the ilium. The psoas major portion arrises from the transverse processes of the lumbar spine.
Insertion: Lesser trochanter of the femur
Innervation: Ventral primary rami of lumbar spine (psoas major) and femoral nerve (iliacus)
Action: Hip flexion
Gluteus medius:
Origin: External surface of the ilium between posterior and anterior gluteal lines
Insertion: Greater trochanter
Innervation: Superior gluteal nerve
Action: Hip abduction
Vascular Anatomy:
There are no major vascular structures at risk during the anterior approach to the sacroiliac joint. Once the iliacus muscle has been elevated from the inner table of the ilium, however, there is frequently bleeding from a bony formina 1-2cm anterior to the sacroiliac joint. This vascular channel can bleed considerably, and typically required control with the use of bone wax to reduce blood loss and maintain a dry field.
INSERT PICTURE
Nervous Anatomy:
Exposure of the sacroiliac joint requires dissection onto the superior aspect of the S1 ala. The L5 nerve root run directly over the superior ala of S1 prior to entering the true pelvis and joining the lumbosacral plexus. This nerve root is located only 10-15mm medial to the sacroiliac joint. As such dissection on the sacral ala should be done in a subperiosteal manner and should not extend beyond 10-15mm. Injury to this nerve root leads to numbness on the dorsum of the foot and weakness in dorsiflexion of the ankle and toes.
Position & Markings
Patient Positioning:
The patient is placed supine on a radiolucent, flat-top operating table that has its supports at its ends rather than its middle. Imaging of the pelvic ring with a c-arm is not possible if the table has its base in the middle of the table. The arms are abducted at the shoulders to 90 degrees and secured to the arm boards. If percutaneous instrumentation of the posterior pelvic ring (ill-sacral or sacral screws) is planned for the same operation, as is frequently the case, the pelvis and torso should be elevated from the bed with a midline sacral bump. The bump allows for the surgeon's hand to drop towards the floor when trying to obtain the necessary trajectory for these percutaneous screws.
Intra-op Imaging:
An AP, inlet, and outlet views are required to judge the reduction and positioning of the fixation for the sacroiliac joint. The c-arm should be positioned on the opposite side of the operating table, coming in perpendicularly.
An AP view is simply obtained by having the c-arm positioned with its beam perpendicular to the ground. A caveat to this is that patients may frequently be slightly tilted to the right or left, often due to not being placed centrally on the sacral bump. The best way to judge the quality of an AP image it to obtain a view of the lumbar spine and to insure the spinous processes are centered between the two pedicles. If the spinous processes are not centered, then the c-arm may need to roll slightly back or over the top to generate a high quality AP image.
Inlet and outlet views are obtained by tilting the c-arm such that the beam is aimed cephalad or caudad respectively. The inlet view is frequently defined as the view in which the anterior aspects of the S1 and S2 bodies perfectly overlap. The inlet view allows the surgeon to judge the adequacy of the reduction in terms of anterior-posterior translation and internal-external rotation.
The outlet view is frequently defined as the view in which the pubic symphysis overlies the middle of the S2 body. The outlet view allow the surgeon to judge the adequacy of the reduction in terms of superior-inferior translation and flexion-extension.
Marking the incision:
The anterior superior iliac spine (ASIS) is palpated to identify the anterior extent of the iliac crest. The remainder of the crest is also palpated, heading posteriorly and superiorly. The incision is started just posterior to the ASIS and then follows the crest posteriorly for 8-10cm. Placing the incision just proximal to the crest, rather than right over it, allows for easier visualization down into the false pelvis and also potentially reduces irritation for an incision placed directly over this bony landmark.
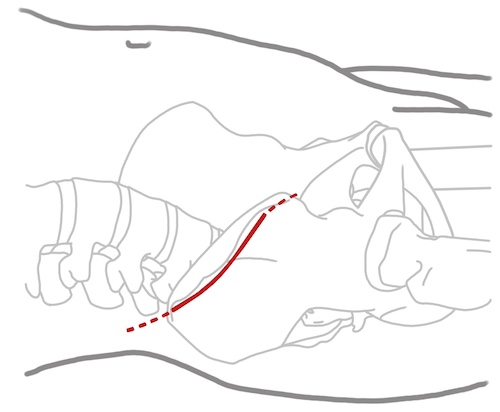
Anterior Approach to the Sacroiliac Joint
Superficial Dissection:
The incision through skin may be taken down sharply to the level of the fascia, as no significant vascular structures cross superficial to the iliac crest. Small full thickness flaps should raised at the level of the fascia exposing the ASIS, the distal extent of the external abdominal oblique, and the gluteus medius muscle on the external surface of the ilium.
The external oblique muscle inserts on the superior aspect of the iliac crest, however the muscle is redundant and folds over the top of the crest. To make this redundant muscle taught and expose its true insertion more clearly it should be put on tension, such as with a raked retractor held by an assistant across the table. A knife or caughtery can then be used to elevated the insertion of the external oblique (and internal oblique and transversus abdominis which run just deep to this and are not explicitly exposed during the approach) from the superior iliac crest starting just posterior to the ASIS.
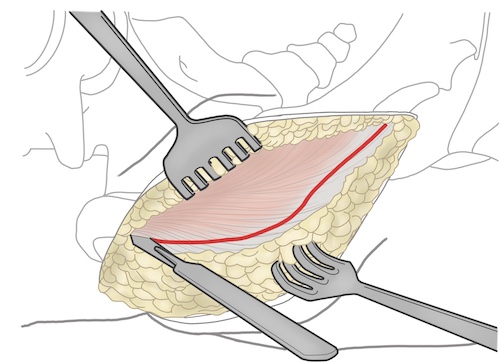
Deep Dissection:
As the external oblique is elevated off the iliac crest, the surgeon follows the bone over the top of the crest and down onto the inner table of the ilium. At this point muscle fibers of the iliacus muscle will be exposed. The knife or caughtery can then be exchanged for a periosteal elevator which can then be used to elevated the muscle of the iliacus of the inner table of the ilium down to the level of the pelvic bring. The elevator should be used to dissect just over the brim and then a malleable retractor placed over the brim to retract the external oblique, iliacus, and the abdominal contents away from the inner surface of the ilium.
Just anterior to the sacroiliac joint there is often a significant bony formina that can bleed profusely. This should be stopped with bone wax to reduce blood loss and keep a dry surgical field.
With the malleable retractor over the pelvic brim the sacroiliac joint should next be identified more posteriorly. In a patient with an intact or reduced sacroiliac joint the joint may just feel like a small linear prominence as the surgeon passes their finger tips from the ilium onto the lateral extent of the sacral ala. In a patient with a disrupted or unreduced sacroiliac joint the ilium is frequently sagged posteriorly and inferior relative to the sacrum. As such, when following the ilium posteriorly and medially the surgeon may feel their fingers run into a bony block, the lateral side of the sacrum. If the surgeon carefully retracts the iliacus superiorly with the back of their hand they will eventually feel the bony block medially disappear as they come over the lateral edge of the sacrum and onto the superior ala. Dissection onto the lateral 10-15mm of lateral sacral ala can then be done carefully and in a subperiosteal manner with an elevator. Straying into the soft tissue or more medial than 10-15mm puts the L5 nerve root at risk for injury.
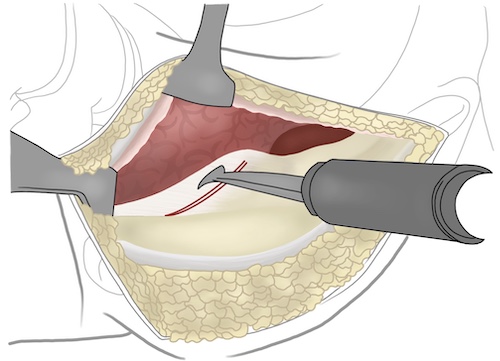
Once the lateral edge of the sacral ala has been cleared a Hohmann retractor can be obtained, placed onto the safely cleared portion of the ala (behind the surgeon's hand which is retracting the soft tissue medially), and malleted into the bone to allow for maintained visualization of the lateral sacrum, sacroiliac joint, and ilium.
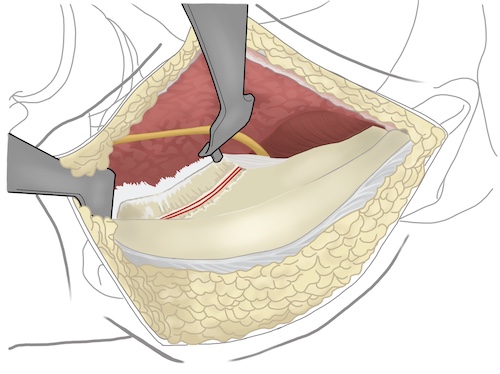
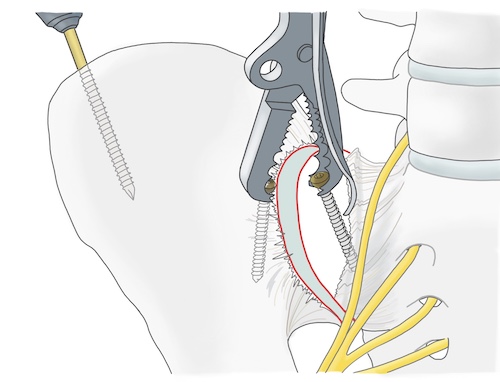
Tips, Tricks & Precautions
Tips:
The external oblique muscle tends to fold over the top of the iliac crest. To avoid cutting through a portion of the muscle, tension should be applied by an assistant using a raked retractor to that the muscle can be cleanly taken off the superior portion of the iliac crest.
Precautions:
Dissection on the lateral sacrum should be confined to the lateral 10-15mm and should be performed in a subperiosteal manner to avoid injury to the L5 nerve root.
Significant bleeding can occur due to the exposure of a bony formina along the pelvic brim just anterior to the sacroiliac joint. Caughtery will not typically be able to control this bleeding. Bone wax, to fill the formina, is the only way to halt such bleeding.
Pelvis: Lateral Window
Lateral Window Video:
Acetabulum - Anterior Approach
Acetabulum - Anterior Approach Video
- Read Full Text
-
Objectives
At the end of this module, the learner should be able to:
1) List the indications for an anterior approach to the acetabulum
2) Understand the relevant anatomy of the anterior approach to the acetabulum
3) Discuss in detail the anterior approach to the acetabulum:
a. Patient positioning
b. Landmarks for incision
c. Relevant internervous planes
d. Sequence of the superficial and deep dissection
Indications
Indications for an Anterior Approach to the Acetabulum
1) Open reduction internal fixation of isolated fractures of the anterior wall and/or column of the acetabulum
The anterior approach to the acetabulum exposes the anterior column/wall of the acetabulum from the iliac wing (high anterior column) all the way to the pubic symphysis (low anterior column). Through this exposure fractures which involve only the anterior column/wall can be visualized directly, and so reduced and fixed.
Anterior wall fractures
Anterior column fractures
2) Open reduction internal fixation of a fracture which involves both the anterior and posterior columns of the acetabulum where the posterior column fracture may be reducible and fixed through an anterior approach.
Certain patterns that disrupt both columns do so in such a way that the reduction and fixation of the posterior column is still possible through a single, anterior approach. The reduction of the posterior column for these patterns can be achieved through the Stoppa window (described in the approach section) and the fixation of the posterior column can be achieved through the Stoppa and lateral widows.
Anterior column posterior hemitransverse fractures
Associated both column fractures
3) Open reduction internal fixation of the anterior column portion of an acetabular fracture which involves both columns and in which both columns require a direct approach.
Some acetabular fracture patterns which involve both the anterior and posterior columns are best managed with separate anterior and posterior approaches to reduce and fix the two columns of the acetabulum independently. These are patterns where the reduction and fixation of the less exposed column is not possible. For the anterior approach, this would be patterns where the posterior column is not able to be reduced and fixed. T-type patterns are the typical example of this phenomena. Separate anterior and posterior approaches and direct reductions of each column are frequently required.
T-type fractures
Contra-Indications for an Anterior Approach to the Acetabulum
Some acetabular fracture patterns are clearly not amenable to an anterior approach. These include patterns which exclusively involve the posterior column/wall and so are better approached posteriorly:
Posterior column fractures
Posterior wall fractures
Posterior column + posterior wall fractures
Additionally, just as there are acetabular fracture patterns which involve both columns that are frequently amenable to a single approach from anterior as described above, there are also patterns which involved both columns of the acetabulum that are typically best approached through a single, posterior approach. While these patterns have anterior column involvement, the anterior column can frequently be reduced and fixed through the same posterior approach used to address the posterior column:
Transverse fractures
Transverse + posterior wall fractures
Anatomy
Introduction:
The anterior approach to the acetabulum is performed by using one, two, or three available "windows" to expose different portions of the hemipelvis. These windows (which will be referred to as the lateral, Stoppa, and middle windows) may be used in isolation or combination during acetabular surgery. The relevant anatomy for each window is highlighted below.
Internervous Plain:
Lateral window:
The iliac crest is the superior most extent of the iliac wing. Although numerous muscles originate or insert on the crest or the inner or outer tables of the ilium, no muscles actually cross the crest. This allows the crest be a point of access to the ilium and the sacroiliac joint.
The peripheral abdominal muscles, (external abdominal oblique, internal abdominal oblique, and transversus abdominis, all innervated by the ventral rami of T7-L1) all originate or insert in part on the iliac crest. The iliacus muscle (innervated by the femoral nerve) originates below the iliac crest on the inner table of the iliac wing within the false pelvis. The gluteus medius muscle (innervated by the superior gluteal nerve) originates from the outer table of the ilium just below the iliac crest. Using the crest to access the superior portion of the ilium/anterior column thus utilizes the internervous plain between the superior gluteal nerve and the ventral rami which segmentally innervate the muscles of the peripheral abdominal wall.
Stoppa window:
The Stoppa window is performed in the anatomic midline of the patient, between the right and left halves of the rectus abdominis muscles. These muscles are segmentally innervated by the intercostal and subcostal nerves (T7-T12). Separation of the rectus abdominis into right and left halves via a midline approach thus makes use of a natural internervous plain.
Middle window:
No true internervous or intermuscular plane is used for the development of the middle window. Rather, this portion of the approach is performed by incising the inferior portion of the external abdominal oblique along its aponeurosis, incising the inguinal ligament, and retracting the iliopsoas tendon and external iliac vessels apart from one another. Though no internervous plain is used, multiple nerves are encountered during the course of the development of this window, including the lateral femoral cutaneous nerve, genitofemoral nerve, and femoral nerve. Each must be understood and dealt with appropriately during the course of the approach. These nerves are reviewed more thoroughly below in the Nervous Anatomy Subsection.
Muscular Anatomy:
Lateral Window:
The lateral elevates the peripheral abdominal muscles from the crest and the iliacus from the inner table of the ilium. These muscles' origins on the ilium are in close proximity, allowing them to be elevated from the ilium as a continuous sleeve.
External Abdominal Oblique:
Origin: Ribs 5-12
Insertion: Iliac crest, inguinal ligament, pubic tubercles, linea alba
Innervation: Segmental innervation from intercostal and subcostal nerves (T7-T12)
Action: Rotation of the torso, compression of the abdominal contents
Internal Abdominal Oblique:
Origin: Inguinal ligament, iliac crest
Insertion: Linea alba, pectin pubis (conjoint tendon), ribs 10-12
Innervation: Segmental innervation from intercostal and subcostal nerves (T7-T12), as well as the iliohypogastric and ilioinguinal nerves (L1)
Action: Rotation of the torso, compression of the abdominal contents
Transverse Abdominis:
Origin: Inguinal ligament, iliac crest, thoracolumbar fascia, costal cartilages
Insertion: Xyphoid, Linea alba, pectin pubis (conjoint tendon)
Innervation: Segmental innervation from intercostal and subcostal nerves (T7-T12), as well as the iliohypogastric and ilioinguinal nerves (L1)
Action: Compression of the abdominal contents
Iliopsoas:
Origin: The iliac portion arises from the internal iliac fossa of the ilium. The psoas major portion arrises from the transverse processes of the lumbar spine.
Insertion: Lesser trochanter of the femur
Innervation: Ventral primary rami of lumbar spine (psoas major) and femoral nerve (iliacus)
Action: Hip flexion
Stoppa Window:
The rectus abdominis consists of eight individual muscles. The rectus is divided into a left and right halves by the longitudinal lines alba. Each half is then further divided into four individual muscles by a series of three transverse tendinous intersections. The rectus abdominis spans the central portion of the abdomen from the xyphoid process and costal cartilages of the anterior inferior rib cage to the superior and anterior portions of the pubic bodies.
While the rectus abdominis makes up the central portion of the muscular covering of the abdomen, the periphery is composed of a series of three layered muscles. From superficial to deep these three muscles are the external abdominal oblique, the internal abdominal oblique, and the transversus abdominis. While the muscular portions of these three muscles cover the periphery of the right and left sides of the abdomen, the broad aponeuroses of these three muscles continue on centrally to enclose the rectus abdominis muscles by creating the rectus sheath. The direction and way these muscles' aponeuroses combine to enclose the rectus abdominis muscles varies depending on their position relative to the arcuate line. This line is a horizontal line located variably between the umbilicus and iliac crest. Above the arcuate line the rectus abdominis muscles are surrounded by an anterior and posterior recuts sheath. Below the arcuate line the rectus abdominis muscles are only covered by an anterior rectus sheath. Above the arcuate line the anterior rectus sheath consists of the aponeurosis of the external abdominal oblique and the aponeurosis of anterior lamina of the internal abdominal oblique, while the posterior rectus sheath consists of the aponeurosis of posterior lamina of the internal abdominal oblique and the entire aponeurosis of the transverses abdominis muscle. Below the arcuate line the internal abdominal oblique no longer divides into anterior and posterior lamina and the entire aponeuroses off all three muscles pass anterior to the rectus and contribute only to the anterior rectus sheath. As such, below the arcuate line there is no posterior rectus sheath.
In addition to the muscular contributions of the abdominal wall just described, there are additional layers superficially and deep that must be understood when approaching the pubic symphysis:
1) Skin
2) Subcutaneous tissue (Camper's fascia)
3) Superficial fascia (Scarpa's fascia)
4) Anterior rectus sheath
5) Rectus Abdominis
6) Posterior rectus sheath (if above arcuate line)
7) Transversalis fascia
8) Extraperitoneal fat
9) Peritoneum
Rectus Abdominis:
Origin: Xyphoid process and costal cartilage of rib cage
Insertion: Anterior and superior surfaces of the pubic bodies
Innervation: Segmental innervation from intercostal and subcostal nerves (T7-T12)
Action: Lumbar spine flexion
Middle Window:
The development of the middle window requires a detailed knowledge of two muscles (external abdominal oblique, iliopsoas) and their relationships with various neurovascular structures in order for this portion of the anterior approach to be performed safely.
The basics of the external abdominal oblique (origin, insertion, innervation, action) have been detailed above. However this muscle's relationship to the inguinal canal requires further explanation to safely use the middle window. The inguinal canal allows passage of the spermatic cord contents from the deep ring (deep and lateral) to the superficial ring (medial and superficial). It can be conceptualized as having a ceiling, a floor, an anterior wall, and a posterior wall. These boundaries originate from various anatomic structures as follows:
Ceiling -----------> Internal abdominal oblique & Transverses abdominus muscles
Floor -------------> Inguinal ligament, which is itself the distal "rolled-up" extension of the aponeurosis of the external abdominal oblique.
Anterior wall---> Aponerosis of the external oblique proximal to the inguinal ligament
Posterior wall--> Transversalis fascia
When developing the middle window the anterior wall of the inguinal canal (aponerosis of external oblique) is first incised to enter the inguinal canal. The inguinal canal is passed through by elevating the spermatic cord. The inguinal ligament (rolled-up external oblique aponeurosis) is then encounter and incised in order to exit the inguinal canal. As such, when developing the middle window and passing through the inguinal canal the surgeon incises the aponeurosis of the external abdominal oblique muscle twice!
Once through the inguinal canal the surgeon comes down immediately upon the iliopsoas muscle laterally and the external iliac vessels medially. Between these structures is the ilio-pectineal fascia. This fascia must be separated from the muscle and vessels and then cut along its course down to the ilio-pectineal eminence (anterior wall of the acetabulum) and pelvic brim. Division of this fascia allows for retraction of the iliopsoas muscle laterally and the external iliac vessels medially. This allows of exposure of the low portion of the anterior column and anterior wall. The ilio-pectineal fascia may be simply thought of as the fascia covering of the iliopsoas tendon.
Vascular Anatomy:
Lateral Window:
There are no major vascular structures at risk during the development of the lateral window. Once the iliacus muscle has been elevated from the inner table of the ilium, however, there is frequently bleeding from a bony formina 1-2cm anterior to the sacroiliac joint. This vascular channel can bleed considerably, and typically required control with the use of bone wax to reduce blood loss and maintain a dry field.
Stoppa Window:
Multiple vascular structures are encountered during the development of the Stoppa window. Understanding their anatomy is absolutely crucial to developing this window safely. Failure to understand this anatomy, to identify and retract of ligate vessels safely can lead to profuse, life-threatening bleeding deep in the pelvis which can be difficult to control. The external iliac and obturator vessels, as well as their connection, the corona mortis, will thus be reviewed.
The external iliac vessels (artery and vein) arise from the common iliac vessels just anterior to the sacroiliac joints. While the internal iliac vessels pass into the true pelvis the external iliac vessels remain in the false pelvis, traveling along the pelvic brim just medial to the iliopsoas muscle. The vessels have two minor branches (the inferior epigastric vessels and deep circumflex iliac artery) just prior to passing under the inguinal ligament, after which point they terminates into the femoral vessels. During the development of the Stoppa window these vessels, along with the iliopsoas muscle, are elevated gently from the pelvis brim and retracted proximally. Thus must be done in a careful, controlled manner to avoid unintended injury.
The obturator vessels (artery and vein) arise from the internal iliac vessels. These vessels pass just medial to the quadrilateral plate of the acetabulum on their way to exiting the pelvis through the obturator canal, a small opening in the obturator membrane which otherwise covers the obturator ring. These vessels are accompanied by the obturator nerve, which supplies the medial compartment of the thigh. During the development of the Stoppa window these vessels and the nerve are retracted toward the midline to allow for exposure of the quadrilateral plate and cephalad portion of the posterior column. Thus must be done in a careful, controlled manner to avoid unintended injury. Many fracture patterns cause significant medialization of the posterior column (anterior column posterior hemitransverse, associated both column) which can injury or even transect these vessels during injury.
The corona mortis is a frequent connection seen between the above two vascular systems. This connect between the external iliac and obturator systems may be venous, arterial, or both and the caliber of this connection can range from very small to quite large. As the anatomy of the two systems would suggest (the external iliac vessels traveling above the pelvic brim and the obturator vessels traveling below) the corona mortis crosses directly across the pelvic brim in order to connect the two systems. As such, the corona mortis, when present, must be identified and ligated to allow for dissection along the pelvic brim when developing the Stoppa window.
Middle Window:
As discussed above, the development of the middle window essentially involves the development of the plain between the iliopsoas muscle and the external iliac vessels as the travel beneath the inguinal ligament. As such the external iliac vessels are inherently at risk during this portion of the anterior approach. When the inguinal ligament is divided medially it is critical to understand the iliac vessels pass just below! Great care must be taken not to inadvertently injure these vessels during this dissection.
Nervous Anatomy:
Lateral window:
Exposure through the lateral window may occasionally require dissect to be carried all the way to and even across the sacroiliac joint for visualization of a high anterior column fracture. If such exposure is required, dissection must be carried onto the superior aspect of the S1 ala. The L5 nerve root run directly over the superior ala of S1 prior to entering the true pelvis and joining the lumbosacral plexus. This nerve root is located only 10-15mm medial to the sacroiliac joint. As such dissection on the sacral ala should be done in a subperiosteal manner and should not extend beyond 10-15mm. Injury to this nerve root leads to numbness on the dorsum of the foot and weakness in dorsiflexion of the ankle and toes.
Stoppa window:
The primary nerve exposed and at risk during the development of the Stoppa window is the obturator nerve. This nerve arises from the lumbar plexus (L2-4) and consolidates into a distinct, white, bow-string like nerve which travels with the obturator vessels along the medial aspect of the quadrilateral plate. Like the vessels, it must be retracted towards the midline to expose the posterior column.
Middle window:
The genitofemoral nerve (L1-2), which travels with the other contents of the spermatic cord, is encountered in the inguinal canal once the external abdominal oblique aponeurosis is incised and must be mobilized and protected with the rest of the spermatic cord during the course of the dissection.
The femoral nerve (L2-4) lies on top of the iliopsoas muscle and may also be encounter during the course of the dissection. This too must be retracted and protected (by retracting the iliopsoas laterally) during the case.
The lateral femoral cutaneous nerve (L2-3) is encountered in the very lateral edge of the dissection. Once the aponeurosis of the external oblique has been incised the nerve is found just medial to the ASIS. The nerve may be preserved during development of the middle window. However, if the nerve is retracted significant during development of the middle window or during an extension of the lateral window (taking down the soft tissue attachments from the ASIS to allow for additional retraction of the iliopsoas), intentionally sacrificing the nerve may prevent permanent burning pain after surgery.
Position & Markings
Patient Positioning:
The patient is placed supine on a radiolucent, flat-top operating table that has its supports at its ends rather than its middle. Imaging of the acetabulum with a c-arm is not possible if the table has its base in the middle of the table. The arms are abducted at the shoulders to 90 degrees and secured to the arm boards. The pelvis and torso should be elevated from the bed with a midline sacral bump. The bump allows the incision to curve well around the iliac crest without the table interfering with the approach.
Intra-op Imaging:
An AP and Judet views (obturator and iliac oblique) are required to judge the reduction and positioning of the fixation for the acetabulum. The c-arm should be positioned on the opposite side of the operating table, coming in perpendicularly.
An AP view is simply obtained by having the c-arm positioned with its beam perpendicular to the ground. A caveat to this is that patients may frequently be slightly tilted to the right or left, often due to not being placed centrally on the sacral bump. The best way to judge the quality of an AP image it to obtain a view of the lumbar spine and to insure the spinous processes are centered between the two pedicles. If the spinous processes are not centered, then the c-arm may need to roll slightly back or over the top to generate a high quality AP image.
The obturator oblique view is obtained by rolling the c-arm "over-the-top" 45 degrees until the beam is perpendicular to the obturator ring. This view provides an excellent view of the lower portion of the anterior column/wall and the posterior wall.
The iliac oblique view is obtained by rolling the c-arm back 45 degrees until the beam is perpendicular to the iliac wing. This view provides an excellent view of the superior portion of the anterior column and the entire posterior column.
Marking the incision:
The anterior superior iliac spine (ASIS) is palpated to identify the anterior extent of the iliac crest. The remainder of the crest is also palpated, heading posteriorly and superiorly. The pubic symphysis is palpated in the midline. The skin incision is marked 3-5 cm beyond the midline (3-5cm towards the uninjured hemipelvis) 1cm proximal to the palpable pubic symphysis. It is carried towards the injured side ASIS, over the inguinal ligament, and then just superior to the iliac crest. If all three windows are to be used during the approach than the entire incision is made. If only the lateral and Stoppa windows are to be made then the lateral portion of the incision (ASIS then posteriorly along the iliac crest) and the midline portion of the incision (essentially a Pfannenstiel incision) can be used, leaving the skin over the inguinal ligament in between.
Anterior Approach to the Acetabulum
Superficial Dissection:
Lateral Window:
The incision (ASIS, iliac crest) through skin may be taken down sharply to the level of the fascia, as no significant vascular structures cross superficial to the iliac crest. Small full thickness flaps should raised at the level of the fascia exposing the ASIS, the distal extent of the external abdominal oblique, and the gluteus medius muscle on the external surface of the ilium.
The external oblique muscle inserts on the superior aspect of the iliac crest, however the muscle is redundant and folds over the top of the crest. To make this redundant muscle taught and expose its true insertion more clearly it should be put on tension, such as with a raked retractor held by an assistant across the table. A knife or caughtery can then be used to elevated the insertion of the external oblique (and internal oblique and transversus abdominis which run just deep to this and are not explicitly exposed during the approach) from the superior iliac crest starting just posterior to the ASIS.
Stoppa Window:
The skin incision (Pfannenstiel) is made sharply with a knife. Dissection is then continued down through the subcutaneous tissue with a knife or caughtery. In cases of severe pelvic injury the subcutaneous tissue may be stained a deep red due to collected hematoma. Its appearance may even be concerning to a novice surgeon, who may confuse it for muscle tissue and be concerned they have strayed too deeply into the rectus abdominis. Carefully dissection through this tissue will eventually reveal a more substantial anterior rectus sheath, recognizable by its white color and pattern of oblique fibers passing from superior-lateral to inferior-medial on each side.
Middle Window:
The skin incision (between the ASIS and pubic tubercle) is made and taken down through skin to the level of the aponeurosis of the external abdominal oblique. Towards the midline the external inguinal ring must be identified. This is appreciated as a cord of tissue heading towards the midline visually and as a distinct palpable ring.
Deep Dissection:
Lateral Window:
As the external oblique is elevated off the iliac crest, the surgeon follows the bone over the top of the crest and down onto the inner table of the ilium. At this point muscle fibers of the iliacus muscle will be exposed. The knife or caughtery can then be exchanged for a periosteal elevator which can then be used to elevated the muscle of the iliacus of the inner table of the ilium down to the level of the pelvic bring. The elevator should be used to dissect just over the brim and then a malleable retractor placed over the brim to retract the external oblique, iliacus, and the abdominal contents away from the inner surface of the ilium.
Just anterior to the sacroiliac joint there is often a significant bony formina that can bleed profusely. This should be stopped with bone wax to reduce blood loss and keep a dry surgical field.
With the malleable retractor over the pelvic brim the sacroiliac joint should next be identified more posteriorly. In a patient with an intact or reduced sacroiliac joint the joint may just feel like a small linear prominence as the surgeon passes their finger tips from the ilium onto the lateral extent of the sacral ala. If need, dissection onto the lateral 10-15mm of lateral sacral ala can then be done carefully and in a subperiosteal manner with an elevator. Straying into the soft tissue or more medial than 10-15mm puts the L5 nerve root at risk for injury.
Once the lateral edge of the sacral ala has been cleared a Hohmann retractor can be obtained, placed onto the safely cleared portion of the ala (behind the surgeon's hand which is retracting the soft tissue medially), and malleted into the bone to allow for maintained visualization of the lateral sacrum, sacroiliac joint, and ilium.
Stoppa Window:
The deep portion of the dissection is initiated by splitting the linea alba longitudinally from the pubic symphysis proximally for 6-8cm. Though often drawn as a clear, white, longitudinal line in anatomic texts, the linea alba is frequently less obvious in actually dissections. Rather than a clear white line, the linea alba is more accurately the midline junction of the right and left peripheral abdominal muscles (external abdominal oblique, internal abdominal oblique, transverses abdominis). As such, it is appreciated as the point where the descending fibers of the right and left external abdominal oblique, the most superficial of the muscles, blend together. Additionally, the linea may be better appreciate by palpation rather than just visually. Pressure applied to the anterior rectus sheath will reveal a firm midline cord (linea alba) flanked by a softer, board, white anterior rectus sheath.
The surgeon should use a knife or caughtery to make a 5mm incision through the linea alba, with care to not carry the incision too deep, as only the thin transversalis fascia, extraperitoneal fat, and peritoneum separate the incision from the underlying bladder. Once this 5mm incision has been made a blunt instrument, such as a clamp, may have it tip passed through it to allow the surgeon to extend the incision proximally and distally on top of this clamp, which serves to protect the underlying structures.
Very frequently, when this incision through linea alba is made, the surgeon will see a small portion of the rectus muscle. This is because rather than staying in the true anatomic midline, the linea alba, either the right or left rectus sheath has instead been entered. If this is the case it should be determined which rectus has been entered to allow the muscle to be retracted appropriately towards its side of origin. This determination can be made by passing a blunt instrument between the anterior rectus sheath and the rectus muscle to the right and left of the incision through anterior rectus sheath. In one of these directions the linea alba will be rapidly encountered and the blunt instrument will no longer be able to pass. The rectus muscle should be drawn away from this direction.
Once the linea alba has been split (or more likely the anterior rectus sheath has been split and the right or left rectus retracted aside) the underlying transversalis fascia will be exposed. This is a weak layer of tissue that can and should be split longitudinally bluntly, often with just the surgeon's finger. Recall that deep the transversalis fascia is only the extraperitoneal fat and peritoneum covering the bladder. With the splitting of the transversalis fascia the surgeon has now entered the Space of Retzius between the posterior pubic symphysis and the bladder and its peritoneal covering. A finger can be used to gently develop this space posterior the palpable pubic bodies.
Once space behind the pubic bodies has been developed a malleable retractor should be placed and used to retract and protect the bladder. Even with a urinary catheter in place the bladder will tend to expand around the malleable retractor and care will need to be taken throughout the case to protect it.
The rectus is next sequentially elevated of the injured side pubic body. The malleable retractor should be turned such that its deep portion is toward the side being dissected and its superficial portion protruding out from the incision is tilted away from the side being dissected. An L-shaped retractor should be used to retract and tension the rectus to be dissected. Both the malleable and L-shaped retractor should be handled by an assistant on the same side as the rectus to be dissected. The surgeon should stand on the contralateral side to allow for visualization along the pubic body and pelvic brim.
The insertion of the rectus should dissected from the pubic bodies starting from the midline and heading laterally along the palpable pelvic brim. Rather than transecting the insertion of the rectus onto the superior pubic bodies, the rectus should be elevated as a sleeve from the superior and then anterior surface of the pubic bodies, leaving its most anterior and distal insertion intact.
This dissection can be safely carried out in a subperiosteal fashion along the superior pelvic brim up to the level of the pubic tubercles. A combination of sharply dissection and elevation with periosteal elevator is safe and effective. The proximity of the external iliac vessels, passing along the pelvic brim and under the inguinal ligament in the lacuna vasorum should be recalled during this dissection; dissection in a subperiosteal fashion along the brim is quite safe, straying even slightly cepahald puts the external iliac system at considerable risk. Retractors can be equally as hazardous and should be placed by the surgeon, who has a full view of the anatomy, rather than blindly by the assistant. Once just past the pubic tubercle a Hohmann retractor can be placed over the tubercle in exchange of the L-shaped retractor, which requires more effort from the assistant.
Dissection is then carried further posteriorly along the pelvic brim in a similar fashion and can be taken as far back as the sacroiliac joint. Once posterior to the pubic tubercle, however, the corona mortis must be identified and ligated to allow for this posterior subperiosteal dissection! Gentle blunt dissection with a suction tip along with retraction of the bladder towards the midline and the iliopsoas and external iliac vessels superiorly will often be enough to reveal a vessel crossing perpendicularly over the pelvic brim. This vessel should be gently dissected out, controlled, and then ligated. There is frequently more than one corona mortis! As such, the surgeon should be vigilant for a series of vessels and not be satisfied once a single vessel crossing the pelvic brim has been ligated.
With the corona mortis ligated the obturator vessels and nerve can then be exposed, again often with simple blunt dissection using a suction tip. These structures travel horizontally (90 degrees from the corona mortis) in the true pelvis. Once identified the malleable retractor can be placed over the top of these structures allowing them to be retracted away from the quadrilateral surface. This exposes the posterior column. From this point dissection can safely occur between the external iliac vessels (being retracted superiorly with an L-shaped retractor) and the obturator system (being retracted towards the midline with the malleable retractor) along the pelvic brim all the way to the sacroiliac joint. Care should be taken not to fall into the greater sciatic notch, where multiple neurovascular structure pass on their way to the lower extremity.
Middle Window:
The aponeurosis of the external abdominal oblique muscle is incised from the ASIS to a point 5mm proximal to the superior edge of the external inguinal ring. Ending the incision through the external oblique aponeurosis just above the ring, rather than extending it into the ring itself, prevents over tightening of the ring at closure, which can strangulate the spermatic cord. Once through the aponeurosis the aponeurosis should be reflected proximally exposing the spermatic cord (with the gentiofemoral nerve lying on top). A gauze should be used to gently free the spermatic cord from the underlying tissue to allow for it to be retracted proximally also. This exposes the inguinal ligament. The ligament is visible as a thin white line and palpable as a stiff cord like structure between the ASIS and pubic tubercle.
The inguinal ligament is next incised. This process may begin laterally over the iliopsoas where there is less likelihood of injury to important structures. As the incision passes more medially the surgeon will be incising the ligament directly over the external iliac vessels. This must be done with great care to avoid injury to these structures! It may be possible to pass a blunt instrument, such as a clamp, from lateral to medial while cutting through the inguinal ligament medially to help prevent inadvertent injury to the vessels.
Once through ligament the iliopsoas muscle is usually plainly visible in the lateral portion of the incision. The external iliac vessels are frequently not clearly visible, as they are surrounded by areolar tissue and lymphatic tissue. The vessels should not be dissected free from this surrounding tissue. Instead, the iliopsoas should be retracted laterally and the thin ilio-pectineal fascia separating the iliopsoas muscle from the contents of the lacuna vasorum (vessels, lymphatics, and surrounding tissue) should be identified. The ilio-pectineal fascia can then be separated from the contents of the lacuna vasorum, which are retracted towards the midline. The ilio-pectineal fascia can then be incised with scissors down onto the ill-pectineal eminence.
Tips, Tricks & Precautions
Precautions:
L5 Nerve Root: When developing the lateral window exposure may require placing a retractor across the sacroiliac joint into the sacral ala. It should be remembered that the L5 nerve root is 10-15mm medial to the sacroiliac joint and as such dissection should not be carried beyond this to avoid injuring this nerve root and causing a post-operative foot drop and numbness on the dorsum of the foot.
Corona Mortis: This arterial or venous connection between the external iliac vessels and obturator vessels crosses the pelvic brim just posterior to the pubic tubercle. it must be controlled and ligated prior to proceeding with dissection more posteriorly along the pelvic brim. Remember than more than one corona mortis may exist!
Genitofemoral nerve: This nerve lies on top of the spermatic cord and can be injured when dissection through the external abdominal oblique aponeurosis. It supplies sensation to the scrotum in males and the mons pubis in females.
External iliac vessels: These structures are at risk when dividing the inguinal ligament while developing the middle window and also during dissection and retraction from the pelvic brim through the Stoppa window. Injury can cause rapid life-threatening bleeding.
Obturator nerve and vessels: Located in the true pelvis, these structures must be dissected away from the quadrilateral surface and retracted towards the midline to expose the posterior column through the Stoppa window. Injury to the vessels can cause serious bleeding deep in the pelvis. Injury to the nerve can generate numbness on the medial thigh and adduction weakness.
Acetabulum - Posterior Approach
Posterior Approach Video:
- Read Full Text
-
Objectives
At the end of this module, the learner should be able to:
1) List the indications for a posterior approach to the acetabulum
2) Understand the relevant anatomy of the posterior approach to the acetabulum
3) Discuss in detail the posterior approach to the acetabulum:
a. Patient positioning
b. Landmarks for incision
c. Relevant internervous planes
d. Sequence of the superficial and deep dissection
Indications
Indications for a Posterior Approach to the Acetabulum
1) Open reduction internal fixation of isolated fractures of the posterior wall and/or column of the acetabulum
The posterior approach to the acetabulum exposes the posterior column/wall of the acetabulum from the ischial tuberosity distally to a point 1-2cm proximal to the proximal extent of the greater sciatic notch and dome of the acetabulum. Further proximal dissection is prevented by the gluteus medius muscle, which originates from the external surface of the ilium. Through this exposure fractures which involve only the posterior column/wall can be visualized directly, and so reduced and fixed.
Posterior wall fractures
Posterior column fractures
Posterior column + posterior wall fractures
2) Open reduction internal fixation of a fracture which involves both the anterior and posterior columns of the acetabulum where the anterior column fracture may be reducible and fixed through a posterior approach.
Certain patterns that disrupt both columns do so in such a way that the reduction of the posterior column assists with reduction of the anterior column. This is true of fractures with a transverse pattern, where although both columns of the acetabulum have been fractured and separated away from the cephalad portion of the acetabulum, the caudal fragment consists of single fragment with both anterior and posterior column portions. As such, the reduction of one portion of the caudal fragment (posterior) may produce at least an approximate reduction of the other (anterior). Additionally, while the posterior approach only directly exposes the posterior column/wall, it also allows access by palpation to the medial surface of the posterior column (quadrilateral plate) and the lowest portions of the anterior column. The surgeon may place a finger or reduction clamp through the greater sciatic notch to feel and manipulate fracture lines along this surface as far anteriorly as the pubic root. As such, while fractures through the anterior column of the acetabulum cannot be directly visualized through this approach, some fractures through the anterior column can be reduced and fixed with the assistance of fluoroscopy, even if they cannot be directly visualized. Because of this, certain patterns of injury which disrupt both columns may still be addressed through a single posterior approach.
Transverse fractures
Transverse + posterior wall fractures
3) Open reduction internal fixation of the posterior column portion of an acetabular fracture which involves both columns and in which both columns require a direct approach.
Some acetabular fracture patterns which involve both the anterior and posterior columns are best managed with separate anterior and posterior approaches to reduce and fix the two columns of the acetabulum independently. These are patterns where the reduction and fixation of the less exposed column is not possible. For the posterior approach, this would be patterns where the anterior column is not able to be manipulated and fixed. T-type patterns are the typical example of this phenomena. Unlike in a transverse pattern, where the caudal fractured fragment consists of a single fragment with both the anterior and posterior columns attached, the anterior and posterior columns of the caudal portion are separated by a coronal plane fracture in a T-type pattern. As such, manipulation of the directly exposed posterior column cannot reliably produce even an approximate reduction of the anterior column. Instead, a separate anterior approach and direct reduction of the anterior column fragment may be required.
T-type fractures
Contra-Indications for a Posterior Approach to the Acetabulum
Some acetabular fracture patterns are clearly not amenable to a posterior approach. These include patterns which exclusively involve the anterior column/wall and so are better approached anteriorly:
Anterior column fractures
Anterior wall fractures
Additionally, just as there are acetabular fracture patterns which involve both columns that are frequently amenable to a single approach from posterior as described above, there are also patterns which involved both columns of the acetabulum that are typically best approached through a single, anterior approach. While these patterns have posterior column involvement, the posterior column can frequently be reduced and fixed through the same anterior approach used to address the anterior column:
Anterior column posterior hemitransverse fractures
Associated both column acetabular fractures
Anatomy
Internervous Plane:
The posterior approach to the acetabulum does not use a true internervous plane. During the superficial dissection the muscle of the Gluteus maximus, innervated by the inferior gluteal nerve, is split. The splitting of the Gluteus maximus, however, generally does not create significant deinnervation of this muscle. However, if the split is carried far medially the inferior gluteal neurovascular bundle can be encountered traveling on the undersurface of this muscle. If this bundle is damaged the blood supply and innervation of the Gluteus maximus distal to the split would be compromised.
INSERT PICTURE
The remainder of the dissection involves taking down a series of small muscles, often referred to together as the "short external rotators", from their insertions on the posterior aspect of the proximal femur. As these muscles are elevated by taking down their insertions from the femur in their tendinous regions their nerve supplies are quite safe.
INSERT PICTURE
Muscular Anatomy:
The superficial portion of the dissection involves the division of the iliotibial band distally over the lateral side of the proximal femur and the division of the fascia over the Gluteus maximus and the maximus muscle itself more proximally. Key to understanding this portion of the dissection is to realize that the fascia over the Gluteus maximus and the Iliotibial band are one continuous structure. The fascia over the Gluteus maximus muscle itself is often quite thin. Conversely, the fascia which makes up the iliotibial band is universally robust.
In the deep portion of the dissection the piriformis, superior gemellus, obturator internus, and inferior gemelli have their tendons incised near their insertions on the femur. A subtle but critical difference between a posterior approach done for acetabular open reduction internal fixation and a posterior approach down for arthroplasty, is in the way these tendons have their insertions taken down from near the back of the femur. When performing an arthroplasty the tendons of these short external rotators are typically taken down directly from bone. This is permissible since their is no plan for preservation of the femoral head during an arthroplasty. As such even though incising these tendons directly from bone disrupts the vascular supply to the femoral head, it will have no ill consequences for the outcome of the patient. The additional length of these tendons gained from taking them directly from bone also eases their repair during closure. The opposite is of course true when performing an acetabular open reduction and internal fixation. In these patient the femoral head is to be preserved, and so its blood supply (medial femoral circumflex) must not be disrupted. As such, the tendons of the short external rotators are incised 1cm from their insertions onto the femur, to preserve the femoral head blood supply which course beneath.
Once the tendons of the piriformis, superior gemellus, obturator internus, and inferior gemellus have been incised 1cm from their insertions they may be serially reflected, exposing progressively more of the posterior column. The specific relationship of each of these muscles to the posterior column allows the surgeon to understand precisely which portion of the posterior column they are viewing as each muscle is reflected and thus allow safe retractor placement:
Piriformis ---> Greater sciatic notch (passes through)
Superior Gemellus ---> Ischial spine (origin)
Obturator Internus ---> Lesser sciatic notch (passes through)
Inferior Gemellus ---> Cephalad portion of ischial tuberosity (origin)
Knowledge of the above sequence of muscles and their relationship to landmarks of the posterior column allows the surgeon to understand which portion of the posterior column they are visualizing. Identification of the obturator internus tendon between the two tendons of the gemelli also allows specifically for safe identification of the lesser sciatic notch; a safe place for retractor placement.
If more caudal exposure of the posterior column is required for fracture reduction and fixation this can be achieved by elevating muscle origins from the ischial tuberosity below the origin of the inferior gemellus. Specifically, the origin of the quadrates femoris and hamstring muscles can be elevated from proximal to distal to gain additional exposure.
Gluteus maximus:
Origin: Sacrotuberous ligament, posterior sacrum & coccyx, lumbar fascia, extenral surface of ilium from posterior gluteal line
Insertion: Gluteal tuberosity on posterior proximal femur, iliotibial band
Innervation: Inferior gluteal nerve
Action: Extends hip from flexion, external rotation of hip
INSERT PICTURE
Gluteus medius:
Origin: External surface of the ilium between posterior and anterior gluteal lines
Insertion: Greater trochanter
Innervation: Superior gluteal nerve
Action: Hip abduction
INSERT PICTURE
Gluteus minimus:
Origin: External surface of the ilium between anterior and inferior gluteal lines
Insertion: Greater trochanter deep to Gluteus medius
Innervation: Superior gluteal nerve
Action: Hip abduction
INSERT PICTURE
Piriformis:
Origin: Anterior surface of the sacrum and sacrotuberous ligament
Through: Greater sciatic notch
Insertion: Piriformis fossa
Innervation: Ventral rams of S1 & S2 (may combine to form "nerve to piriformis")
Action: Hip external rotation
INSERT PICTURE
Superior Gemellus:
Origin: Ischial spine
Insertion: Posterior border of greater trochanter
Innervation: Nerve to obturator internus
Action: Hip external rotation
INSERT PICTURE
Obturator Internus:
Origin: Internal surface of obturator membrane and foramen
Insertion: Posterior border of greater trochanter
Innervation: Nerve to obturator internus
Action: Hip external rotation
INSERT PICTURE
Inferior Gemellus:
Origin: Ischial tuberosity
Insertion: Posterior border of the greater trochanter
Innervation: Nerve to quadratus femoris
Action: Hip external rotation
INSERT PICTURE
Quadratus femoris:
Origin: Ischial tuberosity
Insertion: Quadrate tubercle of proximal femur
Innervation: Nerve to quadratus femoris
Action: Hip external rotation
INSERT PICTURE
Vascular Anatomy:
The primary vasculature of importance during a posterior approach to the acetabulum is that which supplies the femoral head. While the posterior approach to the hip for arthroplasty is similar in many ways to the posterior approach to the acetabulum used for acetabular fractures, the need for respect for this vascular supply is a critical difference. When a posterior approach is used for arthroplasty with the intent to replace the femoral head obviously no concern for the blood supply to the head is needed. When a posterior approach is performed to reduce and fix the acetabulum, however, this blood supply must be preserved, as disruption of the vasculature to the femoral head will lead to avascular necrosis and a poor result regardless of the reduction and fixation of the fractured acetabulum.
The medial femoral circumflex artery branches from the medial side of the profound femoris artery, itself a branch of the common femoral artery in the femoral triangle. The medial femoral circumflex passes posteriorly by first traveling between the iliopsoas and pectineus muscles. It then passes laterally between the adductor brevis and obturator externus muscles to reach the base of the femoral neck. Here it forms an anastomotic ring around the base of the femoral neck. The primary blood supply to the femoral neck then passes within the joint capsule up the posterior superior aspect of the neck to arrive at the femoral head.
INSERT PICTURES
Nervous Anatomy:
The primary nerve at risk during the posterior approach to the acetabulum is the sciatic nerve. Unlike a posterior approach to the hip for arthroplasty, where the sciatic nerve is typically not formally exposed, during a posterior acetabular exposure the sciatic nerve is identified and dissected out along its length to allow for safe access to the posterior column.
This nerve exits the greater sciatic notch and commonly enters the posterior thigh as it exits below the inferior border of the piriformis. Variations of the nerve, where a portion exits through or even above the superior border of the piriformis may also be observed. When the piriformis tendon is incised and the muscle belly reflected this exposes the sciatic nerve. The nerve is always surrounded by a vary amount of adipose and areolar tissue, and thus simply reflecting the piriformis does not usually make the sciatic nerve immediately apparent. Instead, careful dissection must be performed to expose the nerve from its surrounding tissues.
Once the sciatic nerve has been identified and exposed within the incision the gemelli muscles and obturator internus muscle can have their tendons incised and be reflected as a group. As these muscles are deep to the sciatic nerve, reflecting them covers and helps protect the nerve, drawing it away from the posterior column that needs exposure.
INSERT PICTURE
Position & Markings
Patient Positioning:
The posterior approach to the acetabulum can be performed with the patient either in the lateral or prone position. Isolated fractures of the posterior wall can be treated in either position. Fractures which involve the posterior column (posterior column, posterior column + posterior wall, transverse, transverse + posterior wall, "t"-type) may be best managed in the prone position. In the lateral position gravity causes the femoral head to push medially against the posterior column. As such, if the posterior column is fractured, gravity and the femoral head may work to displace the posterior column further, making the reduction more challenging. Placing the patient in the prone position avoids this phenomena. If the posterior column is intact, such as in an isolated posterior wall fracture, the force of gravity on the femoral head is less of a concern and the surgeon may chose whatever position they feel more comfortable.
Prone:
With the patient prone, the head should be placed is a well padded head-holder with the airway secured and the cervical spine in a neutral position. The torso is supported with two longitudinal bolsters, one on either side of the patient, running from the chest to the anterior superior iliac spines. The abdomen should hand free. The knees and the contralateral foot/ankle should be padded. The arms should be positioned with the shoulders abducted to just less than 90 degrees and flexed slightly forward with the forearms laying on arm boards. The entire operative lower extremity is draped into the field. This allows the limb to be manipulated during the operation and for the knee to be flexed to 90 degrees to reduce the tension on the sciatic nerve.
Lateral:
The patient is placed in the lateral position with the operative side up and held in place with rolled blankets along the torso and back. An axillary roll, placed just distal to the actual axilla, should be used. Both arms are out-stretched 90 degrees from the body at the shoulder; the bottom arm is supported by an arm board, the top arm with an arm holder or pillows placed between the arms. The down leg should be padded to protect bony prominences and the peroneal nerve at the knee.
A flat top radiolucent table, supported at the cephalad and cuadal ends and free in the middle, is used regardless of positioning. This allows for the necessary fluoroscopic imaging during the case.
Intra-op Imaging:
Intra-operative AP and Judet (45 degree oblique) views are required during the procedure.
On the AP view there are a series of six classically described landmarks that can be used to judge the position of various portions of the acetabulum:
Ilio-pectineal line ---> Anterior column
Ilio-ischial line ---> Posterior column
Anterior wall
Posterior wall
Acetabular Dome ---> Only the cephalad few millimeters of the actual dome
Teardrop ---> Non-anatomic structure produced by the subcotyloid fossa and quadrilateral surface
The Judet views consist of two views (obturator oblique and iliac oblique) designed to reveal additional information about the columns and walls of the acetabulum. The classic obturator oblique view is obtained by turning the patient 45 degrees by placing a bump under the affected side, effectively internally rotating the pelvis on the affected side. Similarly, the classic iliac oblique view is obtained by turing the patient 45 degrees by placing a bump under the unaffected side, effectively externally rotating the pelvis on the affected side. During surgery, moving the patient is not feasible, but rotating the fluoroscopy unit instead produces the same views. As such, the fluoroscopy arm can be "rolled-over" and "rolled-back" to generate 45 degree oblique views.
The obturator oblique view provides an on-fosse view of the obturator ring and a view down the long axis of the iliac wing. This view provides an excellent view of the inferior portion of the anterior column/wall and also brings the posterior wall into maximum view out from behind the remainder of the posterior column.
The iliac oblique view provides an on-fosse view of the superior portion of the anterior column and the entire posterior column.
Marking the Incision:
The incision consists of two limbs which joint together over the tip of the greater trochanter. The distal limb begins at the tip of the greater trochanter of the femur proximally and descends longitudinally in line with the palpable proximal femur for 10-15cm. The proximal limb begins at the tip of the greater trochanter and ascends obliquely towards the posterior superior iliac spine (PSIS) for 10-15cm. Though a large incision, it is required for safe exposure of the posterior column; smaller incisions and approaches risk tension on the sciatic nerve and post-operative nerve palsy.
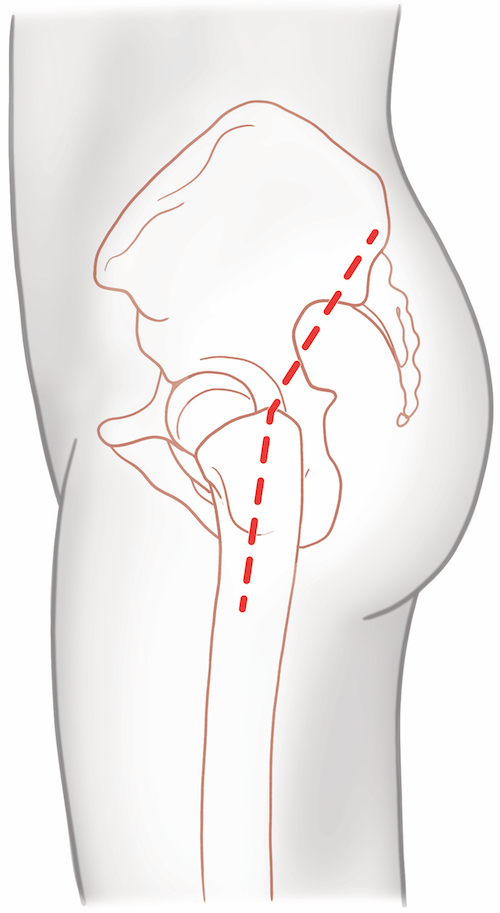
Posterior Approach to the Acetabulum
Superficial Dissection:
The skin incision is made with a knife and may safely be taken down to the fascia over the Gluteus maximus and iliotibial band sharply. The goal is to come down squarely over the greater trochanter and proximal femur; in obese patients it is helpful to continue to palpate the femur as you dissect down to it. It is relatively easy in an obese patient to aim too posterior or anterior if this is not done, which requires creating a large dead-space at the level of the fascia to get the dissection back over the lateral aspect of the femur.
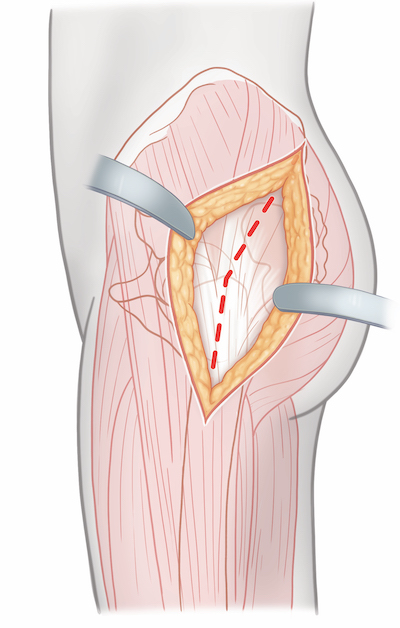
Once the fascial level has been reached the iliotibial band should be incised from the tip of the greater trochanter distally for the length of the skin incision. Care should be taken not to injure the underlying vastus lateralis muscle. Proximally, the fascia over the Gluteus maximus muscle should be incised in line with the fibers of this muscle and then the muscle itself split bluntly. This exposes the underlying Gluteus medius.
A bursa lies over the Gluteus medius, proximal femur, and Vastus lateralis. Excising this will help to better define the underlying anatomy.
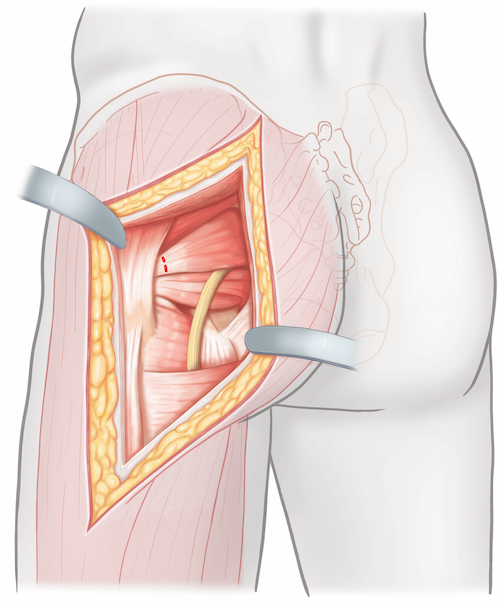
Deep Dissection:
The deep portion of the dissection involves the identification of the piriformis, gemelli, obturator internus, and quadratus femoris and their reflection off the proximal femur. Internal rotation of the hip puts these structures on stretch and helps to identify their insertions on the proximal femur. Placing a retractor under the posterior edge of the gluteus medius and retracting this muscle anteriorly is an essential step in exposing the piriformis. This tendon is invariably a distinct white cord that runs below the Gluteus minimum muscle and above the remainder of the short external rotators. Its identification serves as a "light-house" during the deep portion of the dissection.
The piriformis should be tagged with a heavy suture. The tendon of the piriformis should then be incised 1cm from its insertion on to the femur. The piriformis is then reflected posteriorly. Dissection should continue carefully deep to the prior position of the piriformis until the sciatic nerve has been identified. It is frequently surrounded with significant areolar and adipose tissue. Once identified the sciatic nerve should be dissected out along its course from the greater sciatic notch until it disappears beneath the gemelli/obturator internus muscles.
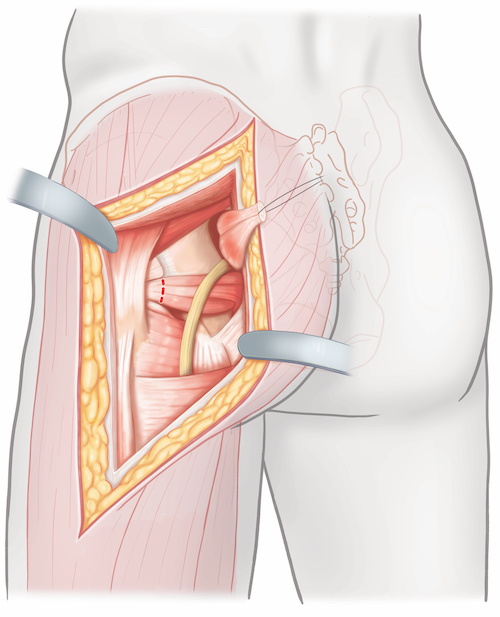
The gemelli and obturator internus tendons should next be identified and tagged as a group. The gemelli are muscular almost to their insertions on the femur. The obturator internus tendon is instead a distinct white tendon passing between the muscular gemelli. The obturator internus tendon is frequently covered by the muscle bellies of the gemelli, which fold over top the thin tendon and conceal it. Spreading the gemelli apart and visualizing the distinct tendon of the obturator internus will help confirm the surgeon's interpretation of the anatomy. These three muscles should be captured together by a single heavy suture and then the tendons incised 1cm from their insertions onto the proximal femur. Reflecting this group of tendons posteriorly retracts and protects the sciatic nerve out of the operative field. By following the obturator internus tendon posteriorly the surgeon will be able to locate the lesser sciatic notch; this is the primary place on the posterior column where tipped retractors may be placed to help expose the posterior column. However, even though retractor placement in the lesser sciatic notch should place the muscles of the gemelli and tendon of the obturator interns between the retractor and the sciatic nerve, caution must still be used. Tension on the nerve should be reduced by extending the hip and flexing the knee throughout the case. Additionally, any time the surgeon is not working along the posterior column the retractor in the lesser sciatic notch should be relaxed to reduce pressure on the sciatic nerve.
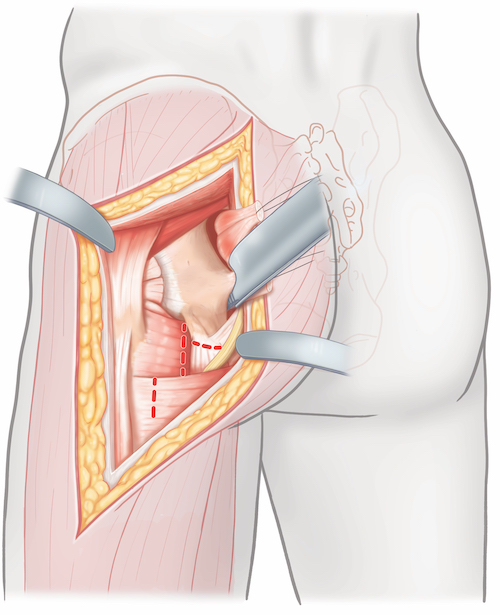
With the piriformis, gemelli, and obturator internus tendons/muscles reflected the bulk of the posterior column has been exposed, though periosteum may need to be elevated to allow for fracture reduction. If additional distal exposure is required the origins of the quadrates femoris and hamstring muscles may be elevated from the ischial tuberosity. This may be performed by tensioning these soft tissue attachments with a retractor, pulling distally, while elevating the origins of these muscles directly from bone with a knife or caughtery.
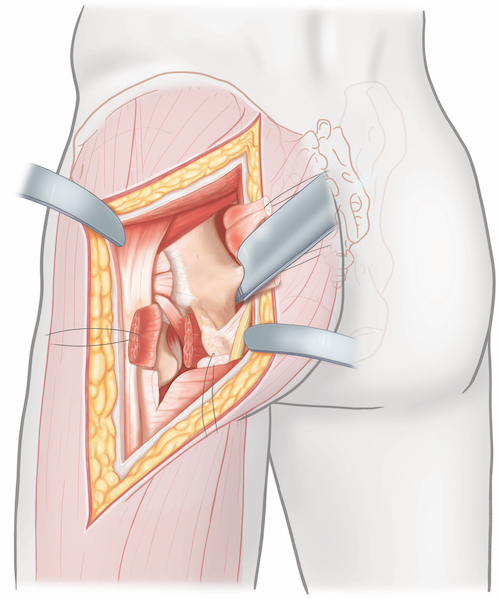
Tips, Tricks & Precautions
Tips:
Fractures of the posterior column and wall reduced and fixed through the posterior approach to the acetabulum are at a known risk of heterotopic ossification (HO). Formation of this new bone around the hip can lead to reduced range of motion and even ankylosis. Muscle that has been highly damaged by the original injury (often the gluteus medius) should be debrided intra-operatively, as this can be a source of HO formation in the post-operative period. If the patient is at a known high risk of HO due to a prior history of HO, head injury, spinal cord injury, or serious burn medical prophylaxis against its formation should be considered. A course of post-operative non-steroidal anti-inflammatories can be used for this purpose.
Precautions:
Great care must be taken to not apply undue tension or pressure on the sciatic nerve with this approach. Even in experienced hands there is a well known incidence of post-operative sciatic nerve palsy even if no overt injury occurs to the nerve during the procedure. All patients should be warned pre-operatively of this potential complication, particularly those with comminuted fractures of the posterior column or wall, where additional time retracting the sciatic nerve may be anticipated. Surgeons may reduce the risk to the nerve by correctly positioning the limb (hip extension, knee flexion), performing a wide exposure with 10-15cm proximal and distal limbs, correctly identifying the lesser sciatic notch for retractor placement, and allowing retractors to relax whenever work along the posterior column is not being directly performed.
Preservation of the blood supply to the femoral head from the medial femoral circumflex artery is crucial during posterior approaches for acetabular fractures. This artery runs just beneath the tendinous insertions of the muscles on the posterior proximal femur. The tendons of the piriformis, gemelli, and obturator internus muscles should be taken down from their insertions 1cm away from the bone of the proximal femur in order to protect this blood supply.
Objectives
At the end of this module, the learner should be able to:
1) List the indications for a posterior approach to the acetabulum
2) Understand the relevant anatomy of the posterior approach to the acetabulum
3) Discuss in detail the posterior approach to the acetabulum:
a. Patient positioning
b. Landmarks for incision
c. Relevant internervous planes
d. Sequence of the superficial and deep dissection
Indications
Indications for a Posterior Approach to the Acetabulum
1) Open reduction internal fixation of isolated fractures of the posterior wall and/or column of the acetabulum
The posterior approach to the acetabulum exposes the posterior column/wall of the acetabulum from the ischial tuberosity distally to a point 1-2cm proximal to the proximal extent of the greater sciatic notch and dome of the acetabulum. Further proximal dissection is prevented by the gluteus medius muscle, which originates from the external surface of the ilium. Through this exposure fractures which involve only the posterior column/wall can be visualized directly, and so reduced and fixed.
Posterior wall fractures
Posterior column fractures
Posterior column + posterior wall fractures
2) Open reduction internal fixation of a fracture which involves both the anterior and posterior columns of the acetabulum where the anterior column fracture may be reducible and fixed through a posterior approach.
Certain patterns that disrupt both columns do so in such a way that the reduction of the posterior column assists with reduction of the anterior column. This is true of fractures with a transverse pattern, where although both columns of the acetabulum have been fractured and separated away from the cephalad portion of the acetabulum, the caudal fragment consists of single fragment with both anterior and posterior column portions. As such, the reduction of one portion of the caudal fragment (posterior) may produce at least an approximate reduction of the other (anterior). Additionally, while the posterior approach only directly exposes the posterior column/wall, it also allows access by palpation to the medial surface of the posterior column (quadrilateral plate) and the lowest portions of the anterior column. The surgeon may place a finger or reduction clamp through the greater sciatic notch to feel and manipulate fracture lines along this surface as far anteriorly as the pubic root. As such, while fractures through the anterior column of the acetabulum cannot be directly visualized through this approach, some fractures through the anterior column can be reduced and fixed with the assistance of fluoroscopy, even if they cannot be directly visualized. Because of this, certain patterns of injury which disrupt both columns may still be addressed through a single posterior approach.
Transverse fractures
Transverse + posterior wall fractures
3) Open reduction internal fixation of the posterior column portion of an acetabular fracture which involves both columns and in which both columns require a direct approach.
Some acetabular fracture patterns which involve both the anterior and posterior columns are best managed with separate anterior and posterior approaches to reduce and fix the two columns of the acetabulum independently. These are patterns where the reduction and fixation of the less exposed column is not possible. For the posterior approach, this would be patterns where the anterior column is not able to be manipulated and fixed. T-type patterns are the typical example of this phenomena. Unlike in a transverse pattern, where the caudal fractured fragment consists of a single fragment with both the anterior and posterior columns attached, the anterior and posterior columns of the caudal portion are separated by a coronal plane fracture in a T-type pattern. As such, manipulation of the directly exposed posterior column cannot reliably produce even an approximate reduction of the anterior column. Instead, a separate anterior approach and direct reduction of the anterior column fragment may be required.
T-type fractures
Contra-Indications for a Posterior Approach to the Acetabulum
Some acetabular fracture patterns are clearly not amenable to a posterior approach. These include patterns which exclusively involve the anterior column/wall and so are better approached anteriorly:
Anterior column fractures
Anterior wall fractures
Additionally, just as there are acetabular fracture patterns which involve both columns that are frequently amenable to a single approach from posterior as described above, there are also patterns which involved both columns of the acetabulum that are typically best approached through a single, anterior approach. While these patterns have posterior column involvement, the posterior column can frequently be reduced and fixed through the same anterior approach used to address the anterior column:
Anterior column posterior hemitransverse fractures
Associated both column acetabular fractures
Anatomy
Internervous Plane:
The posterior approach to the acetabulum does not use a true internervous plane. During the superficial dissection the muscle of the Gluteus maximus, innervated by the inferior gluteal nerve, is split. The splitting of the Gluteus maximus, however, generally does not create significant deinnervation of this muscle. However, if the split is carried far medially the inferior gluteal neurovascular bundle can be encountered traveling on the undersurface of this muscle. If this bundle is damaged the blood supply and innervation of the Gluteus maximus distal to the split would be compromised.
INSERT PICTURE
The remainder of the dissection involves taking down a series of small muscles, often referred to together as the "short external rotators", from their insertions on the posterior aspect of the proximal femur. As these muscles are elevated by taking down their insertions from the femur in their tendinous regions their nerve supplies are quite safe.
INSERT PICTURE
Muscular Anatomy:
The superficial portion of the dissection involves the division of the iliotibial band distally over the lateral side of the proximal femur and the division of the fascia over the Gluteus maximus and the maximus muscle itself more proximally. Key to understanding this portion of the dissection is to realize that the fascia over the Gluteus maximus and the Iliotibial band are one continuous structure. The fascia over the Gluteus maximus muscle itself is often quite thin. Conversely, the fascia which makes up the iliotibial band is universally robust.
In the deep portion of the dissection the piriformis, superior gemellus, obturator internus, and inferior gemelli have their tendons incised near their insertions on the femur. A subtle but critical difference between a posterior approach done for acetabular open reduction internal fixation and a posterior approach down for arthroplasty, is in the way these tendons have their insertions taken down from near the back of the femur. When performing an arthroplasty the tendons of these short external rotators are typically taken down directly from bone. This is permissible since their is no plan for preservation of the femoral head during an arthroplasty. As such even though incising these tendons directly from bone disrupts the vascular supply to the femoral head, it will have no ill consequences for the outcome of the patient. The additional length of these tendons gained from taking them directly from bone also eases their repair during closure. The opposite is of course true when performing an acetabular open reduction and internal fixation. In these patient the femoral head is to be preserved, and so its blood supply (medial femoral circumflex) must not be disrupted. As such, the tendons of the short external rotators are incised 1cm from their insertions onto the femur, to preserve the femoral head blood supply which course beneath.
Once the tendons of the piriformis, superior gemellus, obturator internus, and inferior gemellus have been incised 1cm from their insertions they may be serially reflected, exposing progressively more of the posterior column. The specific relationship of each of these muscles to the posterior column allows the surgeon to understand precisely which portion of the posterior column they are viewing as each muscle is reflected and thus allow safe retractor placement:
Piriformis ---> Greater sciatic notch (passes through)
Superior Gemellus ---> Ischial spine (origin)
Obturator Internus ---> Lesser sciatic notch (passes through)
Inferior Gemellus ---> Cephalad portion of ischial tuberosity (origin)
Knowledge of the above sequence of muscles and their relationship to landmarks of the posterior column allows the surgeon to understand which portion of the posterior column they are visualizing. Identification of the obturator internus tendon between the two tendons of the gemelli also allows specifically for safe identification of the lesser sciatic notch; a safe place for retractor placement.
If more caudal exposure of the posterior column is required for fracture reduction and fixation this can be achieved by elevating muscle origins from the ischial tuberosity below the origin of the inferior gemellus. Specifically, the origin of the quadrates femoris and hamstring muscles can be elevated from proximal to distal to gain additional exposure.
Gluteus maximus:
Origin: Sacrotuberous ligament, posterior sacrum & coccyx, lumbar fascia, extenral surface of ilium from posterior gluteal line
Insertion: Gluteal tuberosity on posterior proximal femur, iliotibial band
Innervation: Inferior gluteal nerve
Action: Extends hip from flexion, external rotation of hip
INSERT PICTURE
Gluteus medius:
Origin: External surface of the ilium between posterior and anterior gluteal lines
Insertion: Greater trochanter
Innervation: Superior gluteal nerve
Action: Hip abduction
INSERT PICTURE
Gluteus minimus:
Origin: External surface of the ilium between anterior and inferior gluteal lines
Insertion: Greater trochanter deep to Gluteus medius
Innervation: Superior gluteal nerve
Action: Hip abduction
INSERT PICTURE
Piriformis:
Origin: Anterior surface of the sacrum and sacrotuberous ligament
Through: Greater sciatic notch
Insertion: Piriformis fossa
Innervation: Ventral rams of S1 & S2 (may combine to form "nerve to piriformis")
Action: Hip external rotation
INSERT PICTURE
Superior Gemellus:
Origin: Ischial spine
Insertion: Posterior border of greater trochanter
Innervation: Nerve to obturator internus
Action: Hip external rotation
INSERT PICTURE
Obturator Internus:
Origin: Internal surface of obturator membrane and foramen
Insertion: Posterior border of greater trochanter
Innervation: Nerve to obturator internus
Action: Hip external rotation
INSERT PICTURE
Inferior Gemellus:
Origin: Ischial tuberosity
Insertion: Posterior border of the greater trochanter
Innervation: Nerve to quadratus femoris
Action: Hip external rotation
INSERT PICTURE
Quadratus femoris:
Origin: Ischial tuberosity
Insertion: Quadrate tubercle of proximal femur
Innervation: Nerve to quadratus femoris
Action: Hip external rotation
INSERT PICTURE
Vascular Anatomy:
The primary vasculature of importance during a posterior approach to the acetabulum is that which supplies the femoral head. While the posterior approach to the hip for arthroplasty is similar in many ways to the posterior approach to the acetabulum used for acetabular fractures, the need for respect for this vascular supply is a critical difference. When a posterior approach is used for arthroplasty with the intent to replace the femoral head obviously no concern for the blood supply to the head is needed. When a posterior approach is performed to reduce and fix the acetabulum, however, this blood supply must be preserved, as disruption of the vasculature to the femoral head will lead to avascular necrosis and a poor result regardless of the reduction and fixation of the fractured acetabulum.
The medial femoral circumflex artery branches from the medial side of the profound femoris artery, itself a branch of the common femoral artery in the femoral triangle. The medial femoral circumflex passes posteriorly by first traveling between the iliopsoas and pectineus muscles. It then passes laterally between the adductor brevis and obturator externus muscles to reach the base of the femoral neck. Here it forms an anastomotic ring around the base of the femoral neck. The primary blood supply to the femoral neck then passes within the joint capsule up the posterior superior aspect of the neck to arrive at the femoral head.
INSERT PICTURES
Nervous Anatomy:
The primary nerve at risk during the posterior approach to the acetabulum is the sciatic nerve. Unlike a posterior approach to the hip for arthroplasty, where the sciatic nerve is typically not formally exposed, during a posterior acetabular exposure the sciatic nerve is identified and dissected out along its length to allow for safe access to the posterior column.
This nerve exits the greater sciatic notch and commonly enters the posterior thigh as it exits below the inferior border of the piriformis. Variations of the nerve, where a portion exits through or even above the superior border of the piriformis may also be observed. When the piriformis tendon is incised and the muscle belly reflected this exposes the sciatic nerve. The nerve is always surrounded by a vary amount of adipose and areolar tissue, and thus simply reflecting the piriformis does not usually make the sciatic nerve immediately apparent. Instead, careful dissection must be performed to expose the nerve from its surrounding tissues.
Once the sciatic nerve has been identified and exposed within the incision the gemelli muscles and obturator internus muscle can have their tendons incised and be reflected as a group. As these muscles are deep to the sciatic nerve, reflecting them covers and helps protect the nerve, drawing it away from the posterior column that needs exposure.
INSERT PICTURE
Position & Markings
Patient Positioning:
The posterior approach to the acetabulum can be performed with the patient either in the lateral or prone position. Isolated fractures of the posterior wall can be treated in either position. Fractures which involve the posterior column (posterior column, posterior column + posterior wall, transverse, transverse + posterior wall, "t"-type) may be best managed in the prone position. In the lateral position gravity causes the femoral head to push medially against the posterior column. As such, if the posterior column is fractured, gravity and the femoral head may work to displace the posterior column further, making the reduction more challenging. Placing the patient in the prone position avoids this phenomena. If the posterior column is intact, such as in an isolated posterior wall fracture, the force of gravity on the femoral head is less of a concern and the surgeon may chose whatever position they feel more comfortable.
Prone:
With the patient prone, the head should be placed is a well padded head-holder with the airway secured and the cervical spine in a neutral position. The torso is supported with two longitudinal bolsters, one on either side of the patient, running from the chest to the anterior superior iliac spines. The abdomen should hand free. The knees and the contralateral foot/ankle should be padded. The arms should be positioned with the shoulders abducted to just less than 90 degrees and flexed slightly forward with the forearms laying on arm boards. The entire operative lower extremity is draped into the field. This allows the limb to be manipulated during the operation and for the knee to be flexed to 90 degrees to reduce the tension on the sciatic nerve.
Lateral:
The patient is placed in the lateral position with the operative side up and held in place with rolled blankets along the torso and back. An axillary roll, placed just distal to the actual axilla, should be used. Both arms are out-stretched 90 degrees from the body at the shoulder; the bottom arm is supported by an arm board, the top arm with an arm holder or pillows placed between the arms. The down leg should be padded to protect bony prominences and the peroneal nerve at the knee.
A flat top radiolucent table, supported at the cephalad and cuadal ends and free in the middle, is used regardless of positioning. This allows for the necessary fluoroscopic imaging during the case.
Intra-op Imaging:
Intra-operative AP and Judet (45 degree oblique) views are required during the procedure.
On the AP view there are a series of six classically described landmarks that can be used to judge the position of various portions of the acetabulum:
Ilio-pectineal line ---> Anterior column
Ilio-ischial line ---> Posterior column
Anterior wall
Posterior wall
Acetabular Dome ---> Only the cephalad few millimeters of the actual dome
Teardrop ---> Non-anatomic structure produced by the subcotyloid fossa and quadrilateral surface
The Judet views consist of two views (obturator oblique and iliac oblique) designed to reveal additional information about the columns and walls of the acetabulum. The classic obturator oblique view is obtained by turning the patient 45 degrees by placing a bump under the affected side, effectively internally rotating the pelvis on the affected side. Similarly, the classic iliac oblique view is obtained by turing the patient 45 degrees by placing a bump under the unaffected side, effectively externally rotating the pelvis on the affected side. During surgery, moving the patient is not feasible, but rotating the fluoroscopy unit instead produces the same views. As such, the fluoroscopy arm can be "rolled-over" and "rolled-back" to generate 45 degree oblique views.
The obturator oblique view provides an on-fosse view of the obturator ring and a view down the long axis of the iliac wing. This view provides an excellent view of the inferior portion of the anterior column/wall and also brings the posterior wall into maximum view out from behind the remainder of the posterior column.
The iliac oblique view provides an on-fosse view of the superior portion of the anterior column and the entire posterior column.
Marking the Incision:
The incision consists of two limbs which joint together over the tip of the greater trochanter. The distal limb begins at the tip of the greater trochanter of the femur proximally and descends longitudinally in line with the palpable proximal femur for 10-15cm. The proximal limb begins at the tip of the greater trochanter and ascends obliquely towards the posterior superior iliac spine (PSIS) for 10-15cm. Though a large incision, it is required for safe exposure of the posterior column; smaller incisions and approaches risk tension on the sciatic nerve and post-operative nerve palsy.
Posterior Approach to the Acetabulum
Superficial Dissection:
The skin incision is made with a knife and may safely be taken down to the fascia over the Gluteus maximus and iliotibial band sharply. The goal is to come down squarely over the greater trochanter and proximal femur; in obese patients it is helpful to continue to palpate the femur as you dissect down to it. It is relatively easy in an obese patient to aim too posterior or anterior if this is not done, which requires creating a large dead-space at the level of the fascia to get the dissection back over the lateral aspect of the femur.
Once the fascial level has been reached the iliotibial band should be incised from the tip of the greater trochanter distally for the length of the skin incision. Care should be taken not to injure the underlying vastus lateralis muscle. Proximally, the fascia over the Gluteus maximus muscle should be incised in line with the fibers of this muscle and then the muscle itself split bluntly. This exposes the underlying Gluteus medius.
A bursa lies over the Gluteus medius, proximal femur, and Vastus lateralis. Excising this will help to better define the underlying anatomy.
Deep Dissection:
The deep portion of the dissection involves the identification of the piriformis, gemelli, obturator internus, and quadratus femoris and their reflection off the proximal femur. Internal rotation of the hip puts these structures on stretch and helps to identify their insertions on the proximal femur. Placing a retractor under the posterior edge of the gluteus medius and retracting this muscle anteriorly is an essential step in exposing the piriformis. This tendon is invariably a distinct white cord that runs below the Gluteus minimum muscle and above the remainder of the short external rotators. Its identification serves as a "light-house" during the deep portion of the dissection.
The piriformis should be tagged with a heavy suture. The tendon of the piriformis should then be incised 1cm from its insertion on to the femur. The piriformis is then reflected posteriorly. Dissection should continue carefully deep to the prior position of the piriformis until the sciatic nerve has been identified. It is frequently surrounded with significant areolar and adipose tissue. Once identified the sciatic nerve should be dissected out along its course from the greater sciatic notch until it disappears beneath the gemelli/obturator internus muscles.
The gemelli and obturator internus tendons should next be identified and tagged as a group. The gemelli are muscular almost to their insertions on the femur. The obturator internus tendon is instead a distinct white tendon passing between the muscular gemelli. The obturator internus tendon is frequently covered by the muscle bellies of the gemelli, which fold over top the thin tendon and conceal it. Spreading the gemelli apart and visualizing the distinct tendon of the obturator internus will help confirm the surgeon's interpretation of the anatomy. These three muscles should be captured together by a single heavy suture and then the tendons incised 1cm from their insertions onto the proximal femur. Reflecting this group of tendons posteriorly retracts and protects the sciatic nerve out of the operative field. By following the obturator internus tendon posteriorly the surgeon will be able to locate the lesser sciatic notch; this is the primary place on the posterior column where tipped retractors may be placed to help expose the posterior column. However, even though retractor placement in the lesser sciatic notch should place the muscles of the gemelli and tendon of the obturator interns between the retractor and the sciatic nerve, caution must still be used. Tension on the nerve should be reduced by extending the hip and flexing the knee throughout the case. Additionally, any time the surgeon is not working along the posterior column the retractor in the lesser sciatic notch should be relaxed to reduce pressure on the sciatic nerve.
With the piriformis, gemelli, and obturator internus tendons/muscles reflected the bulk of the posterior column has been exposed, though periosteum may need to be elevated to allow for fracture reduction. If additional distal exposure is required the origins of the quadrates femoris and hamstring muscles may be elevated from the ischial tuberosity. This may be performed by tensioning these soft tissue attachments with a retractor, pulling distally, while elevating the origins of these muscles directly from bone with a knife or caughtery.
Tips, Tricks & Precautions
Tips:
Fractures of the posterior column and wall reduced and fixed through the posterior approach to the acetabulum are at a known risk of heterotopic ossification (HO). Formation of this new bone around the hip can lead to reduced range of motion and even ankylosis. Muscle that has been highly damaged by the original injury (often the gluteus medius) should be debrided intra-operatively, as this can be a source of HO formation in the post-operative period. If the patient is at a known high risk of HO due to a prior history of HO, head injury, spinal cord injury, or serious burn medical prophylaxis against its formation should be considered. A course of post-operative non-steroidal anti-inflammatories can be used for this purpose.
Precautions:
Great care must be taken to not apply undue tension or pressure on the sciatic nerve with this approach. Even in experienced hands there is a well known incidence of post-operative sciatic nerve palsy even if no overt injury occurs to the nerve during the procedure. All patients should be warned pre-operatively of this potential complication, particularly those with comminuted fractures of the posterior column or wall, where additional time retracting the sciatic nerve may be anticipated. Surgeons may reduce the risk to the nerve by correctly positioning the limb (hip extension, knee flexion), performing a wide exposure with 10-15cm proximal and distal limbs, correctly identifying the lesser sciatic notch for retractor placement, and allowing retractors to relax whenever work along the posterior column is not being directly performed.
Preservation of the blood supply to the femoral head from the medial femoral circumflex artery is crucial during posterior approaches for acetabular fractures. This artery runs just beneath the tendinous insertions of the muscles on the posterior proximal femur. The tendons of the piriformis, gemelli, and obturator internus muscles should be taken down from their insertions 1cm away from the bone of the proximal femur in order to protect this blood supply.
Anterior Approach to the Hip
Anterior Approach to the Hip Video:
- Read Full Text
-
Objectives
At the end of this module, the learner should be able to:
1) List the indications for an anterior approach to the hip
2) Understand the relevant anatomy of the anterior approach to the hip
3) Discuss in detail the anterior approach to the hip, including:
-Patient positioning
-Landmarks for incision
-Relevant internervous planes
-Sequence of the superficial and deep dissection
Indications
Indications for an Anterior Approach to the Hip:
1) Femoral neck fracture open reduction and internal fixation
2) Drainage and debridement of a septic hip joint
3) Total hip arthroplasty
4) Open reduction internal fixation of amenable femoral head fractures
Anatomy
Internervous Plane:
The anterior approach to the hip is the only approach which utilizes a true inter nervous plane. This plane runs between the superior gluteal nerve and the femoral nerve, both superficially and deeply.
Superficially this plane is between the Tensor Fascia Lata, innervated by the superior gluteal nerve, and the Sartorius, innervated by the femoral nerve.
INSERT PICTURE
During the deep dissection the internervous plane remains the same, although the intermuscular plane changes. The deep plane is between the Gluteus Medius, innervated by the superior gluteal nerve, and the Rectus Femoris, innervated by the femoral nerve.
INSERT PICTURE
Muscular Anatomy:
The superficial muscles encountered during the anterior approach to the hip are the sartorius and the tensor fascia lata. Both of these muscles are either partially or completely covered by the fascia lata. While the sartorius is covered by this fascia only on it superficial surface the tensor fascia lata is enclosed by this fascia completely. Posteriorly the fascia lata covers the superficial surface of the gluteus medius and encloses the gluteus maxiumus.
INSERT PICTURE
Sartorius:
Origin: Anterior superior iliac spine (ASIS)
Insertion: Pes Anserinus (proximal medial tibial plateau)
Innervation: Femoral nerve
Action: Flexes, abducts, and externally rotated hip. Flexes knee.
INSERT PICTURE
Tensor fascia lata:
Origin: ASIS and anterior portion of iliac crest
Insertion: Iliotibial band, which in turn inserts onto Gerdy's tubercle on the anterior-lateral proximal tibia.
Innervation: Superior gluteal nerve
Action: Flexes, abducts, and internally rotates hip.
INSERT PICTURE
The muscles encountered during the deep dissection for an anterior approach to the hip include the gluteus medius, the rectus femoris, the vastus lateralis, and the iliopsoas. The gluteus medius lies superior and lateral to the joint capsule as it comes to insert on the greater trochanter. The vastus lateralis lies inferior and lateral to the joint capsule as it originates in part from the intertrochanteric line on the anterior aspect of the proximal femur. The rectus femoris lies directly anterior to the joint capsule, with its reflected head arising from the superior rim of the acetabulum itself and the more substantial direct head arising from the anterior inferior iliac spine (AIIS). Finally, the iliopsoas tendon is located just medial to the rectus femoris on its way to inserting on the lesser trochanter.
INSERT PICTURE
Gluteus Medius:
Origin: Between the anterior and posterior gluteal lines on the external surface of the ilium
Insertion: Greater trochanter
Innervation: Superior gluteal nerve
Action: Hip abduction
INSERT PICTURE
Vastus lateralis:
Origin: Intertrochanteric line and vastus ridge of the proximal femur, linea aspera
Insertion: Patella by the quadriceps tendon
Innervation: Femoral nerve
Action: Knee extension
INSERT PICTURE
Rectus femoris:
Origin: Anterior inferior iliac spine (AIIS) (direct head), superior rim of acetabulum (reflected head).
Insertion: Patella by the quadriceps tendon
Innervation: Femoral nerve
Action: Hip flexion, knee extension
INSERT PICTUR
Iliopsoas:
Origin: The iliac portion arises from the internal iliac fossa of the ilium. The psoas major portion arrises from the transverse processes of the lumbar spine.
Insertion: Lesser trochanter of the femur
Innervation: Ventral primary rami of lumbar spine (psoas major) and femoral nerve (iliacus)
Action: Hip flexion
INSERT PICTURE
Vascular Anatomy:
The primary vascular structure of interest during the anterior approach to the hip is the ascending branch of the lateral femoral circumflex artery and its associated accompanying veins. These vessels are encountered just deep to the sartorius and tensor fascia lata once this fascial plane has been developed during the superficial dissection.
INSERT PICTURE
Nervous Anatomy:
The primary nerve of interest during the anterior approach is the lateral femoral cutaneous nerve. This structure is a sensory nerve only, supplying the skin of the anterior and lateral proximal thigh. It arises from the lumbar plexus and exits along with the iliopsoas under the inguinal ligament through the lacuna musculorum just medial to the ASIS. It travels on the anterior surface of the sartorius muscle as it heads distally and does not pierce the fascia lata until it is several centimeters below the inguinal ligament. This nerve is explicitly encountered during a traditional anterior approach which develops the plane between the sartorius and tensor facia lata. The nerve is typically not encountered during a contemporary approach where the superficial dissection is performed through the fascial sheath that encloses the tensor fascia lata rather than by developing the plane between the superficial muscles.
INSERT PICTURE
Positioning & Markings
Patient Positioning:
For all surgical indications the typical positioning of the patient is supine.
For fracture cases either a radiolucent flat top table with distal skeletal traction or a fracture table with traction applied through the table are common set ups:
Flat top table with traction:
The patient is placed supine on the table. A small bump (rolled blanket) is placed under the ipsilateral hip; this elevates the hip slightly to allow for lateral imaging with fluoroscopy. The limb distally is placed on a foam ramp or stack of blankets. Distal femoral skeletal traction is applied via a ~2mm wire and tension bow attached to 10-20 lbs of weight. The ipsilateral upper extremity is placed over the chest while the contralateral extremity is abducted away from the body at 90 degrees.
Fracture table:
The patient is placed supine on the table. A perineal post is placed in the groin to stabilize the patient and allow for the application of traction. The foot of the operative lower extremity is placed in the table's traction boot. The contralateral extremity may be either lowered and padded and tapped to the middle post of the table or flexed and abducted away with a well-leg holder. The ipsilateral upper extremity is placed over the chest while the contralateral extremity is abducted away from the body at 90 degrees.
Intra-op Imaging:
The fluoroscopy machine comes in from the contralateral side at approximately 45 degree angle from the table with the machines base distal. With the flat top table set up the AP image often requires ~ 10 degrees of "roll-back" tilt to account for the bump under the hip and ~10 degrees of "inlet" tilt (towards patient's head) to account for the position of the leg on a ramp. The lateral image is likewise not obtained by simply making the fluoroscopy machine parallel with the floor. Due to the anteversion of the femoral neck, this image is typically obtained with the flouroscopy machine ~10-20 degrees shy of a full lateral.
Marking the Incision:
Palpate the patient's anterior superior iliac spine (ASIS). The incision begins ~2cm inferior and ~2cm lateral to this landmark. It extends for ~10cm towards the lateral border of the patella. The incision may be extended in either direction as required.
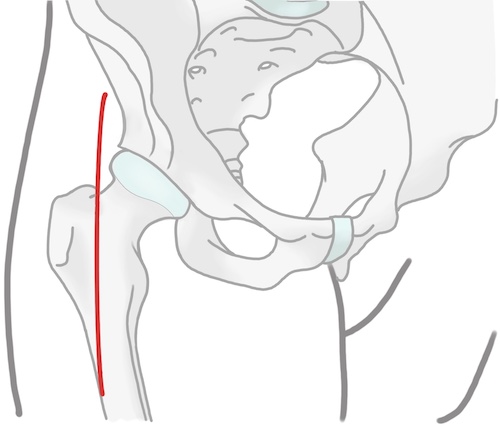
Anterior Approach to the Hip
Superficial Dissection:
A knife is used to make the skin incision and continue down through the subcutaneous tissue to the level of the fascia lata. Scarpa's superficial fascia may be encountered as a seemingly distinct fascia layer prior to encountering the true fascia lata. However this layer is thin, has no perforating vessels, and deep to it is a second layer of fat. Once through Scarpa's fascia the subcutaneous tissue below is then gently cleared from the underlying fascia lata for several centimeters to facilitate closure later. The fascia lata overlying the tensor fascia lata is identified by its fibers traveling laterally and distally towards the iliotibial band, and by its thinness allowing the red hue of the underlying muscle to show through. In distinction, the fascia over the sartorius has fibers which are directed medially towards this muscle's insertion at the pes anserinus; this fascia is distinctly thicker and less translucent, making it more white than that overlying the tensor fascia lata. Once identified, the fascia over the tensor fascia lata is incised inline with the skin incision.
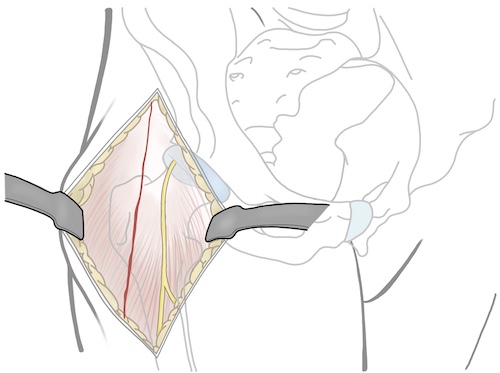
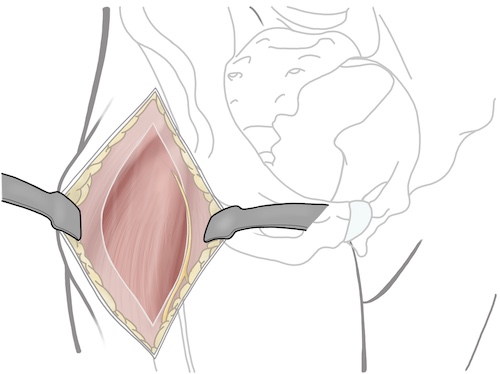
The muscle belly of the tensor fascia lata may be gently swept off the undersurface of the fascia and then the entire muscle may be retracted laterally. This exposes the deeper portion of the investing fascia around the tensor fascia lata muscle. Also located at this level is the ascending brach of the lateral femoral circumflex and its accompanying veins. If identified these should be cauterized to prevent bleeding. The deep portion of the investing fascia is now incised.
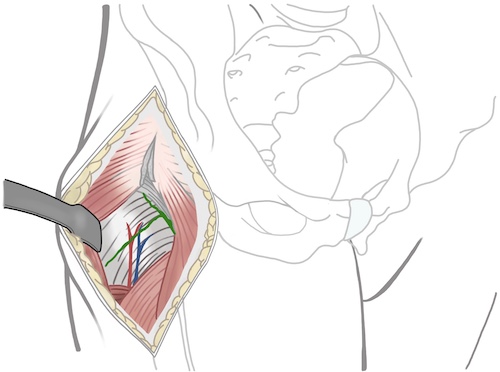
Deep Dissection:
The deep portion of the dissection requires lateral retraction of the gluteus medius muscle and medial retraction of the rectus femoris. Proximally, elevation of the reflected head from the anterior and superior joint capsule may be required. If wider exposure is required the conjoint tendon (the confluence of the direct and indirect heads of the rectus slightly distal to the ASIS) may be incised just distal to the AIIS, leaving a cuff of tendon for later repair. Additionally, the iliopsoas tendon passes over the medial portion of the femoral neck on its course towards the lesser trochanter. Medial retraction of this muscle may be required to expose the joint capsule.
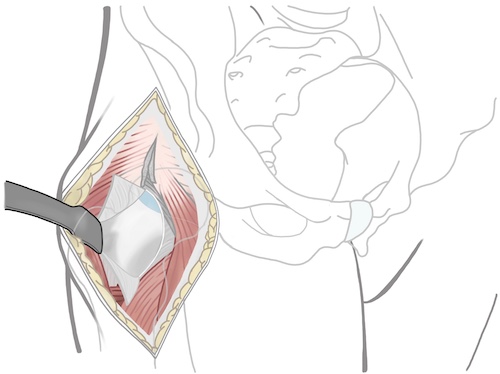
Fluoroscopy may be a useful adjunct for precisely identifying the femoral neck and rim of the acetabulum, particularly in fracture cases where the anatomy may be distorted. Once this is determined a T or H shaped capsulotomy may be performed to expose the underlying femoral head and neck. For femoral neck fracture cases the T may have its horizontal limb at either the base of the femoral neck for basicervical patterns or along the rim of the acetabulum for subcapital patterns. For the vast majority of femoral neck fractures, adequate exposure can be obtained with a T-shaped capsulotomy with the horizontal limb at the base of the femoral neck.
Tips, Tricks & Precautions
Precautions:
Lateral femoral cutaneous nerve:
This cutaneous nerve may be encountered during the superficial portion of the dissection. It travels first on the sartorius muscle belly below the level of the fascia and then between the sartorius and tensor fascia lata once it pierces the fascia more distally. Injury may be from transection or undue tension during a procedure. There is considerable variability in the fascial exit and pathway of the lateral femoral cutaneous nerve.
Ascending branch of the lateral femoral circumflex artery:
Encountered during the deep portion of the dissection, this artery and its associated veins should be identified once the tensor fascia lata has been retracted laterally. If injured unintentionally it may lead to brisk bleeding deep in the wound.
Objectives
At the end of this module, the learner should be able to:
1) List the indications for an anterior approach to the hip
2) Understand the relevant anatomy of the anterior approach to the hip
3) Discuss in detail the anterior approach to the hip, including:
-Patient positioning
-Landmarks for incision
-Relevant internervous planes
-Sequence of the superficial and deep dissection
Indications
Indications for an Anterior Approach to the Hip:
1) Femoral neck fracture open reduction and internal fixation
2) Drainage and debridement of a septic hip joint
3) Total hip arthroplasty
4) Open reduction internal fixation of amenable femoral head fractures
Anatomy
Internervous Plane:
The anterior approach to the hip is the only approach which utilizes a true inter nervous plane. This plane runs between the superior gluteal nerve and the femoral nerve, both superficially and deeply.
Superficially this plane is between the Tensor Fascia Lata, innervated by the superior gluteal nerve, and the Sartorius, innervated by the femoral nerve.
INSERT PICTURE
During the deep dissection the internervous plane remains the same, although the intermuscular plane changes. The deep plane is between the Gluteus Medius, innervated by the superior gluteal nerve, and the Rectus Femoris, innervated by the femoral nerve.
INSERT PICTURE
Muscular Anatomy:
The superficial muscles encountered during the anterior approach to the hip are the sartorius and the tensor fascia lata. Both of these muscles are either partially or completely covered by the fascia lata. While the sartorius is covered by this fascia only on it superficial surface the tensor fascia lata is enclosed by this fascia completely. Posteriorly the fascia lata covers the superficial surface of the gluteus medius and encloses the gluteus maxiumus.
INSERT PICTURE
Sartorius:
Origin: Anterior superior iliac spine (ASIS)
Insertion: Pes Anserinus (proximal medial tibial plateau)
Innervation: Femoral nerve
Action: Flexes, abducts, and externally rotated hip. Flexes knee.
INSERT PICTURE
Tensor fascia lata:
Origin: ASIS and anterior portion of iliac crest
Insertion: Iliotibial band, which in turn inserts onto Gerdy's tubercle on the anterior-lateral proximal tibia.
Innervation: Superior gluteal nerve
Action: Flexes, abducts, and internally rotates hip.
INSERT PICTURE
The muscles encountered during the deep dissection for an anterior approach to the hip include the gluteus medius, the rectus femoris, the vastus lateralis, and the iliopsoas. The gluteus medius lies superior and lateral to the joint capsule as it comes to insert on the greater trochanter. The vastus lateralis lies inferior and lateral to the joint capsule as it originates in part from the intertrochanteric line on the anterior aspect of the proximal femur. The rectus femoris lies directly anterior to the joint capsule, with its reflected head arising from the superior rim of the acetabulum itself and the more substantial direct head arising from the anterior inferior iliac spine (AIIS). Finally, the iliopsoas tendon is located just medial to the rectus femoris on its way to inserting on the lesser trochanter.
INSERT PICTURE
Gluteus Medius:
Origin: Between the anterior and posterior gluteal lines on the external surface of the ilium
Insertion: Greater trochanter
Innervation: Superior gluteal nerve
Action: Hip abduction
INSERT PICTURE
Vastus lateralis:
Origin: Intertrochanteric line and vastus ridge of the proximal femur, linea aspera
Insertion: Patella by the quadriceps tendon
Innervation: Femoral nerve
Action: Knee extension
INSERT PICTURE
Rectus femoris:
Origin: Anterior inferior iliac spine (AIIS) (direct head), superior rim of acetabulum (reflected head).
Insertion: Patella by the quadriceps tendon
Innervation: Femoral nerve
Action: Hip flexion, knee extension
INSERT PICTUR
Iliopsoas:
Origin: The iliac portion arises from the internal iliac fossa of the ilium. The psoas major portion arrises from the transverse processes of the lumbar spine.
Insertion: Lesser trochanter of the femur
Innervation: Ventral primary rami of lumbar spine (psoas major) and femoral nerve (iliacus)
Action: Hip flexion
INSERT PICTURE
Vascular Anatomy:
The primary vascular structure of interest during the anterior approach to the hip is the ascending branch of the lateral femoral circumflex artery and its associated accompanying veins. These vessels are encountered just deep to the sartorius and tensor fascia lata once this fascial plane has been developed during the superficial dissection.
INSERT PICTURE
Nervous Anatomy:
The primary nerve of interest during the anterior approach is the lateral femoral cutaneous nerve. This structure is a sensory nerve only, supplying the skin of the anterior and lateral proximal thigh. It arises from the lumbar plexus and exits along with the iliopsoas under the inguinal ligament through the lacuna musculorum just medial to the ASIS. It travels on the anterior surface of the sartorius muscle as it heads distally and does not pierce the fascia lata until it is several centimeters below the inguinal ligament. This nerve is explicitly encountered during a traditional anterior approach which develops the plane between the sartorius and tensor facia lata. The nerve is typically not encountered during a contemporary approach where the superficial dissection is performed through the fascial sheath that encloses the tensor fascia lata rather than by developing the plane between the superficial muscles.
INSERT PICTURE
Positioning & Markings
Patient Positioning:
For all surgical indications the typical positioning of the patient is supine.
For fracture cases either a radiolucent flat top table with distal skeletal traction or a fracture table with traction applied through the table are common set ups:
Flat top table with traction:
The patient is placed supine on the table. A small bump (rolled blanket) is placed under the ipsilateral hip; this elevates the hip slightly to allow for lateral imaging with fluoroscopy. The limb distally is placed on a foam ramp or stack of blankets. Distal femoral skeletal traction is applied via a ~2mm wire and tension bow attached to 10-20 lbs of weight. The ipsilateral upper extremity is placed over the chest while the contralateral extremity is abducted away from the body at 90 degrees.
Fracture table:
The patient is placed supine on the table. A perineal post is placed in the groin to stabilize the patient and allow for the application of traction. The foot of the operative lower extremity is placed in the table's traction boot. The contralateral extremity may be either lowered and padded and tapped to the middle post of the table or flexed and abducted away with a well-leg holder. The ipsilateral upper extremity is placed over the chest while the contralateral extremity is abducted away from the body at 90 degrees.
Intra-op Imaging:
The fluoroscopy machine comes in from the contralateral side at approximately 45 degree angle from the table with the machines base distal. With the flat top table set up the AP image often requires ~ 10 degrees of "roll-back" tilt to account for the bump under the hip and ~10 degrees of "inlet" tilt (towards patient's head) to account for the position of the leg on a ramp. The lateral image is likewise not obtained by simply making the fluoroscopy machine parallel with the floor. Due to the anteversion of the femoral neck, this image is typically obtained with the flouroscopy machine ~10-20 degrees shy of a full lateral.
Marking the Incision:
Palpate the patient's anterior superior iliac spine (ASIS). The incision begins ~2cm inferior and ~2cm lateral to this landmark. It extends for ~10cm towards the lateral border of the patella. The incision may be extended in either direction as required.
Anterior Approach to the Hip
Superficial Dissection:
A knife is used to make the skin incision and continue down through the subcutaneous tissue to the level of the fascia lata. Scarpa's superficial fascia may be encountered as a seemingly distinct fascia layer prior to encountering the true fascia lata. However this layer is thin, has no perforating vessels, and deep to it is a second layer of fat. Once through Scarpa's fascia the subcutaneous tissue below is then gently cleared from the underlying fascia lata for several centimeters to facilitate closure later. The fascia lata overlying the tensor fascia lata is identified by its fibers traveling laterally and distally towards the iliotibial band, and by its thinness allowing the red hue of the underlying muscle to show through. In distinction, the fascia over the sartorius has fibers which are directed medially towards this muscle's insertion at the pes anserinus; this fascia is distinctly thicker and less translucent, making it more white than that overlying the tensor fascia lata. Once identified, the fascia over the tensor fascia lata is incised inline with the skin incision.
The muscle belly of the tensor fascia lata may be gently swept off the undersurface of the fascia and then the entire muscle may be retracted laterally. This exposes the deeper portion of the investing fascia around the tensor fascia lata muscle. Also located at this level is the ascending brach of the lateral femoral circumflex and its accompanying veins. If identified these should be cauterized to prevent bleeding. The deep portion of the investing fascia is now incised.
Deep Dissection:
The deep portion of the dissection requires lateral retraction of the gluteus medius muscle and medial retraction of the rectus femoris. Proximally, elevation of the reflected head from the anterior and superior joint capsule may be required. If wider exposure is required the conjoint tendon (the confluence of the direct and indirect heads of the rectus slightly distal to the ASIS) may be incised just distal to the AIIS, leaving a cuff of tendon for later repair. Additionally, the iliopsoas tendon passes over the medial portion of the femoral neck on its course towards the lesser trochanter. Medial retraction of this muscle may be required to expose the joint capsule.
Fluoroscopy may be a useful adjunct for precisely identifying the femoral neck and rim of the acetabulum, particularly in fracture cases where the anatomy may be distorted. Once this is determined a T or H shaped capsulotomy may be performed to expose the underlying femoral head and neck. For femoral neck fracture cases the T may have its horizontal limb at either the base of the femoral neck for basicervical patterns or along the rim of the acetabulum for subcapital patterns. For the vast majority of femoral neck fractures, adequate exposure can be obtained with a T-shaped capsulotomy with the horizontal limb at the base of the femoral neck.
Tips, Tricks & Precautions
Precautions:
Lateral femoral cutaneous nerve:
This cutaneous nerve may be encountered during the superficial portion of the dissection. It travels first on the sartorius muscle belly below the level of the fascia and then between the sartorius and tensor fascia lata once it pierces the fascia more distally. Injury may be from transection or undue tension during a procedure. There is considerable variability in the fascial exit and pathway of the lateral femoral cutaneous nerve.
Ascending branch of the lateral femoral circumflex artery:
Encountered during the deep portion of the dissection, this artery and its associated veins should be identified once the tensor fascia lata has been retracted laterally. If injured unintentionally it may lead to brisk bleeding deep in the wound.
Lateral Approach to the Hip
- Read Full Text
-
Objectives
At the end of this module, the learner should be able to:
1) List the indications for a lateral approach to the hip
2) Understand the relevant anatomy of the lateral approach to the hip
3) Discuss in detail the lateral approach to the hip, including:
-Patient positioning
-Landmarks for incision
-Relevant internervous planes
-Sequence of the superficial and deep dissection
Indications
Indications for an Posterior Approach to the Hip:
1) Hemiarthroplasty for femoral neck fracture
2) Total hip arthroplasty for femoral neck fracture or arthritis
Anatomy
Internervous Plane:
The lateral approach uses an internervous plane superficially, but is a muscle splitting approach during the deep dissection. Superficially, the shared investing fascia that surrounds the tensor fascia lata (superior gluteal nerve) and the Gluteus maximus (inferior gluteal nerve) may be split between these two muscles. During the deep portion of the dissection the anterior 1/3rd of the gluteus medius/minimus (superior gluteal nerve) and vastus lateralis (femoral nerve) are divided from the posterior 2/3rds of these muscles.
Muscular Anatomy:
The superficial portion of the dissection involves the division of the iliotibial band distally over the lateral side of the proximal femur and the division of the fascia lata between the tensor fascia lata and the Gluteus maximus more proximally. Key to understanding this portion of the dissection is to realize that the fascia surrounding the tensor fascia lata and the Gluteus maximus and the Iliotibial band are one continuous structure. The fascia lata proximally is often quite thin. Conversely, the fascia which makes up the iliotibial band is universally robust.
Gluteus maximus:
Origin: Sacrotuberous ligament, posterior sacrum & coccyx, lumbar fascia, extenral surface of ilium from posterior gluteal line
Insertion: Gluteal tuberosity on posterior proximal femur, iliotibial band
Innervation: Inferior gluteal nerve
Action: Extends hip from flexion, external rotation of hip
Gluteus medius:
Origin: External surface of the ilium between posterior and anterior gluteal lines
Insertion: Greater trochanter
Innervation: Superior gluteal nerve
Action: Hip abduction
Gluteus minimus:
Origin: External surface of the ilium between anterior and inferior gluteal lines
Insertion: Greater trochanter deep to Gluteus medius
Innervation: Superior gluteal nerve
Action: Hip abduction
Tensor fascia lata:
Origin: ASIS and anterior portion of iliac crest
Insertion: Iliotibial band, which in turn inserts onto Gerdy's tubercle on the anterior-lateral proximal tibia.
Innervation: Superior gluteal nerve
Action: Flexes, abducts, and internally rotates hip.
Vastus lateralis:
Origin: Intertrochanteric line and vastus ridge of the proximal femur, linea aspera
Insertion: Patella by the quadriceps tendon
Innervation: Femoral nerve
Action: Knee extension
Vascular Anatomy:
There are no major vascular structures which are routinely exposed or in danger during the lateral approach to the hip. That said, like all approaches, an errant retractor placed on the anterior rim of the acetabulum could place the common femoral vessels in danger.
Nervous Anatomy:
Similarly, no major nerves are routinely exposed or in danger during the lateral approach to the hip. However, the sciatic nerve could be compressed by an errant retractor placed too posteriorly along the posterior column.
Positioning & Markings
Patient Positioning:
For all surgical indications the typical positioning of the patient is lateral. Especially if a total hip arthroplasty is being performed, the pelvis should be held rigidly in place to allow for proper positioning of the acetabular component. Typically one positioner is placed on the sacrum and another is placed on the pubic symphysis. An axillary roll, placed just distal to the actual axilla, should be used. Both arms are out-stretched 90 degrees from the body; the bottom arm is supported by an arm board, the top arm with an arm holder of pillows placed between the arms. The surgeon should insure that none of the devices used to hold the patient in position will impede the necessary movements of the limb, such as flexion, adduction, and internal rotation to dislocate the hip during an arthroplasty procedure.
A standard cantilever table is typically adequate for this approach and its indications. If the surgeon desires the use of intra-operative fluoroscopy a flat top table is preferable.
Intra-op Imaging:
An intra-operative AP view of the pelvis is possible with any table and standard radiography. AP and lateral views of the femur may be obtained in a similar manner by rotation of the limb. Such imaging can be used to check component positioning and size.
Marking the Incision:
A lateral approach uses a straight, lateral incision. The incision is centered at the tip of the greater trochanter. Distally is travels in line with the longitudinal axis of the femur for ~5-7cm. Proximally it also extends in line with femur for 3-5cm above the tip of the greater trochanter.
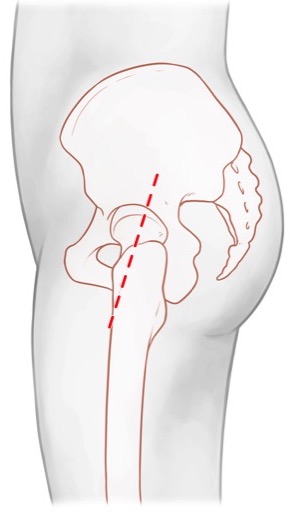
Lateral Approach to the Hip
Superficial Dissection:
The skin incision is made with a knife and may safely be taken down to the fascia over the Gluteus maximus and iliotibial band sharply. The goal is to come down squarely over the greater trochanter and proximal femur; in obese patients it is helpful to continue to palpate the femur as you dissect down to it. It is relatively easy in an obese patient to aim too posterior or anterior if this is not done, which requires creating a large dead-space at the level of the fascia to get the dissection back over the lateral aspect of the femur.
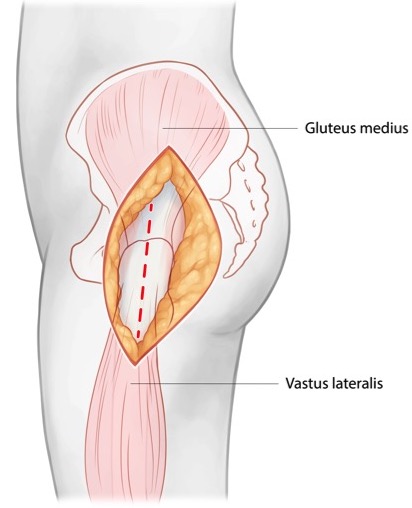
Once the fascial level has been reached the fascia lata proximally and iliotibial band distally should be incised in line with the skin incision and the palpable femur. Care should be taken not to injure the underlying vastus lateralis and Gluteus medius muscles. A bursa lies over the Gluteus medius, proximal femur, and Vastus lateralis. Incising this and sweeping it posteriory will help to better define the underlying anatomy.
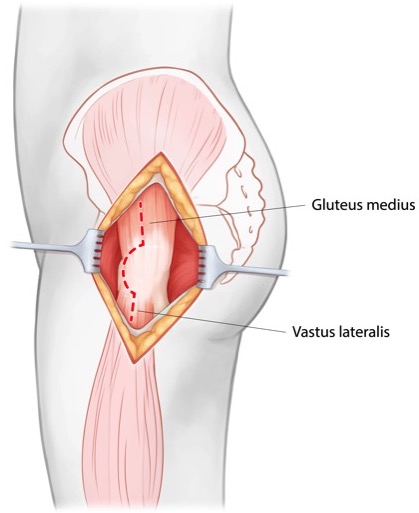
Deep Dissection:
The extent of the Gluteus medius should be palpated to define its anterior and posterior borders. The junction between the anterior 1/3rd and posterior 2/3rds of the muscle should be determined. Often there is a small dimple in this region on the tip of the greater trochanter that can also be palpated as a guide. Similarly, the junction of the anterior 1/3rd and posterior 2/3rds of the vastus lateralis should be determined. A soft tissue sleeve including the anterior 1/3rd of the Gluteus medius, Gluteus minimus, vastus lateralis, and intervening soft tissue on the proximal femur should then be elevated heading in an anterior direction on the proximal femur.
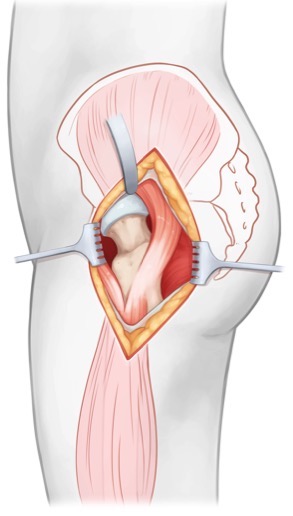
When the approach is being used for total hip arthroplasty in the arthritic hip it is often possible to define a plane between the muscles being elevated off the anterior-lateral aspect of the proximal femur as described above and the thickened joint capsule. If this is the case the sleeve of the anterior 1/3rd of the Gluteus medius, Gluteus minimus, and vastus lateralis may be retracted anteriorly exposing the underlying hip capsule. The capsule may then be incised in a H-pattern, with the longitudinal limb parallel to the axis of the femoral neck and each transverse limb parallel to the rim of the acetabulum and intertrochanteric line respectively.
When performing this approach for hemiarthroplasty for a femoral neck fracture the capsule is often not as robust, in which case elevating the capsules along with the muscular sleeve is a simple alternative.
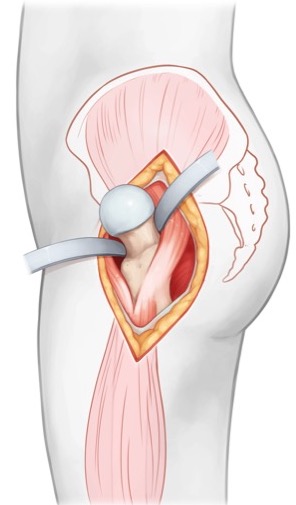
Tips, Tricks & Precautions
Tips:
Indications: Compared with the posterior approach the lateral approach appears to have a reduced dislocation rate with arthroplasty procedures. As such, it is a well indicated approach in individuals with an elevated risk of dislocation, such as the demented, low demand, elderly.
Posterior Approach to the Hip
Posterior Approach to the Hip Video:
- Read Full Text
-
Objectives
At the end of this module, the learner should be able to:
1) List the indications for a posterior approach to the hip
2) Understand the relevant anatomy of the posterior approach to the hip
3) Discuss in detail the posterior approach to the hip, including:
-Patient positioning
-Landmarks for incision
-Relevant internervous planes
-Sequence of the superficial and deep dissection
Indications
Indications for an Posterior Approach to the Hip:
1) Hemiarthroplasty for femoral neck fracture
2) Total hip arthroplasty for femoral neck fracture or arthritis
Anatomy
Internervous Plain:
The posterior approach to the hip does not use a true internervous plane. During the superficial dissection the muscle of the Gluteus maximus, innervated by the inferior gluteal nerve, is split. The splitting of the Gluteus maximus, however, generally does not create significant deinnervation of this muscle. However, if the split is carried unusually far medially the inferior gluteal neurovascular bundle can be encounter traveling on the undersurface of this muscle. If this bundle is damaged the blood supply and innervation of the Gluteus maximus distal to the split would be compromised.
The remainder of the dissection involves taking down a series of small muscles, often referred to together as the "short external rotators", directly from their insertions on the posterior aspect of the proximal femur. As these muscles are elevated directly off bone their nerve supplies are quite safe.
Muscular Anatomy:
The superficial portion of the dissection involves the division of the iliotibial band distally over the lateral side of the proximal femur and the division of the fascia over the Gluteus maximus and the maximus muscle itself more proximally. Key to understanding this portion of the dissection is to realize that the fascia over the Gluteus maximus and the Iliotibial band are one continuous structure. The fascia over the Gluteus maximus muscle itself is often quite thin. Conversely, the fascia which makes up the iliotibial band is universally robust.
Gluteus maximus:
Origin: Sacrotuberous ligament, posterior sacrum & coccyx, lumbar fascia, extenral surface of ilium from posterior gluteal line
Insertion: Gluteal tuberosity on posterior proximal femur, iliotibial band
Innervation: Inferior gluteal nerve
Action: Extends hip from flexion, external rotation of hip
Gluteus medius:
Origin: External surface of the ilium between posterior and anterior gluteal lines
Insertion: Greater trochanter
Innervation: Superior gluteal nerve
Action: Hip abduction
Gluteus Minimus:
Origin: External surface of the ilium between anterior and inferior gluteal lines
Insertion: Greater trochanter deep to Gluteus medius
Innervation: Superior gluteal nerve
Action: Hip abduction
Piriformis:
Origin: Anterior surface of the sacrum and sacrotuberous ligament
Through: Greater sciatic notch
Insertion: Piriformis fossa
Innervation: Ventral rams of S1 & S2 (may combine to form "nerve to piriformis")
Action: Hip external rotation
Superior Gemellus:
Origin: Ischial spine
Insertion: Posterior border of greater trochanter
Innervation: Nerve to obturator internus
Action: Hip external rotation
Obturator Internus:
Origin: Internal surface of obturator membrane and foramen
Insertion: Posterior border of greater trochanter
Innervation: Nerve to obturator internus
Action: Hip external rotation
Inferior Gemellus:
Origin: Ischial tuberosity
Insertion: Posterior border of the greater trochanter
Innervation: Nerve to quadratus femoris
Action: Hip external rotation
Quadratus femoris:
Origin: Ischial tuberosity
Insertion: Quadrate tubercle of proximal femur
Innervation: Nerve to quadratus femoris
Action: Hip external rotation
Vascular Anatomy:
The major vascular supply to the lower extremity, the common femoral artery, is an anterior structure and so is not routinely in danger from a posterior approach. However, if the posterior approach is performed while attempting a total hip arthroplasty, caution should be taken while placing retractors around the acetabulum. A retractor placed on the anterior wall of the acetabulum that strays too medial and away from bone could make contact with the common femoral artery/vein even if these vessels are not directly in the surgical field.
The superior and inferior gluteal vessels exit the greater sciatic notch on the superior and inferior borders of the piriformis muscle, respectively. When performing typical primary arthroplasty procedures for fracture or arthritis these vessels are not routinely visualized or in danger. However, if exposure is required more posterior/medially during the procedure, such as to visualize the posterior column of the acetabulum during a revision arthroplasty or to address a posterior column fracture line encountered intra-operatively, these vessels may be put at risk. The superior gluteal artery exits directly adjacent to bone along the superior border of the greater sciatic notch just medial to the angle of the notch. As the piriformis and short external rotators are reflected this artery becomes exposed and at risk. The inferior gluteal artery is actually covered and protected by the Gemelli and Obturator internus muscles as they are reflected. However this artery and vein may be injured as the Gluteus maximus is split to gain additional posterior/medial exposure, as they ride along the deep surface of this muscle.
Nervous Anatomy:
The primary nerve at risk during the posterior approach to the hip is the sciatic nerve. This nerve exits the greater sciatic notch and commonly enters the posterior thigh as it exits below the inferior border of the piriformis. Variations of the nerve, where a portion exits through or even above the superior border of the piriformis may also be observed.
The sciatic nerve is not commonly exposed during primary arthroplasty procedures, but is none the less at risk due to its proximity. Reflection of the Piriformis muscle exposes the sciatic nerve, as the nerve runs deep to this muscle. Reflection of the remainder of the short external rotators protects the nerve, as the nerve also gets reflected as the nerve runs superficial to this group of muscles.
The superior and inferior gluteal nerves follow the courses of their respective vessels as discussed above. As such they are also at risk whenever the same named vessels are at risk. Injury to these nerves weakens the Gluteus maximus (inferior gluteal nerve) and/or the hip abductors (superior gluteal nerve supply to the Gluteus medius & minimus and tensor fascia lata).
Positioning & Markings
Patient Positioning:
For all surgical indications the typical positioning of the patient is lateral. Especially if a total hip arthroplasty is being performed, the pelvis should be held rigidly in place to allow for proper positioning of the acetabular component. Typically one positioner is placed on the sacrum and another is placed on the pubic symphysis. An axillary roll, placed just distal to the actual axilla, should be used. Both arms are out-stretched 90 degrees from the body; the bottom arm is supported by an arm board, the top arm with an arm holder of pillows placed between the arms. The surgeon should insure that none of the devices used to hold the patient in position will impede the necessary movements of the limb, such as flexion, adduction, and internal rotation to dislocate the hip during an arthroplasty procedure.
A standard cantilever table is typically adequate for this approach and its indications. If the surgeon desires the use of intra-operative fluoroscopy a flat top table is preferable.
Intra-op Imaging:
An intra-operative AP view of the pelvis is possible with any table and standard radiography. AP and lateral views of the femur may be obtained in a similar manner by rotation of the limb. Such imaging can be used to check component positioning and size.
Marking the Incision:
A traditional posterior approach uses a curved, posterior-lateral incision. The incision is centered at the tip of the greater trochanter. Distally is travels in line with the longitudinal axis of the femur for ~7cm. Proximally it curves posteriorly in line with the fibers of the gluteus maximus heading towards the posterior superior iliac spine (PSIS) for a distal of ~5cm.
Contemporary minimally invasive approaches use a straight incision. This incision is again centered at the tip go the greater trochanter and is ~10cm in length. 1/3rd of the incision is proximal to the tip of the trochanter and 2/3rd is distal. Rather than being parallel to the longitudinal axis of the femur, the incision is angled slightly, such that it travels from posterior superior to anterior inferior.
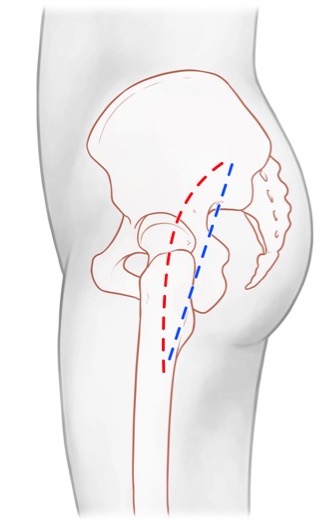
Posterior Approach Hip
Superficial Dissection:
The skin incision is made with a knife and may safely be taken down to the fascia over the Gluteus maximus and iliotibial band sharply. The goal is to come down squarely over the greater trochanter and proximal femur; in obese patients it is helpful to continue to palpate the femur as you dissect down to it. It is relatively easy in an obese patient to aim too posterior or anterior if this is not done, which requires creating a large dead-space at the level of the fascia to get the dissection back over the lateral aspect of the femur.
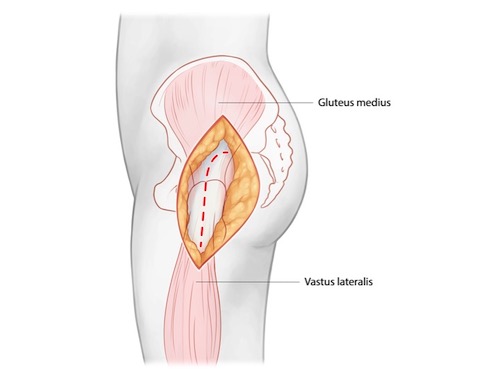
Once the fascial level has been reached the iliotibial band should be incised from the tip of the greater trochanter distally for the length of the skin incision. Care should be taken not to injure the underlying vastus lateralis muscle. Proximally, the fascia over the Gluteus maximus muscle should be incised in line with the fibers of this muscle and then the muscle itself split bluntly. This exposes the underlying Gluteus medius.
A bursa lies over the Gluteus medius, proximal femur, and Vastus lateralis. Incising this and swelling it posteriory will help to better define the underlying anatomy.
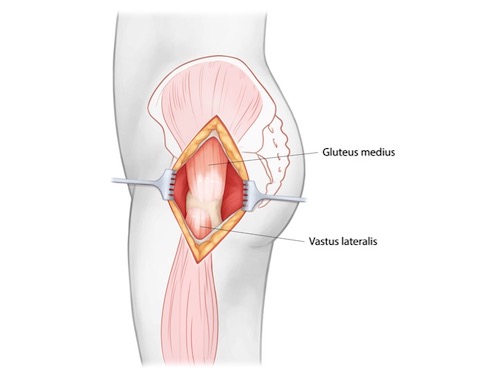
Deep Dissection:
The deep portion of the dissection involves the identification of the piriformis, gemelli, obturator internus, and quadratus femoris and their reflection off the proximal femur. Internal rotation of the hip puts these structures on stretch and helps to identify their insertions on the proximal femur. Placing a retractor under the posterior edge of the gluteus medius and retracting this muscle anteriorly is an essential step in exposing the piriformis. This tendon is invariably a distinct white cord that runs below the Gluteus minimum muscle and above the remainder of the short external rotators. Its identification serves as a "light-house" during the deep portion of the dissection.
The piriformis should be tagged with a heavy suture. The gemelli and obturator internus tendons may be tagged with the piriformis or separately. When performing an arthroplasty procedure, where preservation of the blood supply to the femoral head is of no importance, the piriformis and short external rotators below it may be taken from their insertions into the proximal femur directly off bone. If using the posterior approach for some purpose where the femoral head will not be removed and replaced, then these tendons should be incised from their insertions 1cm away from bone to preserve the blood supply to the femoral head.
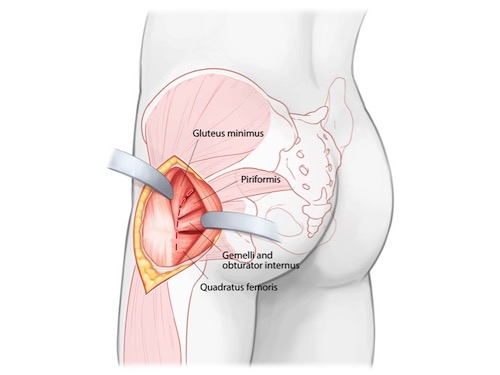
When performing an arthroplasty, the capsule, piriformis, and short external rotators may all be taken down together in a single, L -shaped sleeve for later repair. This is done by incising down to bone (femoral neck) between the piriformis tendon and Gluteus minimus muscle for a distance 1.5-2cm medial to the tip of the greater trochanter and then once the piriformis fossa is reached turning the dissection along the posterior lateral aspect of the femur. All soft tissue may be taken directly off bone while pulling tension on the tagging suture. This dissection is taken down to the level of the lesser trochanter and iliopsoas tendon which insert on it. The iliopsoas should not be routinely taken down from its insertion on the lesser trochanter. For an arthroplasty procedure, the lesser trochanter and iliopsoas tendon typically serve as a land mark to guide the femoral neck resection level.

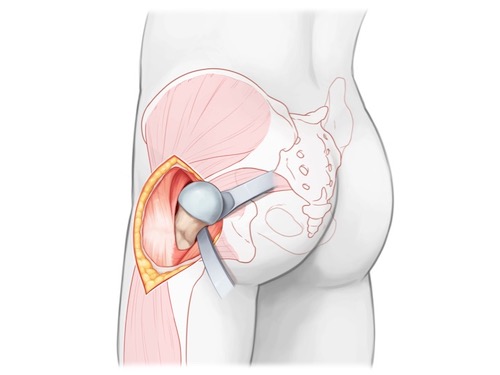
Tips, Tricks, & Precautions
Precautions:
Sciatic nerve:
Although it is in extremely close proximity, the sciatic nerve is typically not exposed during the posterior approach to the hip when performing arthroplasty procedures. It is merely reflected away from the field as the short external rotators are retracted away from the proximal femur. The nerve may be at risk if the oblique limb of the incision to take down the piriformis and capsule, between the piriformis and Gluteus minimum, is carried too far medially. The nerve may also be compressed by a retractor that strays away from the margins of the acetabulum's posterior wall and instead has its tip placed along the posterior column or within the greater sciatic notch.
Objectives
At the end of this module, the learner should be able to:
1) List the indications for a posterior approach to the hip
2) Understand the relevant anatomy of the posterior approach to the hip
3) Discuss in detail the posterior approach to the hip, including:
-Patient positioning
-Landmarks for incision
-Relevant internervous planes
-Sequence of the superficial and deep dissection
Indications
Indications for an Posterior Approach to the Hip:
1) Hemiarthroplasty for femoral neck fracture
2) Total hip arthroplasty for femoral neck fracture or arthritis
Anatomy
Internervous Plain:
The posterior approach to the hip does not use a true internervous plane. During the superficial dissection the muscle of the Gluteus maximus, innervated by the inferior gluteal nerve, is split. The splitting of the Gluteus maximus, however, generally does not create significant deinnervation of this muscle. However, if the split is carried unusually far medially the inferior gluteal neurovascular bundle can be encounter traveling on the undersurface of this muscle. If this bundle is damaged the blood supply and innervation of the Gluteus maximus distal to the split would be compromised.
The remainder of the dissection involves taking down a series of small muscles, often referred to together as the "short external rotators", directly from their insertions on the posterior aspect of the proximal femur. As these muscles are elevated directly off bone their nerve supplies are quite safe.
Muscular Anatomy:
The superficial portion of the dissection involves the division of the iliotibial band distally over the lateral side of the proximal femur and the division of the fascia over the Gluteus maximus and the maximus muscle itself more proximally. Key to understanding this portion of the dissection is to realize that the fascia over the Gluteus maximus and the Iliotibial band are one continuous structure. The fascia over the Gluteus maximus muscle itself is often quite thin. Conversely, the fascia which makes up the iliotibial band is universally robust.
Gluteus maximus:
Origin: Sacrotuberous ligament, posterior sacrum & coccyx, lumbar fascia, extenral surface of ilium from posterior gluteal line
Insertion: Gluteal tuberosity on posterior proximal femur, iliotibial band
Innervation: Inferior gluteal nerve
Action: Extends hip from flexion, external rotation of hip
Gluteus medius:
Origin: External surface of the ilium between posterior and anterior gluteal lines
Insertion: Greater trochanter
Innervation: Superior gluteal nerve
Action: Hip abduction
Gluteus Minimus:
Origin: External surface of the ilium between anterior and inferior gluteal lines
Insertion: Greater trochanter deep to Gluteus medius
Innervation: Superior gluteal nerve
Action: Hip abduction
Piriformis:
Origin: Anterior surface of the sacrum and sacrotuberous ligament
Through: Greater sciatic notch
Insertion: Piriformis fossa
Innervation: Ventral rams of S1 & S2 (may combine to form "nerve to piriformis")
Action: Hip external rotation
Superior Gemellus:
Origin: Ischial spine
Insertion: Posterior border of greater trochanter
Innervation: Nerve to obturator internus
Action: Hip external rotation
Obturator Internus:
Origin: Internal surface of obturator membrane and foramen
Insertion: Posterior border of greater trochanter
Innervation: Nerve to obturator internus
Action: Hip external rotation
Inferior Gemellus:
Origin: Ischial tuberosity
Insertion: Posterior border of the greater trochanter
Innervation: Nerve to quadratus femoris
Action: Hip external rotation
Quadratus femoris:
Origin: Ischial tuberosity
Insertion: Quadrate tubercle of proximal femur
Innervation: Nerve to quadratus femoris
Action: Hip external rotation
Vascular Anatomy:
The major vascular supply to the lower extremity, the common femoral artery, is an anterior structure and so is not routinely in danger from a posterior approach. However, if the posterior approach is performed while attempting a total hip arthroplasty, caution should be taken while placing retractors around the acetabulum. A retractor placed on the anterior wall of the acetabulum that strays too medial and away from bone could make contact with the common femoral artery/vein even if these vessels are not directly in the surgical field.
The superior and inferior gluteal vessels exit the greater sciatic notch on the superior and inferior borders of the piriformis muscle, respectively. When performing typical primary arthroplasty procedures for fracture or arthritis these vessels are not routinely visualized or in danger. However, if exposure is required more posterior/medially during the procedure, such as to visualize the posterior column of the acetabulum during a revision arthroplasty or to address a posterior column fracture line encountered intra-operatively, these vessels may be put at risk. The superior gluteal artery exits directly adjacent to bone along the superior border of the greater sciatic notch just medial to the angle of the notch. As the piriformis and short external rotators are reflected this artery becomes exposed and at risk. The inferior gluteal artery is actually covered and protected by the Gemelli and Obturator internus muscles as they are reflected. However this artery and vein may be injured as the Gluteus maximus is split to gain additional posterior/medial exposure, as they ride along the deep surface of this muscle.
Nervous Anatomy:
The primary nerve at risk during the posterior approach to the hip is the sciatic nerve. This nerve exits the greater sciatic notch and commonly enters the posterior thigh as it exits below the inferior border of the piriformis. Variations of the nerve, where a portion exits through or even above the superior border of the piriformis may also be observed.
The sciatic nerve is not commonly exposed during primary arthroplasty procedures, but is none the less at risk due to its proximity. Reflection of the Piriformis muscle exposes the sciatic nerve, as the nerve runs deep to this muscle. Reflection of the remainder of the short external rotators protects the nerve, as the nerve also gets reflected as the nerve runs superficial to this group of muscles.
The superior and inferior gluteal nerves follow the courses of their respective vessels as discussed above. As such they are also at risk whenever the same named vessels are at risk. Injury to these nerves weakens the Gluteus maximus (inferior gluteal nerve) and/or the hip abductors (superior gluteal nerve supply to the Gluteus medius & minimus and tensor fascia lata).
Positioning & Markings
Patient Positioning:
For all surgical indications the typical positioning of the patient is lateral. Especially if a total hip arthroplasty is being performed, the pelvis should be held rigidly in place to allow for proper positioning of the acetabular component. Typically one positioner is placed on the sacrum and another is placed on the pubic symphysis. An axillary roll, placed just distal to the actual axilla, should be used. Both arms are out-stretched 90 degrees from the body; the bottom arm is supported by an arm board, the top arm with an arm holder of pillows placed between the arms. The surgeon should insure that none of the devices used to hold the patient in position will impede the necessary movements of the limb, such as flexion, adduction, and internal rotation to dislocate the hip during an arthroplasty procedure.
A standard cantilever table is typically adequate for this approach and its indications. If the surgeon desires the use of intra-operative fluoroscopy a flat top table is preferable.
Intra-op Imaging:
An intra-operative AP view of the pelvis is possible with any table and standard radiography. AP and lateral views of the femur may be obtained in a similar manner by rotation of the limb. Such imaging can be used to check component positioning and size.
Marking the Incision:
A traditional posterior approach uses a curved, posterior-lateral incision. The incision is centered at the tip of the greater trochanter. Distally is travels in line with the longitudinal axis of the femur for ~7cm. Proximally it curves posteriorly in line with the fibers of the gluteus maximus heading towards the posterior superior iliac spine (PSIS) for a distal of ~5cm.
Contemporary minimally invasive approaches use a straight incision. This incision is again centered at the tip go the greater trochanter and is ~10cm in length. 1/3rd of the incision is proximal to the tip of the trochanter and 2/3rd is distal. Rather than being parallel to the longitudinal axis of the femur, the incision is angled slightly, such that it travels from posterior superior to anterior inferior.
Posterior Approach Hip
Superficial Dissection:
The skin incision is made with a knife and may safely be taken down to the fascia over the Gluteus maximus and iliotibial band sharply. The goal is to come down squarely over the greater trochanter and proximal femur; in obese patients it is helpful to continue to palpate the femur as you dissect down to it. It is relatively easy in an obese patient to aim too posterior or anterior if this is not done, which requires creating a large dead-space at the level of the fascia to get the dissection back over the lateral aspect of the femur.
Once the fascial level has been reached the iliotibial band should be incised from the tip of the greater trochanter distally for the length of the skin incision. Care should be taken not to injure the underlying vastus lateralis muscle. Proximally, the fascia over the Gluteus maximus muscle should be incised in line with the fibers of this muscle and then the muscle itself split bluntly. This exposes the underlying Gluteus medius.
A bursa lies over the Gluteus medius, proximal femur, and Vastus lateralis. Incising this and swelling it posteriory will help to better define the underlying anatomy.
Deep Dissection:
The deep portion of the dissection involves the identification of the piriformis, gemelli, obturator internus, and quadratus femoris and their reflection off the proximal femur. Internal rotation of the hip puts these structures on stretch and helps to identify their insertions on the proximal femur. Placing a retractor under the posterior edge of the gluteus medius and retracting this muscle anteriorly is an essential step in exposing the piriformis. This tendon is invariably a distinct white cord that runs below the Gluteus minimum muscle and above the remainder of the short external rotators. Its identification serves as a "light-house" during the deep portion of the dissection.
The piriformis should be tagged with a heavy suture. The gemelli and obturator internus tendons may be tagged with the piriformis or separately. When performing an arthroplasty procedure, where preservation of the blood supply to the femoral head is of no importance, the piriformis and short external rotators below it may be taken from their insertions into the proximal femur directly off bone. If using the posterior approach for some purpose where the femoral head will not be removed and replaced, then these tendons should be incised from their insertions 1cm away from bone to preserve the blood supply to the femoral head.
When performing an arthroplasty, the capsule, piriformis, and short external rotators may all be taken down together in a single, L -shaped sleeve for later repair. This is done by incising down to bone (femoral neck) between the piriformis tendon and Gluteus minimus muscle for a distance 1.5-2cm medial to the tip of the greater trochanter and then once the piriformis fossa is reached turning the dissection along the posterior lateral aspect of the femur. All soft tissue may be taken directly off bone while pulling tension on the tagging suture. This dissection is taken down to the level of the lesser trochanter and iliopsoas tendon which insert on it. The iliopsoas should not be routinely taken down from its insertion on the lesser trochanter. For an arthroplasty procedure, the lesser trochanter and iliopsoas tendon typically serve as a land mark to guide the femoral neck resection level.
Tips, Tricks, & Precautions
Precautions:
Sciatic nerve:
Although it is in extremely close proximity, the sciatic nerve is typically not exposed during the posterior approach to the hip when performing arthroplasty procedures. It is merely reflected away from the field as the short external rotators are retracted away from the proximal femur. The nerve may be at risk if the oblique limb of the incision to take down the piriformis and capsule, between the piriformis and Gluteus minimum, is carried too far medially. The nerve may also be compressed by a retractor that strays away from the margins of the acetabulum's posterior wall and instead has its tip placed along the posterior column or within the greater sciatic notch.
Femur - Lateral Approach
- Read Full Text
-
Objectives
At the end of this module, the learner should be able to:
1) List the indications for an lateral approach to the femur
2) Understand the relevant anatomy of the lateral approach to the femur
3) Discuss in detail the lateral approach to the femur:
-Patient positioning
-Landmarks for incision
-Relevant internervous planes
-Sequence of the superficial and deep dissection
Indications
Indications for the lateral approach to the femur:
1) Open reduction +/- internal fixation of femur fractures: intertrochanteric, subtrochanteric, shaft, and supracondylar.
2) Fasciotomy of the anterior and posterior compartments of the thigh
Anatomy
Internervous Plain:
No true internervous plain is used to approach the lateral side of the femur. The vastus lateralis, innervated by the femoral nerve, covers the entire lateral surface of the femur. This muscle is elevated from the lateral intermuscular septum, thus maintaining its innervation.
Muscular Anatomy:
The primary muscle encountered during a lateral approach to the femur is the vastus lateralis. If the approach is extended proximal to the vastus ridge of the femur then the gluteus medius muscle will also be encountered. If the approach is used as part of a compartment release then the posterior compartment of the thigh will also be accessed through this approach, exposing the lateral hamstrings muscle, the biceps femoris.
Vastus lateralis:
Origin: Intertrochanteric line and vastus ridge of the proximal femur, linea aspera
Insertion: Patella by the quadriceps tendon
Innervation: Femoral nerve
Action: Knee extension
Gluteus medius:
Origin: External surface of the ilium between posterior and anterior gluteal lines
Insertion: Greater trochanter
Innervation: Superior gluteal nerve
Action: Hip abduction
Biceps femoris:
Origin:
Long head: Ischial tuberosity
Short head: Linea aspera and lateral supracondylar line
Insertion: Fibular head
Innervation:
Long head: Tibial portion of sciatic nerve
Short head: Common peroneal portion of the sciatic nerve
Action: Hip extension (long head only), knee flexion
Vascular Anatomy:
While no major vessels travel within the anterior compartment of the thigh, significant bleeding can be encounter when elevating the vastus lateralis from the lateral intermuscular septum due to a substantial number of large caliber perforating vessels from the profound femoris system. As such, the vastus lateralis should be gently and carefully elevated to allow for identification and ligation of this perforating vessels as they are come across.
Nervous Anatomy:
No significant nerves are encountered during the lateral approach to the femur.
Position, Imaging, Markings
Patient Positioning:
The details of the patient's position will vary substantially depending on the region of the femur being addressed and the specific operation being performed. Generally speaking, however, patient will be positioned either supine or lateral decubitus during a lateral approach to the femur.
For the supine position the patient is frequently place on the table with a bump under the hip to internally rotate the limb into anatomic position. This bump also serves to slightly elevate the operative hip above the non-operative hip, which allows for intra-operative lateral imaging to be obtained. Similarly, the operative limb may be placed on a wedge shaped ramp or stack of blankets to elevate the shaft and distal portion of the femur for lateral imaging. The arm ipsilateral to the operative leg is placed across the patients body while the contralateral arm is placed out-stretched on an arm board.
For the lateral position the patient is placed on their side with the operative extremity up and the torso and pelvis secured to maintain this position. Multiple methods may be used to secure the torso and pelvis, however a simple blanket roll placed on the anterior and posterior sides of the patient is a simple and universally available method to maintain a lateral position. The down, non-operative limb is covered with blankets to produce a surface to rest the operative limb. The non-operative limb should be flexed forward and the operative limb extended back to reduce the overlap of the two extremities which will interfere with intra-operative imaging.
Intra-op Imaging:
For most procedures an AP and lateral image of the affected area of the femur is all that is required. A table that allows for this imaging (one where the base of the table will not be in the way) should be selected.
For the proximal femur an AP image may be defined as the image which maximally brings the femoral neck into profile; it is thus the image which eliminates the normal anteversion of the neck. The lateral image is one in which the profile of the neck and profile of the proximal femoral shaft are parallel.
For the distal femur an AP image may be defined as the image in which the patella is centered over the distal femoral metaphysis. The lateral image is one is which the posterior femoral condyles are perfectly over-lapped.
Marking the Incision:
The incision should be centered over the portion of the femur in need of exposure and be extended proximally and distally as much as is required to perform the procedure. The incision is simply placed on the lateral aspect of the palpable femur in line with the diaphysis.
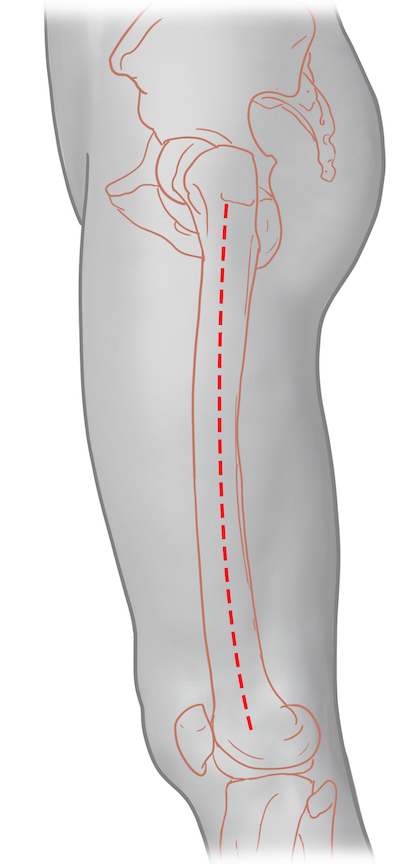
Lateral Approach to the Femur
Superficial Dissection:
The skin incision is made with a knife and may be safely taken down to the iliotibial band sharply, as no structures of concern reside in the subcutaneous tissue. In very obese patients it is worth pausing during the dissection to palpate the femur as dissection is taken deeper to insure the approach remains in line with the femur and not considerably anterior or posterior to it. The iliotibial band is a robust, white longitudinal band which is easily identifiable. Small flaps should be raised anteriorly and posteriorly once the iliotibial band is encountered to allow for a simplified closure. The iliotibial band is then incised in line with the skin incision and retracted anteriorly and posteriorly, exposing the underlying vastus lateralis muscle.

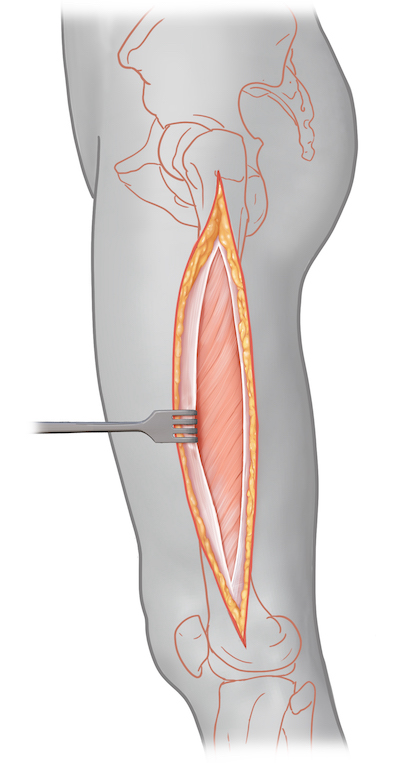
Deep Dissection:
The vastus lateralis muscle should be retracted anteriorly with a rake-like retractor and the posterior edge of the iliotibial band should be followed until the lateral intermuscular septum is encountered. Once this is found the entire vastus lateralis muscle cab be elevated from the intermuscular septum en masse with a combination of blunt and sharp dissection. Taking the time to elevate the entire vastus laterals muscle together, rather than going through the muscle, has the advantages of reducing muscle damage and innervation and also producing a cleaner, less bloody dissection plain.
As the dissection courses more medially towards the femur itself a series of perforating vessels are encountered traveling between the anterior and posterior compartments of the thigh. These may be seen with the naked eye or are often first appreciated as a resistance to blunt dissection when elevating the vastus lateralis muscle from the septum. Identifying and ligating these perforating vessels reduces bleeding and can prevent an injured vessel from retracting beneath the septum and required additional dissection through the septum to control.
Once the femoral bone has been encountered retractors can be placed under the vastus lateralis and over the anterior surface of the femur to complete the exposure of the lateral side of the femur.
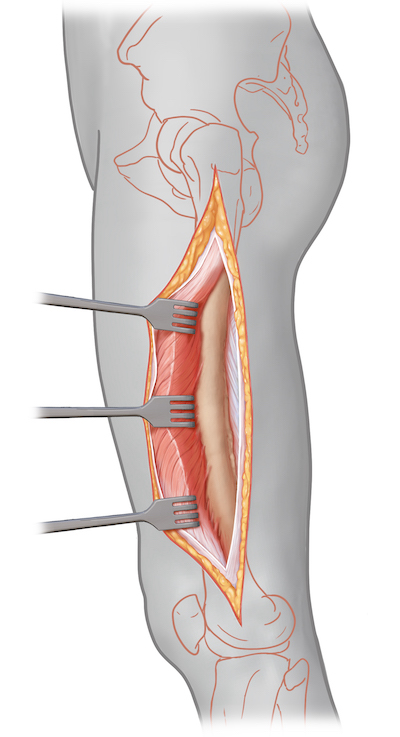
Fasciotomy of the anterior and posterior compartments of the thigh:
The above description adequately describes the approach needed for a fasciotomy to be performed of the anterior compartment of the thigh. The approach would of course be modified to expose the entire anterior compartment through a 20-30cm incision and would not require complete elevation of the vastus lateralis from the intermuscular and femur. The approach can also be used to decompress the posterior compartment in one of two fashions:
1) The superficial dissection can be continued above the level of the iliotibial band and fascia more posteriorly by developing a larger posterior full thickness flap. A longitudinal incision below the lateral intermuscular septum through fascia can then be made to release the posterior compartment.
2) Alternatively, once the anterior compartment has been entered the vastus lateralis may be elevated off the lateral intermuscular septum enough to allow for a longitudinal incision to be made in the septum itself to enter and release the posterior compartment.
Tips, Tricks & Precautions
Precautions:
The lateral approach to the femur is extremely safe with few anatomic structures at risk. The single exception to this is the perforating vessels encountered traveling between the anterior and posterior compartments of the thigh through the intermuscular septum. These may be seen or felt as areas of resistance to blunt dissection of the vastus lateralis off the intermuscular septum. They should be identified and ligated to prevent unintended, sometime serious, bleeding.
Tips:
Although certain procedures may require an open reduction of the fracture, much of the time fixation can be applied in a less invasive manner with the use of percutaneous incisions and intra-operative imaging. As an example, an open reduction of a supracondylar femur fracture might require a 10cm incision for reduction and placement of the distal portion of the fixation into the metaphysis, while the more proximal fixation into the diaphysis can be performed by making small incisions over individual holes in the plate using intra-operative imaging. This reduces the biologic insult to the bone.
Tibial Plateau - Anterior Lateral Approach
Anterior Lateral Approach - Drs. Herring and Morshed
- Read Full Text
-
Objectives
At the end of this module, the learner should be able to:
1) List the indications for an anterior lateral approach to the tibial plateau
2) Understand the relevant anatomy of the anterior lateral approach to the tibial plateau
3) Discuss in detail the anterior lateral approach to the tibial plateau, including:
-Patient positioning
-Landmarks for incision
-Relevant internervous plains
-Sequence of the superficial and deep dissection
Indications
Indications for an Anterior Lateral Approach to the Tibial Plateau:
1) Open reduction internal fixation of unicondylar, lateral tibial plateau fractures
2) Open reduction and internal fixation of the lateral condylar portion of a bicondylar plateau fracture which is being managed with "dual incisions" (anterior lateral and posterior medial approaches)
3) Open reduction internal fixation of some extra-articular proximal tibial fractures
Anatomy
Internervous Plain:
There is no internervous plain used during this approach. The proximal portions of the muscles of the anterior compartment of the leg are elevated and retracted en masse along with their nerovascular bundle (deep peroneal nerve, anterior tibial artery) to avoid deinnervation.
Muscular Anatomy:
The iliotibial band is the thick aponeurotic distal extent of the fascia of the gluteus maximus and tensor fascia lata. It travels down the lateral aspect of the thigh and comes to insert at Gerdy's tubercle on the proximal anterior lateral tibia. This thick fascial layer is continuous distally with the much thinner fascia which covers the anterior compartment of the leg. During the dissection this continuous layer is incised and elevated from its robust attachment to Gerdy's tubercle, revealing the distal extent of the vastus lateralis, the lateral joint capsule, and the muscles of the anterior compartment beneath.
Tibialis Anterior:
Origin: Lateral condyle of the proximal tibia, proximal 1/2 of the lateral surface of the proximal tibia, interosseus membrane
Insertion: Medial cuneiform and 1st metatarsal base
Innervation: Deep peroneal nerve
Action: Ankle dorsiflexion and inversion
Extensor Hallucis Longus:
Origin: Middle 1/3rd of the anterior fibula, interosseus membrane
Insertion: Dorsal base of the distal phalanx of the hallux
Innervation: Deep peroneal nereve
Action: Extends hallux at interphalangeal and metatarsal-phalangeal joints, ankle dorsiflexion
Extensor Digitorum Longus:
Origin: Superior 1/3rd of anterior fibula, interosseus membrane, lateral condyle of tibia
Insertion: Dorsal base of the middle phalanx of lesser digits
Innervation: Deep peroneal nerve
Action: Extends digits at proximal interphalangeal and metatarsal-phalangeal joints, ankle dorsiflexion
Peroneus Teritus:
Origin: Inferior 1/3rd of the anterior fibula, interosseus membrane
Insertion: Dorsal 5th metatarsal base
Innervation: Deep peroneal nerve
Action: Ankle dorsiflexion and eversion
Vascular Anatomy:
The primary vascular bundle at theoretical risk during this approach is the anterior tibial artery and its accompanying veins. This artery originates in the popliteal fossa and passes into the anterior compartment of the leg via a round opening in the proximal portion of the interosseus membrane. It then continues distally between the tibialis anterior muscle and the extensor hallucis longus muscle. As long as the entire anterior compartment is elevated en masse from the proximal tibia this artery should be safely retracted away from the operative approach and should not be routinely identified during the course of the dissection. Continuing the dissection from the proximal tibia onto the interosseus membrane posteriorly would put this vessel at risk, though should not typically be necessary.
In addition to the named anterior tibial artery, there is occasionally a vessel which penetrates the proximal tibia metaphysis which may be come across while elevating the anterior compartment muscles from the proximal tibia. If inadvertently transected this can produce significant bleeding. If possible it should be identified and coagulated prior to transection.
Nervous Anatomy:
Similar to the vascular anatomy just described, the primary nervous structure at theoretical risk, though rarely encountered during surgery, is the deep peroneal nerve. This nerve is of course a branch off the common peroneal nerve which typically arborizes at the level of the fibular neck. The deep peroneal nerve continues distally along with the anterior tibial artery and innervates all the muscles of the anterior compartment before innervating the two small extensor muscles on the dorsum of the foot (extensor digitorum and hallucis brevis) and eventually providing sensation in the first dorsal webspace. Like the anterior tibial artery, this nerve is not routinely sought in surgery, but rather is retracted laterally en masse with the muscles of the anterior compartment.
Positioning & Markings
Patient Positioning:
For all surgical indications the typical positioning of the patient is supine. A bump is placed under the hip to internally rotate the leg which will tend to rest in an externally rotated position without this maneuver. The ipsilateral arm is placed over the patient's body, the contralateral arm is laid out on an arm board. The operative leg is elevated on a foam ramp of stack of blankets to allow for lateral imaging.
When performing dual anterior lateral and posterior medial approaches the hip bump should be reduced to allow for enough external rotation of the limb to allow for the posterior medial approach also.
A cantilever table with no metal appliances attached allows for simplified fluoroscopic imaging of the limb.
Intra-op Imaging:
The fluoroscopy machine comes in from the contralateral side and obtains AP and lateral images throughout the case. The AP view typically requires 3-7 degrees of of cephalad tilt to account for the normal posterior slope the joint line. The lateral view of the knee is often defined as the perfect overlap of the medial and lateral condyles of the femur. However, particularly if a varus force if being actively applied during the case to help with lateral joint visualization, such as with a universal distractor, the surfaces of the distal femur and proximal tibia may no longer be parallel. As such a good lateral of the surface of interest (proximal tibia) may not have perfect overlap of the distal femoral condyles until this force has been removed.
Marking the Incision:
The incision is centered on Gerdy's tubercle. This landmark is on the anterior lateral proximal tibia and may be obscured by swelling in the trauma patient. If uncertainty exists, marking out the tibial tubercle and fibular head may also be of benefit. Gerdy's tubercle is between these two landmarks from medial to lateral, though it is positioned slightly more proximally than either the tibial tubercle or fibular head.
The incision curves into an S-shape, heading gently posteriorly proximally and anteriorly distally. Distally the incision should stay 1cm lateral to the palpable anterior tibial crest. Proximally the incision is centered along the lateral aspect of the femur, which again may be palpated.
Anterior Lateral Tibial Plateau | Description
Superficial dissection:
A knife is used to make the incision as previously described. This is taken down through skin and subcutaneous tissue until the continuous fascial layer of the distal portion of the iliotibial band and fascia over the anterior compartment of the leg is identified.
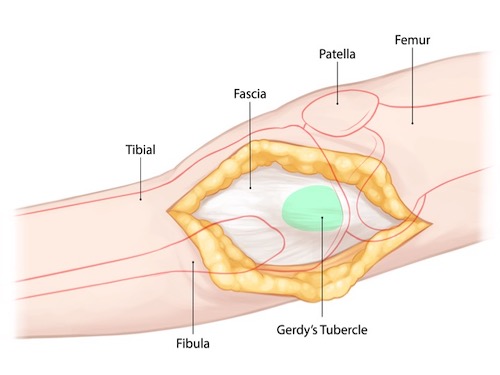
Palpate the anterior tibial crest and Gerdy's tubercle through the incision. Again mark out an S-shaped incision, this time through fascia. The fascial incision is again centered on Gerdy's tubercle. Proximally it is through the mid substance of the dense iliotibial band in line with its fibers. Distally, like the skin incision, the fascia over the anterior compartment is entered 1cm lateral to the anterior crest of the tibia.

When over Gerdy's tubercle the fascial incision is full thickness and comes right down onto this bony landmark. However both proximally and distally this incision is NOT full thickness, and instead great care it taken to only go through fascia so that the underlying muscle and joint capsule is not unintentionally violated. Proximally the iliotibial band, which is 1-3mm thick, is incised from the level of the lateral femoral epicondyle down to Gerdy's tubercle. Distally the anterior compartment fascia, which is < 1mm thick, is incised exposing the underlying muscles of the anterior compartment of the leg.
Deep Dissection:
The anterior compartment muscles can be swept off the undersurface of the remaining portion of the fascia that was left still attached to the tibial crest. This then brings the surgeon to the bone of the proximal lateral tibia. The anterior compartment muscles may then be taken off this bone in an epi-periosteal fashion using an elevator or knife. A sponge may be left in place temporarily to help stop any bleeding produced by this maneuver.
The tough insertion of the iliotibial band must then be taken off Gerdy's tubercle. Full thickness flaps are developed anteriorly and posteriorly as this is performed in a subperiosteal fashion. Anteriorly this flap, if needed, may be taken all the way to the level of the tibial tubercle and patellar tendon. Posteriorly this flap of iliotibial band insertion and the proximal origins of the tibialis anterior and extensor digitorum longus may be taken back to the level of the fibular head. Typically only what is needed for reduction and plate application is exposed. The surgeon should not stray posterior to the fibular head otherwise the lateral collateral ligament becomes at risk.
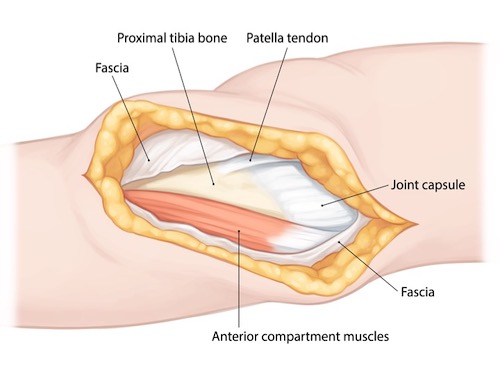
The lateral joint line should now be palpated through the capsule. It is often also visible, as the capsule appears blue in this area due to intra-capsular hematoma from the fracture. A transverse arthrotomy, parallel to the joint line should then be performed. This is performed just proximal to the palpable proximal extent of the lateral plateau so that the arthrotomy is below the level of the meniscus.
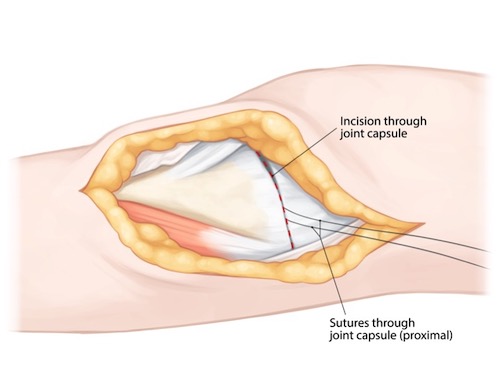
The proximal capsule and meniscus are then retracted proximally by applying sutures through these structures. These same sutures may be used for lateral repair of the capsule at the conclusion of the case. If a rim of capsule is left in place the capsule may be repaired to itself If this was not achieved, then the capsule repair may be brought down into place by securing these sutures to the plate used for fracture fixation. Also of note, lateral meniscus tears are frequently encountered with plateau fractures. They are typically peripheral tears and may be repaired back to the rim of capsule.
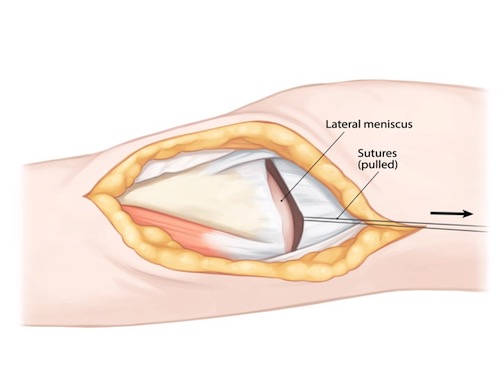
A final step in aiding visualization of the lateral joint line through the arthrotomy is the application of static distraction, such as with a universal distractor. This may be applied with two pins, one placed proximally through the above exposure into the lateral epicondyle of the femur, the other placed in a separate stab incision into the tibia diaphysis below the level of intended fixation.
Tips, Tricks & Precautions
Universal Distractor
Both for adequately visualizing the lateral plateau and for regaining height of this same structure the application of static distraction across the lateral joint line is indispensable. For isolated lateral plateau fractures significant varus force may be applied towards this purpose. During fixation of bicondylar plateau fractures the medial side if often approached, reduced, and provisionally fixed prior to addressing the lateral side. If this is the case, then laterally distraction may still be applied to help visualize and reduce the lateral plateau, however the surgeon must be aware that this generates force across the medial side which may cause a loss of reduction if care is not taken.
Objectives
At the end of this module, the learner should be able to:
1) List the indications for an anterior lateral approach to the tibial plateau
2) Understand the relevant anatomy of the anterior lateral approach to the tibial plateau
3) Discuss in detail the anterior lateral approach to the tibial plateau, including:
-Patient positioning
-Landmarks for incision
-Relevant internervous plains
-Sequence of the superficial and deep dissection
Indications
Indications for an Anterior Lateral Approach to the Tibial Plateau:
1) Open reduction internal fixation of unicondylar, lateral tibial plateau fractures
2) Open reduction and internal fixation of the lateral condylar portion of a bicondylar plateau fracture which is being managed with "dual incisions" (anterior lateral and posterior medial approaches)
3) Open reduction internal fixation of some extra-articular proximal tibial fractures
Anatomy
Internervous Plain:
There is no internervous plain used during this approach. The proximal portions of the muscles of the anterior compartment of the leg are elevated and retracted en masse along with their nerovascular bundle (deep peroneal nerve, anterior tibial artery) to avoid deinnervation.
Muscular Anatomy:
The iliotibial band is the thick aponeurotic distal extent of the fascia of the gluteus maximus and tensor fascia lata. It travels down the lateral aspect of the thigh and comes to insert at Gerdy's tubercle on the proximal anterior lateral tibia. This thick fascial layer is continuous distally with the much thinner fascia which covers the anterior compartment of the leg. During the dissection this continuous layer is incised and elevated from its robust attachment to Gerdy's tubercle, revealing the distal extent of the vastus lateralis, the lateral joint capsule, and the muscles of the anterior compartment beneath.
Tibialis Anterior:
Origin: Lateral condyle of the proximal tibia, proximal 1/2 of the lateral surface of the proximal tibia, interosseus membrane
Insertion: Medial cuneiform and 1st metatarsal base
Innervation: Deep peroneal nerve
Action: Ankle dorsiflexion and inversion
Extensor Hallucis Longus:
Origin: Middle 1/3rd of the anterior fibula, interosseus membrane
Insertion: Dorsal base of the distal phalanx of the hallux
Innervation: Deep peroneal nereve
Action: Extends hallux at interphalangeal and metatarsal-phalangeal joints, ankle dorsiflexion
Extensor Digitorum Longus:
Origin: Superior 1/3rd of anterior fibula, interosseus membrane, lateral condyle of tibia
Insertion: Dorsal base of the middle phalanx of lesser digits
Innervation: Deep peroneal nerve
Action: Extends digits at proximal interphalangeal and metatarsal-phalangeal joints, ankle dorsiflexion
Peroneus Teritus:
Origin: Inferior 1/3rd of the anterior fibula, interosseus membrane
Insertion: Dorsal 5th metatarsal base
Innervation: Deep peroneal nerve
Action: Ankle dorsiflexion and eversion
Vascular Anatomy:
The primary vascular bundle at theoretical risk during this approach is the anterior tibial artery and its accompanying veins. This artery originates in the popliteal fossa and passes into the anterior compartment of the leg via a round opening in the proximal portion of the interosseus membrane. It then continues distally between the tibialis anterior muscle and the extensor hallucis longus muscle. As long as the entire anterior compartment is elevated en masse from the proximal tibia this artery should be safely retracted away from the operative approach and should not be routinely identified during the course of the dissection. Continuing the dissection from the proximal tibia onto the interosseus membrane posteriorly would put this vessel at risk, though should not typically be necessary.
In addition to the named anterior tibial artery, there is occasionally a vessel which penetrates the proximal tibia metaphysis which may be come across while elevating the anterior compartment muscles from the proximal tibia. If inadvertently transected this can produce significant bleeding. If possible it should be identified and coagulated prior to transection.
Nervous Anatomy:
Similar to the vascular anatomy just described, the primary nervous structure at theoretical risk, though rarely encountered during surgery, is the deep peroneal nerve. This nerve is of course a branch off the common peroneal nerve which typically arborizes at the level of the fibular neck. The deep peroneal nerve continues distally along with the anterior tibial artery and innervates all the muscles of the anterior compartment before innervating the two small extensor muscles on the dorsum of the foot (extensor digitorum and hallucis brevis) and eventually providing sensation in the first dorsal webspace. Like the anterior tibial artery, this nerve is not routinely sought in surgery, but rather is retracted laterally en masse with the muscles of the anterior compartment.
Positioning & Markings
Patient Positioning:
For all surgical indications the typical positioning of the patient is supine. A bump is placed under the hip to internally rotate the leg which will tend to rest in an externally rotated position without this maneuver. The ipsilateral arm is placed over the patient's body, the contralateral arm is laid out on an arm board. The operative leg is elevated on a foam ramp of stack of blankets to allow for lateral imaging.
When performing dual anterior lateral and posterior medial approaches the hip bump should be reduced to allow for enough external rotation of the limb to allow for the posterior medial approach also.
A cantilever table with no metal appliances attached allows for simplified fluoroscopic imaging of the limb.
Intra-op Imaging:
The fluoroscopy machine comes in from the contralateral side and obtains AP and lateral images throughout the case. The AP view typically requires 3-7 degrees of of cephalad tilt to account for the normal posterior slope the joint line. The lateral view of the knee is often defined as the perfect overlap of the medial and lateral condyles of the femur. However, particularly if a varus force if being actively applied during the case to help with lateral joint visualization, such as with a universal distractor, the surfaces of the distal femur and proximal tibia may no longer be parallel. As such a good lateral of the surface of interest (proximal tibia) may not have perfect overlap of the distal femoral condyles until this force has been removed.
Marking the Incision:
The incision is centered on Gerdy's tubercle. This landmark is on the anterior lateral proximal tibia and may be obscured by swelling in the trauma patient. If uncertainty exists, marking out the tibial tubercle and fibular head may also be of benefit. Gerdy's tubercle is between these two landmarks from medial to lateral, though it is positioned slightly more proximally than either the tibial tubercle or fibular head.
The incision curves into an S-shape, heading gently posteriorly proximally and anteriorly distally. Distally the incision should stay 1cm lateral to the palpable anterior tibial crest. Proximally the incision is centered along the lateral aspect of the femur, which again may be palpated.
Anterior Lateral Tibial Plateau | Description
Superficial dissection:
A knife is used to make the incision as previously described. This is taken down through skin and subcutaneous tissue until the continuous fascial layer of the distal portion of the iliotibial band and fascia over the anterior compartment of the leg is identified.
Palpate the anterior tibial crest and Gerdy's tubercle through the incision. Again mark out an S-shaped incision, this time through fascia. The fascial incision is again centered on Gerdy's tubercle. Proximally it is through the mid substance of the dense iliotibial band in line with its fibers. Distally, like the skin incision, the fascia over the anterior compartment is entered 1cm lateral to the anterior crest of the tibia.
When over Gerdy's tubercle the fascial incision is full thickness and comes right down onto this bony landmark. However both proximally and distally this incision is NOT full thickness, and instead great care it taken to only go through fascia so that the underlying muscle and joint capsule is not unintentionally violated. Proximally the iliotibial band, which is 1-3mm thick, is incised from the level of the lateral femoral epicondyle down to Gerdy's tubercle. Distally the anterior compartment fascia, which is < 1mm thick, is incised exposing the underlying muscles of the anterior compartment of the leg.
Deep Dissection:
The anterior compartment muscles can be swept off the undersurface of the remaining portion of the fascia that was left still attached to the tibial crest. This then brings the surgeon to the bone of the proximal lateral tibia. The anterior compartment muscles may then be taken off this bone in an epi-periosteal fashion using an elevator or knife. A sponge may be left in place temporarily to help stop any bleeding produced by this maneuver.
The tough insertion of the iliotibial band must then be taken off Gerdy's tubercle. Full thickness flaps are developed anteriorly and posteriorly as this is performed in a subperiosteal fashion. Anteriorly this flap, if needed, may be taken all the way to the level of the tibial tubercle and patellar tendon. Posteriorly this flap of iliotibial band insertion and the proximal origins of the tibialis anterior and extensor digitorum longus may be taken back to the level of the fibular head. Typically only what is needed for reduction and plate application is exposed. The surgeon should not stray posterior to the fibular head otherwise the lateral collateral ligament becomes at risk.
The lateral joint line should now be palpated through the capsule. It is often also visible, as the capsule appears blue in this area due to intra-capsular hematoma from the fracture. A transverse arthrotomy, parallel to the joint line should then be performed. This is performed just proximal to the palpable proximal extent of the lateral plateau so that the arthrotomy is below the level of the meniscus.
The proximal capsule and meniscus are then retracted proximally by applying sutures through these structures. These same sutures may be used for lateral repair of the capsule at the conclusion of the case. If a rim of capsule is left in place the capsule may be repaired to itself If this was not achieved, then the capsule repair may be brought down into place by securing these sutures to the plate used for fracture fixation. Also of note, lateral meniscus tears are frequently encountered with plateau fractures. They are typically peripheral tears and may be repaired back to the rim of capsule.
A final step in aiding visualization of the lateral joint line through the arthrotomy is the application of static distraction, such as with a universal distractor. This may be applied with two pins, one placed proximally through the above exposure into the lateral epicondyle of the femur, the other placed in a separate stab incision into the tibia diaphysis below the level of intended fixation.
Tips, Tricks & Precautions
Universal Distractor
Both for adequately visualizing the lateral plateau and for regaining height of this same structure the application of static distraction across the lateral joint line is indispensable. For isolated lateral plateau fractures significant varus force may be applied towards this purpose. During fixation of bicondylar plateau fractures the medial side if often approached, reduced, and provisionally fixed prior to addressing the lateral side. If this is the case, then laterally distraction may still be applied to help visualize and reduce the lateral plateau, however the surgeon must be aware that this generates force across the medial side which may cause a loss of reduction if care is not taken.
Tibial Plateau - Posterior Medial Approach
Posterior Medial Approach to the Tibial Plateau | Video
- Read Full Text
-
Objectives
At the end of this module, the learner should be able to:
1) List the indications for an posterior medial approach to the tibial plateau
2) Understand the relevant anatomy of the posterior medial approach to the tibial plateau
3) Discuss in detail the posterior medial approach to the tibial plateau, including:
-Patient positioning
-Landmarks for incision
-Relevant internervous plains
-Sequence of the superficial and deep dissection
Indications
Indications for an Posterior Medial Approach to the Tibial Plateau:
1) Open reduction internal fixation of unicondylar, medial tibial plateau fractures
2) Open reduction and internal fixation of the medial condylar portion of a bicondylar plateau fracture which is being managed with "dual incisions" (anterior lateral and posterior medial approaches)
Anatomy
Internervous Plain:
There is no classic internervous plain used during this approach, however various muscles of differing innervation are separated from each other to allow access to the posterior medial portion of the proximal tibia. The distal insertions of the sartorius (femoral nerve), gracilis (obturator nerve), and semitendenosus (tibial division of sciatic), all portions of the pes anserinus, are retracted anteriorly. The proximal portion of the medial head of the gastrocnemius (tibial nerve) is retracted posteriorly. Depending on the degree of exposure required the origins of the popliteus (tibia nerve), soleus (tibial nerve), and even flexor digitorum longus (tibial nerve) may be elevated off the posterior medial proximal tibia.
Muscular Anatomy:
The medial side of the knee is made of various layers of muscle, fascia, tendon, and capsule:
Layer 1: Sartorius and its fascia
Between layers 1 & 2: Tendons of the gracilis and semitendenosus
Layer 2: Superficial medial collateral ligament (MCL) and semimembranosus
Layer 3: Deep MCL/joint capsule
These various layers are encountered in the proximal extend of the dissection towards the posterior-medial portion of the proximal tibia. As is made clear by the description above, the tendons of the pes anserinus are not all traveling in the same layer, as might be assumed for this named structure.
More distally the dissection involves elevating muscles off the posterior medial border of the tibial metaphysics and diaphysis. For reduction and fixation of fractures of the tibial plateau this invariably involves elevating off a portion of the medial head of the gastrocnemius muscle. If the dissection requires access to the posterior surface of the tibia, rather than the posterior medial border alone, this may require elevation of portions of the popliteus proximally and soleus and even flexor digitorum longus distally. The soleus has a distinct origin off the posterior surface of the tibia referred to as the soleal line. Muscles proximal (popliteus) and distal (deep posterior compartment muscles) arise above of below this distinct bony landmark.
Sartorius:
Origin: Anterior superior iliac spine (ASIS)
Insertion: Anterior medial proximal tibia as superficial portion of the pes anserinus
Innervation: Femoral nerve
Action: Hip flexion, abduction, external rotation. Knee flexion.
Gracilis:
Origin: Ischiopubic ramus of the pelvis
Insertion: Anterior medial proximal tibia as deep portion of the pes anserinus
Innervation: Obturator nerve
Action: Hip adduction, knee flexion
Semitendenous:
Origin: Tuberosity of the ischium
Insertion: Anterior medial proximal tibia as deep portion of the pes anserinus
Innervation: Tibial division of sciatic nerve
Action: Hip extension, knee flexion
Gastrocnemius:
Origin: Posterior aspects of the medial and lateral condyles of the femur just proximal to the articular surface
Insertion: Calcaneal tuberosity via the Achilles tendon
Innervation: Tibial nerve
Action: Ankle plantarflexion, knee flexion
Popliteus:
Origin: Medial 2/3rds of the posterior surface of the proximal tibia proximal to the soleal line
Insertion: Lateral femoral condyle
Innervation: Tibial nerve
Action: With the tibia fixed this muscle externally rotates the femur. With the femur fixed, this muscle internally rotates the tibia.
Soleus:
Origin: Soleal line of the tibia, fibular head
Insertion: Calcaneal tuberosity via the Achilles tendon
Innervation: Tibial nerve
Action: Ankle plantarflexion
Flexor Digitorum Longus:
Origin: Posterior surface of the medial tibial shaft distal to the soleal line
Insertion: Base of the plantar surface of the distal phalanges of the lesser digits
Innervation: Tibial nerve
Action: Ankle plantarflexion, flexion of the lesser digits at the distal interphalangeal, proximal interphalangeal, and metatarsal phalangeal joints.
Vascular Anatomy:
The greater saphenous vein and its accompanying saphenous nerve (terminal branch of the femoral nerve) travel down the medial aspect of the leg and are typically encountered during the posterior medial approach to the tibial plateau. They may be identified running along the posterior border of the sartorius muscle and should be retracted anteriorly along with this muscle to protect them during the dissection.
While not typically encountered during this approach, surgeons should none-the-less be mindful of the proximity of the popliteal artery and vein. These structures run over the popliteus muscle origin deep to the medial head of the gastrocnemius muscle prior to passing through a hiatus in the soleus. Dissections that continue posteriorly close to the mid-line of the tibia put these structures at risk.
Nervous Anatomy:
Similar to the vascular anatomy just described, the saphenous nerve, which is the terminal branch of the femoral nerve, runs along the medial aspect of the leg along with the greater saphenous vein and can be found along the posterior border of the sartorius.
The tibia nerve also travels within the popliteal fossa with the popliteal artery and vein. It begins proximally in the fossa lateral to the vessels, but crosses them within the fossa to be more medial as it exits the fossa through the hiatus in the soleus. As with the popliteal vessels, this nerve should not be routinely visualized with this approach.
Positioning & Markings
Patient Positioning:
For all surgical indications the typical positioning of the patient is supine. A bump is placed under the hip to internally rotate the leg which will tend to rest in an externally rotated position without this maneuver. The ipsilateral arm is placed over the patient's body, the contralateral arm is laid out on an arm board. The operative leg is elevated on a foam ramp of stack of blankets to allow for lateral imaging.
When performing an isolated posterior medial approach or dual anterior lateral and posterior medial approaches the hip bump should be reduced to allow for enough external rotation of the limb to allow for the posterior medial approach.
Elevating the limb, such as with a stack of blankets just above the knee and ankle, allows the gastrocnemius muscle to hang with gravity, easing dissection.
A cantilever table with no metal appliances attached allows for simplified fluoroscopic imaging of the limb.
Intra-op Imaging:
The fluoroscopy machine comes in from the contralateral side and obtains AP and lateral images throughout the case. The AP view typically requires 3-7 degrees of of cephalad tilt to account for the normal posterior slope the joint line. The lateral view of the knee is often defined as the perfect overlap of the medial and lateral condyles of the femur. However, particularly if a varus force if being actively applied during the case to help with lateral joint visualization, such as with a universal distractor, the surfaces of the distal femur and proximal tibia may no longer be parallel. As such a good lateral of the surface of interest (proximal tibia) may not have perfect overlap of the distal femoral condyles until this force has been removed.
Marking the Incision:
The incision is marked from the medial epicondyle along a longitudinal path parallel to but 1-2cm posterior to the posterior medial border of the tibia. The length of the incision distally depends on the amount of exposure needed for fracture visualization, reduction, and fixation.
Posterior Medial Approach to the Tibial Plateau | Description
Superficial dissection:
A knife is used to make the incision as previously described. Once through skin dissection should be carried out with a scissors or elevator to avoid unintentional damage to the greater saphenous vein and saphenous nerve. Carry dissection down through the subcutaneous tissue to the level of the fascia in this manner. The posterior edge of the sartorius is identified along with the greater saphenous vein and saphenous nerve. The vein and nerve are retracted.
Tips, Tricks & Precautions
Reduction of the posterior medial fragment of the tibial plateau:
To regain the position of the posterior medial tibial plateau which has fracture off, a combination of extension, valgus, and traction are often required. A clamp placed with one tine on the fragment through the wound and one tine on the tibial tubercle via a percutaneous incision may also aid in this reduction.
Fasciotomy of the Leg - Single Incision
Single Incision Fasciotomy of the Leg | Video
- Read Full Text
-
Objectives
At the end of this module, the learner should be able to:
1) List the indications for a fasciotomy of the leg
2) Understand the relevant anatomy of fasciotomy of the leg
3) Discuss in detail the single incision fasciotomy of the leg:
-Patient positioning
-Landmarks for incision
-Relevant internervous planes
-Sequence of the superficial and deep dissection
Indications
Indication for a fasciotomy of the leg:
1) Compartment syndrome of the leg.
Compartment syndrome occurs when the pressure within a closed muscular compartment of the body rises, often due to injury such as fracture. This rise in pressure creates ischemia, which in turns causes muscle and nerve injury or even death. It is an orthopedic emergency which requires rapid diagnosis and treatment within 4-6 hours to prevent long term dysfunction of the involved limb.
Compartment syndrome remains primarily a clinical diagnosis. It frequently occurs after fracture, a crush injury to a limb, or after re-perfusion of a previously ischemic limb. It occurs most frequently in the forearm and lower leg. Symptoms of compartment syndrome include:
Pain Pain with passive stretch of the muscles of the involved compartment Firm compartments by palpation Signs of nerve compression such as numbness, tingling, weakness Weak or absent pulses (LATE SIGN) Cooling of the extremity (LATE SIGN) Valor of the extremity (LATE SIGN)
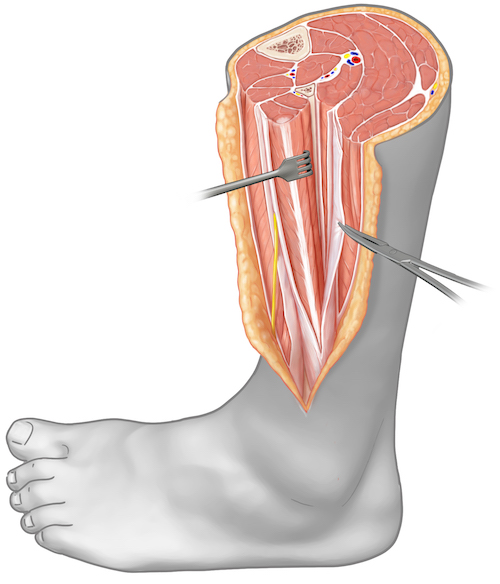
Tips, Tricks & Precautions
Precautions:
1) Superficial peroneal nerve: This nerve must be identified and protected to allow for a complete release of the anterior compartment. When developing the full thickness flap at the fascial level anteriorly a blunt instrument should be used in the distal half of the leg. Dissecting along the intermuscular septum between the lateral and anterior compartments will reliably allow the surgeon to come across the sensory nerve.
2) Large incisions: Fasciotomy for acute compartment syndrome is not a minimally invasive procedure. Incisions through skin and fascia should be performed along most of the length of the leg.
3) Deep posterior compartment: If you are uncertain if the deep posterior compartment has been entered passively flex and extend the hallux. If the muscle in front of you moves you are looking at the flexor hallucis longus and have successfully entered the deep posterior compartment.
In addition to the above clinical signs direct measurements of compartment pressure can be taken and used to help confirm the diagnosis. A compartment pressure within 30mmHg of the diastolic blood pressure (delta p) is thought to be diagnostic of compartment syndrome. While the exact role of pressure monitoring remains to be defined, it may be most useful in the obtunded patient who is unable to report their symptoms or participate with a physical exam.
Anatomy
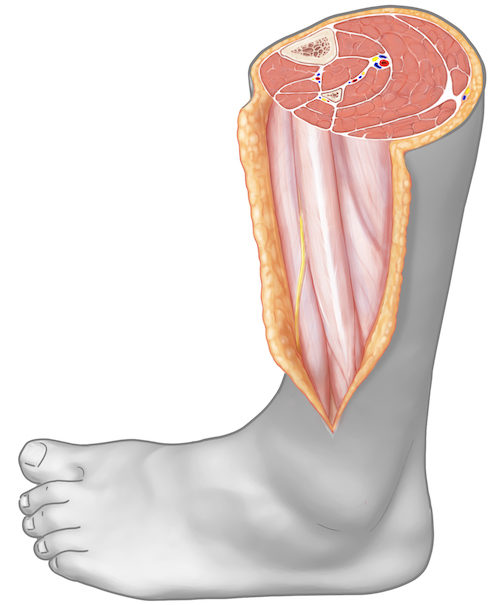
Internervous Plain:
The majority of the compartments released during a single incision fasciotomy (anterior, lateral, and superficial posterior) are exposed superficially, at the fascial level, and thus no deep (and therefore no internervous) dissection is required. The only compartment that requires a deeper dissection to be performed in order to access and release it is the aptly named deep posterior compartment. Accessing the deep posterior compartment from the lateral side of the leg requires retracting the muscles of the lateral compartment (superficial peroneal nerve) anteriorly and allowing the muscles of the superficial posterior compartment (tibial nerve) to fall posteriorly. This exposes the insertion of the deep posterior compartment's fascia on the posterior border of the fibula. Separation of the superficial posterior and lateral compartment muscles for this exposure is an internervous dissection between the tibial and superficial peroneal nerves.
Muscular/Compartment Anatomy:
There are four compartments of the lower leg: anterior, lateral, superficial posterior, deep posterior . The boundaries of these compartments are created by investing fascia over muscle, the tibia and fibula bones, and the interosseous membrane between the tibia and fibula. Muscles within a single compartment share their innervation from a single peripheral nerve. The three vascular bundles which supply the lower leg also travel within these compartments.
ANTERIOR COMPARTMENT:
Vascular bundle: Anterior tibial artery and veins
Nerve: Deep peroneal nerve
Muscles:
Tibialis Anterior:
Origin: Lateral condyle of the proximal tibia, proximal 1/2 of the lateral surface of the proximal tibia, interosseus membrane
Insertion: Medial cuneiform and 1st metatarsal base
Innervation: Deep peroneal nerve
Action: Ankle dorsiflexion and inversion
Extensor Hallucis Longus:
Origin: Middle 1/3rd of the anterior fibula, interosseus membrane
Insertion: Dorsal base of the distal phalanx of the hallux
Innervation: Deep peroneal nereve
Action: Extends hallux at interphalangeal and metatarsal-phalangeal joints, ankle dorsiflexion
Extensor Digitorum Longus:
Origin: Superior 1/3rd of anterior fibula, interosseus membrane, lateral condyle of tibia
Insertion: Dorsal base of the middle phalanx of lesser digits
Innervation: Deep peroneal nerve
Action: Extends digits at proximal interphalangeal and metatarsal-phalangeal joints, ankle dorsiflexion
Peroneus Teritus:
Origin: Inferior 1/3rd of the anterior fibula, interosseus membrane
Insertion: Dorsal 5th metatarsal base
Innervation: Deep peroneal nerve
Action: Ankle dorsiflexion and eversion
LATERAL COMPARTMENT MUSCLES:
Vascular bundle: None
Nerve: Superficial peroneal nerve
Muscles:
Peroneus Longus:
Origin: Fibular head and upper 2/3rds of the lateral fibular shaft
Insertion: Plantar surface of the medial cuneiform and 1st metatarsal base
Innervation: Superficial peroneal nerve
Action: Ankle plantarflexion and eversion
Peroneus Brevis:
Origin: Lower 2/3rds of the lateral fibular shaft
Insertion: 5th metatarsal base
Innervation: Superficial peroneal nerve
Action: Ankle plantarflexion and eversion
SUPERFICIAL POSTERIOR COMPARTMENT MUSCLES:
Vascular bundle: None
Nerve: Tibial nerve
Muscles:
Gastrocnemius:
Origin: Posterior aspects of the medial and lateral condyles of the femur just proximal to the articular surface
Insertion: Calcaneal tuberosity via the Achilles tendon
Innervation: Tibial nerve
Action: Ankle plantarflexion, knee flexion
Soleus:
Origin: Soleal line of the tibia, fibular head
Insertion: Calcaneal tuberosity via the Achilles tendon
Innervation: Tibial nerve
Action: Ankle plantarflexion
DEEP POSTERIOR COMPARTMENT MUSCLES:
Vascular bundle: Posterior tibial artery and veins, Peroneal artery and veins
Nerve: Tibial nerve
Muscles:
Flexor Hallucis Longus:
Origin: Posterior aspect of the fibula
Insertion: Plantar aspect of the base of the distal phalanx of the hallux
Innervation: Tibial nerve
Action: Flexion of hallux at interphalangeal and metatarsal phalangeal joints. Weak ankle plantar flexion.
Posterior Tibialis:
Origin: Posterior surface of interosseus membrane as well as small portions of posterior tibia and fibula
Insertion: Primarily inserts into plantar navicular and medial cuneiform. Also sends slips into middle and lateral cuneiforms, and bases of 2-4th metatarsals.
Innervation: Tibial nerve
Action: Ankle plantar flexion and inversion
Flexor Digitorum Longus:
Origin: Posterior surface of tibia inferior to soleal line
Insertion: Plantar aspect of the base of the distal phalanges of the 2-5th digits
Innervation: Tibial nerve
Action: Flexion of lesser toes at interphalangeal and metatarsal phalangeal joints. Weak ankle plantar flexion.
Vascular Anatomy:
There are no major vascular structures routinely encountered during a single incision fasciotomy of the lower leg.
Nervous Anatomy:
The only nerve which is encountered during a single incision fasciotomy of the leg is superficial peroneal nerve. This nerve travels within the lateral compartment of the leg, innervating the peroneus longus and brevis. Within 5-10cm of the ankle joint this nerve exits the anterior aspect of the lateral compartment along the intermuscular septum between the lateral and anterior compartments. From this point the nerve courses in an oblique fashion towards the dorsum of the foot while traveling superficially over the muscles/fascia of the anterior compartment. This nerve must be identified and protected in order to safely release the muscles of the anterior compartment.
Position, Markings, & Imaging
Patient Positioning:
The patient is placed supine. A bump is placed under the hip to internally rotate the leg which will tend to rest in an externally rotated position without this maneuver. The ipsilateral arm is placed over the patient's body, the contralateral arm is laid out on an arm board. If needed for associated fracture management the operative leg is elevated on a foam ramp of stack of blankets to allow for lateral imaging.
Marking the Incision:
The fibular head and lateral malleolus should be palpated. The incision is marked longitudinally directly in line with the fibula from ~3cm below the fibular head to ~5cm above the lateral malleolus. The compartments have the bulk of their muscle bellies proximally and become progressively tendinous more distally. As such, the distal extent of the incision can end further away from the tip of the bony landmark used to draw the incision, the lateral malleolus.
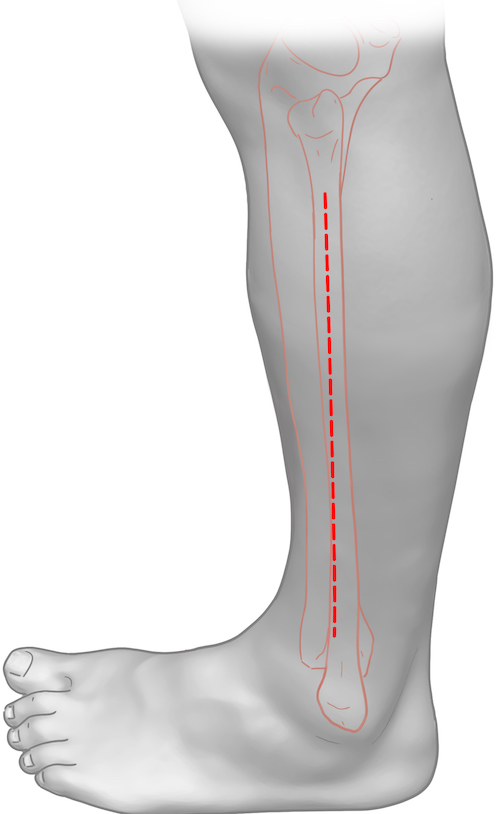
Fasciotomies for the purposes of acute compartment syndrome release are not minimally invasive procedures! To allow a complete fascial release and to protect the superficial peroneal nerve distally an incision which extends most of the length of the limb is required.
Single Incision Fasciotomy of the Leg | Description
Superficial Dissection:
The previously marked incision over the lateral aspect of the fibula is made with a knife and can be taken sharply directly down to the fascia over the lateral compartment. While some worry about injury to the superficial peroneal nerve with sharp dissection, if the incision has been placed appropriately over the fibula/lateral compartment it is safe to come down sharply. Recall that the superficial peroneal nerve travels within the lateral compartment proximally (and so is deep to the proximal extent of the superficial dissection) and that it exits the lateral compartment at the intermuscular septum and travels over the anterior compartment superficially (and so a sharp dissection taken down directly onto the lateral compartment should not risk injury to the nerve).
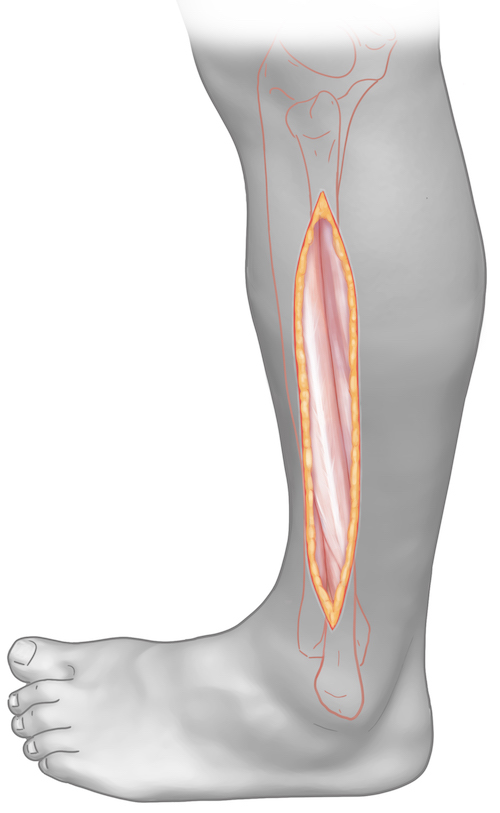
Once down at the level of the fascia over the lateral compartment full thickness flaps are raised anteriorly and posteriorly to expose the anterior and superficial posterior compartments respectively. Posteriorly this elevation can be done with a knife. In the proximal half of the leg this can also be performed anteriorly with a knife. In the distal half of the leg, due to the superficial peroneal nerve, elevation of the flap anteriorly must be done bluntly. This can be performed with a elevator; a tool sharp enough to brush subcutaneous tissue from fascia but not so sharp as to risk transection of the superficial peroneal nerve. The nerve can be found exiting the lateral compartment at the intermuscular septum between the lateral and anterior compartments. This septum can often be appreciated both visually and by palpation. Locating the septum proximally and dissecting bluntly along it distally will reliably reveal the superficial peroneal nerve. Once identified the nerve should be dissected out and mobilized from the fascia over the anterior compartment.

Deep Dissection (release of each compartment):
With flaps raised the fascia over the anterior, lateral, and superficial posterior compartments should be exposed.
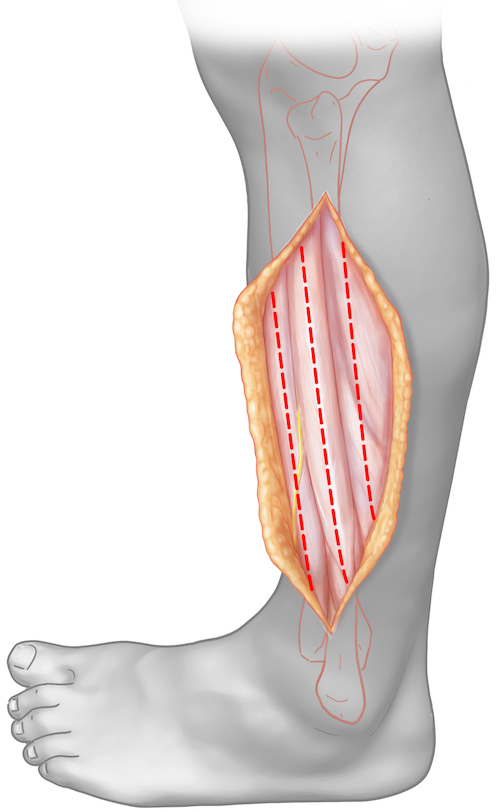
Begin by releasing the fascia longitudinally over the lateral compartment muscles for the length of the incision. This can be done sharply with a knife. The lateral compartment is typically the easiest to identify; this compartment of course runs directly with the fibula and the tendons of the peroneal muscles are often plainly visible through the fascial covering.
With the lateral compartment released, the surgeon can proceed to release the anterior compartment. If the intermuscular septum between the lateral and anterior compartments is apparent either visually or by palpation this can be done simply by making a longitudinal incision anterior to the intermuscular septum with care taken distally to work around the superficial peroneal nerve. If the intermuscular septum is not obvious then a finger may be placed into the lateral compartment and advanced anteriorly until blunt dissection is no longer possible. The surgeon's finger is prevented from advancing any further anteriorly by the intermuscular septum between the lateral and anterior compartments. With the intermuscular septum now identified the anterior compartment can be release anterior to this palpated landmark.
The superficial posterior compartment can next be released. As with the anterior compartment, the septum between the lateral and posterior compartments may be obvious to the surgeon visually or by palpation of the septum of gastrocnemius muscles, allowing for the longitudinal release of the superficial posterior compartment to be performed posterior to the septum. If it is unclear to he surgeon where the septum lies between the two compartments again the lateral compartment can be entered and a finger used to dissect posteriorly until additional blunt dissection is impossible. This limit of blunt dissection is the septum between the lateral and posterior compartments and a longitudinal incision through fascia posterior to this point will release the superficial posterior compartment.
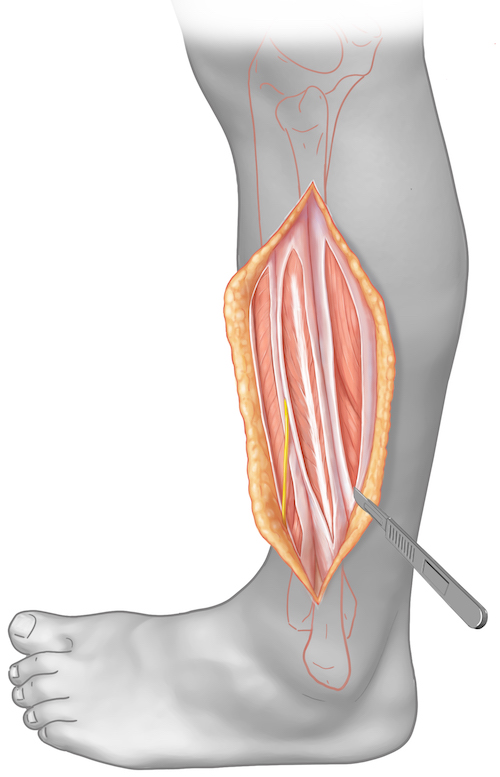
Finally the deep posterior compartment must be released. The peroneal muscles in the lateral compartment should be retracted anteriorly while the septum and superficial posterior compartment muscles should be retracted posteriorly. The posterior border of the fibula can then be palpated. The fascia over the deep posterior compartment (specifically the flexor hallucis longus) inserts along the posterior border of the fibula. Incising longitudinally along this posterior border of the fibula will thus release the deep posterior compartment.
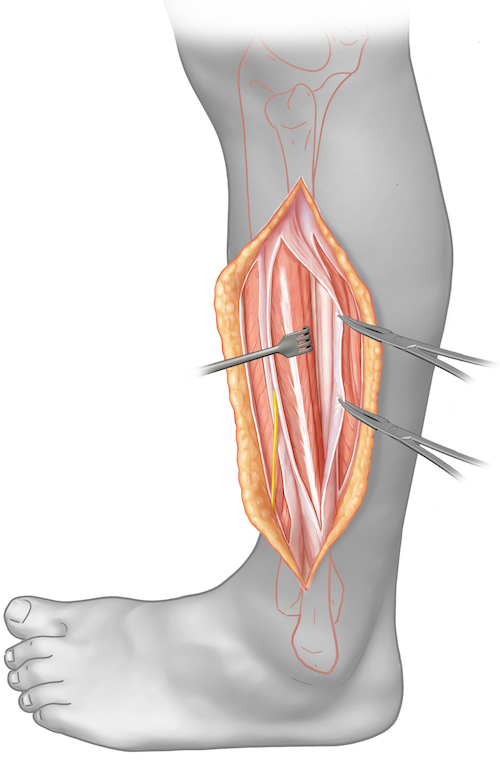
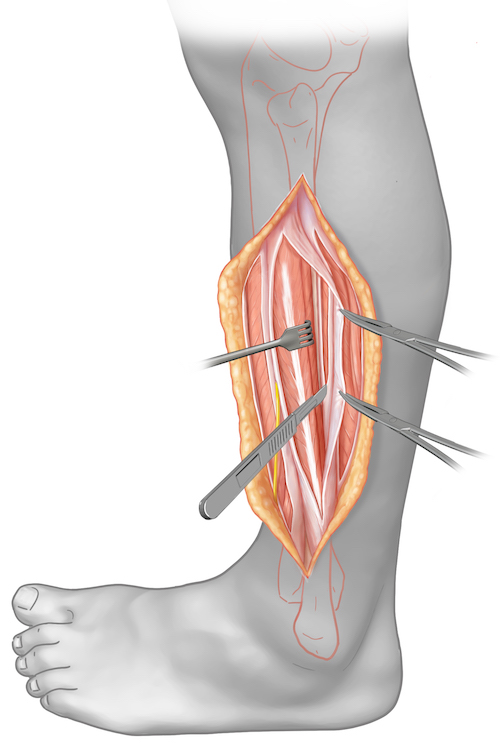
Objectives
At the end of this module, the learner should be able to:
1) List the indications for a fasciotomy of the leg
2) Understand the relevant anatomy of fasciotomy of the leg
3) Discuss in detail the single incision fasciotomy of the leg:
-Patient positioning
-Landmarks for incision
-Relevant internervous planes
-Sequence of the superficial and deep dissection
Indications
Indication for a fasciotomy of the leg:
1) Compartment syndrome of the leg.
Compartment syndrome occurs when the pressure within a closed muscular compartment of the body rises, often due to injury such as fracture. This rise in pressure creates ischemia, which in turns causes muscle and nerve injury or even death. It is an orthopedic emergency which requires rapid diagnosis and treatment within 4-6 hours to prevent long term dysfunction of the involved limb.
Compartment syndrome remains primarily a clinical diagnosis. It frequently occurs after fracture, a crush injury to a limb, or after re-perfusion of a previously ischemic limb. It occurs most frequently in the forearm and lower leg. Symptoms of compartment syndrome include:
Pain Pain with passive stretch of the muscles of the involved compartment Firm compartments by palpation Signs of nerve compression such as numbness, tingling, weakness Weak or absent pulses (LATE SIGN) Cooling of the extremity (LATE SIGN) Valor of the extremity (LATE SIGN)
Tips, Tricks & Precautions
Precautions:
1) Superficial peroneal nerve: This nerve must be identified and protected to allow for a complete release of the anterior compartment. When developing the full thickness flap at the fascial level anteriorly a blunt instrument should be used in the distal half of the leg. Dissecting along the intermuscular septum between the lateral and anterior compartments will reliably allow the surgeon to come across the sensory nerve.
2) Large incisions: Fasciotomy for acute compartment syndrome is not a minimally invasive procedure. Incisions through skin and fascia should be performed along most of the length of the leg.
3) Deep posterior compartment: If you are uncertain if the deep posterior compartment has been entered passively flex and extend the hallux. If the muscle in front of you moves you are looking at the flexor hallucis longus and have successfully entered the deep posterior compartment.
In addition to the above clinical signs direct measurements of compartment pressure can be taken and used to help confirm the diagnosis. A compartment pressure within 30mmHg of the diastolic blood pressure (delta p) is thought to be diagnostic of compartment syndrome. While the exact role of pressure monitoring remains to be defined, it may be most useful in the obtunded patient who is unable to report their symptoms or participate with a physical exam.
Anatomy
Internervous Plain:
The majority of the compartments released during a single incision fasciotomy (anterior, lateral, and superficial posterior) are exposed superficially, at the fascial level, and thus no deep (and therefore no internervous) dissection is required. The only compartment that requires a deeper dissection to be performed in order to access and release it is the aptly named deep posterior compartment. Accessing the deep posterior compartment from the lateral side of the leg requires retracting the muscles of the lateral compartment (superficial peroneal nerve) anteriorly and allowing the muscles of the superficial posterior compartment (tibial nerve) to fall posteriorly. This exposes the insertion of the deep posterior compartment's fascia on the posterior border of the fibula. Separation of the superficial posterior and lateral compartment muscles for this exposure is an internervous dissection between the tibial and superficial peroneal nerves.
Muscular/Compartment Anatomy:
There are four compartments of the lower leg: anterior, lateral, superficial posterior, deep posterior . The boundaries of these compartments are created by investing fascia over muscle, the tibia and fibula bones, and the interosseous membrane between the tibia and fibula. Muscles within a single compartment share their innervation from a single peripheral nerve. The three vascular bundles which supply the lower leg also travel within these compartments.
ANTERIOR COMPARTMENT:
Vascular bundle: Anterior tibial artery and veins
Nerve: Deep peroneal nerve
Muscles:
Tibialis Anterior:
Origin: Lateral condyle of the proximal tibia, proximal 1/2 of the lateral surface of the proximal tibia, interosseus membrane
Insertion: Medial cuneiform and 1st metatarsal base
Innervation: Deep peroneal nerve
Action: Ankle dorsiflexion and inversion
Extensor Hallucis Longus:
Origin: Middle 1/3rd of the anterior fibula, interosseus membrane
Insertion: Dorsal base of the distal phalanx of the hallux
Innervation: Deep peroneal nereve
Action: Extends hallux at interphalangeal and metatarsal-phalangeal joints, ankle dorsiflexion
Extensor Digitorum Longus:
Origin: Superior 1/3rd of anterior fibula, interosseus membrane, lateral condyle of tibia
Insertion: Dorsal base of the middle phalanx of lesser digits
Innervation: Deep peroneal nerve
Action: Extends digits at proximal interphalangeal and metatarsal-phalangeal joints, ankle dorsiflexion
Peroneus Teritus:
Origin: Inferior 1/3rd of the anterior fibula, interosseus membrane
Insertion: Dorsal 5th metatarsal base
Innervation: Deep peroneal nerve
Action: Ankle dorsiflexion and eversion
LATERAL COMPARTMENT MUSCLES:
Vascular bundle: None
Nerve: Superficial peroneal nerve
Muscles:
Peroneus Longus:
Origin: Fibular head and upper 2/3rds of the lateral fibular shaft
Insertion: Plantar surface of the medial cuneiform and 1st metatarsal base
Innervation: Superficial peroneal nerve
Action: Ankle plantarflexion and eversion
Peroneus Brevis:
Origin: Lower 2/3rds of the lateral fibular shaft
Insertion: 5th metatarsal base
Innervation: Superficial peroneal nerve
Action: Ankle plantarflexion and eversion
SUPERFICIAL POSTERIOR COMPARTMENT MUSCLES:
Vascular bundle: None
Nerve: Tibial nerve
Muscles:
Gastrocnemius:
Origin: Posterior aspects of the medial and lateral condyles of the femur just proximal to the articular surface
Insertion: Calcaneal tuberosity via the Achilles tendon
Innervation: Tibial nerve
Action: Ankle plantarflexion, knee flexion
Soleus:
Origin: Soleal line of the tibia, fibular head
Insertion: Calcaneal tuberosity via the Achilles tendon
Innervation: Tibial nerve
Action: Ankle plantarflexion
DEEP POSTERIOR COMPARTMENT MUSCLES:
Vascular bundle: Posterior tibial artery and veins, Peroneal artery and veins
Nerve: Tibial nerve
Muscles:
Flexor Hallucis Longus:
Origin: Posterior aspect of the fibula
Insertion: Plantar aspect of the base of the distal phalanx of the hallux
Innervation: Tibial nerve
Action: Flexion of hallux at interphalangeal and metatarsal phalangeal joints. Weak ankle plantar flexion.
Posterior Tibialis:
Origin: Posterior surface of interosseus membrane as well as small portions of posterior tibia and fibula
Insertion: Primarily inserts into plantar navicular and medial cuneiform. Also sends slips into middle and lateral cuneiforms, and bases of 2-4th metatarsals.
Innervation: Tibial nerve
Action: Ankle plantar flexion and inversion
Flexor Digitorum Longus:
Origin: Posterior surface of tibia inferior to soleal line
Insertion: Plantar aspect of the base of the distal phalanges of the 2-5th digits
Innervation: Tibial nerve
Action: Flexion of lesser toes at interphalangeal and metatarsal phalangeal joints. Weak ankle plantar flexion.
Vascular Anatomy:
There are no major vascular structures routinely encountered during a single incision fasciotomy of the lower leg.
Nervous Anatomy:
The only nerve which is encountered during a single incision fasciotomy of the leg is superficial peroneal nerve. This nerve travels within the lateral compartment of the leg, innervating the peroneus longus and brevis. Within 5-10cm of the ankle joint this nerve exits the anterior aspect of the lateral compartment along the intermuscular septum between the lateral and anterior compartments. From this point the nerve courses in an oblique fashion towards the dorsum of the foot while traveling superficially over the muscles/fascia of the anterior compartment. This nerve must be identified and protected in order to safely release the muscles of the anterior compartment.
Position, Markings, & Imaging
Patient Positioning:
The patient is placed supine. A bump is placed under the hip to internally rotate the leg which will tend to rest in an externally rotated position without this maneuver. The ipsilateral arm is placed over the patient's body, the contralateral arm is laid out on an arm board. If needed for associated fracture management the operative leg is elevated on a foam ramp of stack of blankets to allow for lateral imaging.
Marking the Incision:
The fibular head and lateral malleolus should be palpated. The incision is marked longitudinally directly in line with the fibula from ~3cm below the fibular head to ~5cm above the lateral malleolus. The compartments have the bulk of their muscle bellies proximally and become progressively tendinous more distally. As such, the distal extent of the incision can end further away from the tip of the bony landmark used to draw the incision, the lateral malleolus.
Fasciotomies for the purposes of acute compartment syndrome release are not minimally invasive procedures! To allow a complete fascial release and to protect the superficial peroneal nerve distally an incision which extends most of the length of the limb is required.
Single Incision Fasciotomy of the Leg | Description
Superficial Dissection:
The previously marked incision over the lateral aspect of the fibula is made with a knife and can be taken sharply directly down to the fascia over the lateral compartment. While some worry about injury to the superficial peroneal nerve with sharp dissection, if the incision has been placed appropriately over the fibula/lateral compartment it is safe to come down sharply. Recall that the superficial peroneal nerve travels within the lateral compartment proximally (and so is deep to the proximal extent of the superficial dissection) and that it exits the lateral compartment at the intermuscular septum and travels over the anterior compartment superficially (and so a sharp dissection taken down directly onto the lateral compartment should not risk injury to the nerve).
Once down at the level of the fascia over the lateral compartment full thickness flaps are raised anteriorly and posteriorly to expose the anterior and superficial posterior compartments respectively. Posteriorly this elevation can be done with a knife. In the proximal half of the leg this can also be performed anteriorly with a knife. In the distal half of the leg, due to the superficial peroneal nerve, elevation of the flap anteriorly must be done bluntly. This can be performed with a elevator; a tool sharp enough to brush subcutaneous tissue from fascia but not so sharp as to risk transection of the superficial peroneal nerve. The nerve can be found exiting the lateral compartment at the intermuscular septum between the lateral and anterior compartments. This septum can often be appreciated both visually and by palpation. Locating the septum proximally and dissecting bluntly along it distally will reliably reveal the superficial peroneal nerve. Once identified the nerve should be dissected out and mobilized from the fascia over the anterior compartment.
Deep Dissection (release of each compartment):
With flaps raised the fascia over the anterior, lateral, and superficial posterior compartments should be exposed.
Begin by releasing the fascia longitudinally over the lateral compartment muscles for the length of the incision. This can be done sharply with a knife. The lateral compartment is typically the easiest to identify; this compartment of course runs directly with the fibula and the tendons of the peroneal muscles are often plainly visible through the fascial covering.
With the lateral compartment released, the surgeon can proceed to release the anterior compartment. If the intermuscular septum between the lateral and anterior compartments is apparent either visually or by palpation this can be done simply by making a longitudinal incision anterior to the intermuscular septum with care taken distally to work around the superficial peroneal nerve. If the intermuscular septum is not obvious then a finger may be placed into the lateral compartment and advanced anteriorly until blunt dissection is no longer possible. The surgeon's finger is prevented from advancing any further anteriorly by the intermuscular septum between the lateral and anterior compartments. With the intermuscular septum now identified the anterior compartment can be release anterior to this palpated landmark.
The superficial posterior compartment can next be released. As with the anterior compartment, the septum between the lateral and posterior compartments may be obvious to the surgeon visually or by palpation of the septum of gastrocnemius muscles, allowing for the longitudinal release of the superficial posterior compartment to be performed posterior to the septum. If it is unclear to he surgeon where the septum lies between the two compartments again the lateral compartment can be entered and a finger used to dissect posteriorly until additional blunt dissection is impossible. This limit of blunt dissection is the septum between the lateral and posterior compartments and a longitudinal incision through fascia posterior to this point will release the superficial posterior compartment.
Finally the deep posterior compartment must be released. The peroneal muscles in the lateral compartment should be retracted anteriorly while the septum and superficial posterior compartment muscles should be retracted posteriorly. The posterior border of the fibula can then be palpated. The fascia over the deep posterior compartment (specifically the flexor hallucis longus) inserts along the posterior border of the fibula. Incising longitudinally along this posterior border of the fibula will thus release the deep posterior compartment.
Fasciotomy of the Leg - Dual Incision
- Read Full Text
-
Objectives
At the end of this module, the learner should be able to:
1) List the indications for a fasciotomy of the leg
2) Understand the relevant anatomy of fasciotomy of the leg
3) Discuss in detail the dual incision fasciotomy of the leg:
-Patient positioning
-Landmarks for incision
-Relevant internervous planes
-Sequence of the superficial and deep dissection
Indications
Indication for a fasciotomy of the leg:
1) Compartment syndrome of the leg.
Compartment syndrome occurs when the pressure within a closed muscular compartment of the body rises, often due to injury such as fracture. This rise in pressure creates ischemia, which in turns causes muscle and nerve injury or even death. It is an orthopedic emergency which requires rapid diagnosis and treatment within 4-6 hours to prevent long term dysfunction of the involved limb.
Compartment syndrome remains primarily a clinical diagnosis. It frequently occurs after fracture, a crush injury to a limb, or after re-perfusion of a previously ischemic limb. It occurs most frequently in the forearm and lower leg. Symptoms of compartment syndrome include:
Pain Pain with passive stretch of the muscles of the involved compartment Firm compartments by palpation Signs of nerve compression such as numbness, tingling, weakness Weak or absent pulses (LATE SIGN) Cooling of the extremity (LATE SIGN Valor of the extremity (LATE SIGN)
Tips, Tricks & Precautions
Precautions:
Superficial peroneal nerve: In the anterior-lateral incision care must be taken to identify and protect the superficial peroneal nerve. Unlike during a single incision fasciotomy, where the skin incision is made more posteriorly directly over the fibula, in a traditional dual incision fasciotomy the anterior-lateral incision is made in an attempt to come down directly on top of the intermuscular septum between the anterior and lateral compartments. While placing the skin incision here reduces the size of the flaps needed to expose the anterior and lateral compartments, it also places the incision directly over the area where the superficial peroneal nerve becomes superficial, the intermuscular septum. As such, in the distal half of the incision dissection through the subcutaneous tissue should be performed with scissors to avoid potential injury to the nerve with sharp dissection.
Saphenous nerve and greater saphenous vein: In the medial incision these two structures pass near the posterior-medial border of the tibia above the level of the fascia. Once through skin dissection should be performed with scissors to allow for safe identification, dissection, and retraction of these structures. The greater saphenous vein often has mutliple branches that arborize form it. Ideally these are identified and ligated to avoid unnecessary bleeding and damage to this vein.
Tips:
Tibial plateau fractures associated with compartment syndrome: Bicondylar tibial plateau fractures are frequently associated with compartment syndrome. When performing a fasciotomy for acute compartment syndrome associated with these injuries it is worth considering the position of possible future incisions for the plateau open reduction and internal fixation. Bicondylar plateau fractures typically require posterior-medial and anterior-lateral approaches for reduction and fixation. If a prior medial incision is present from a dual incision fasciotomy the proximal portion of the medial fasciotomy wound will have to be re-open to perform the reduction and fixation of the medial plateau. If a prior anterior-lateral fasciotomy has been performed the presence of such an incision may exclude the use of a typical anterior-lateral approach to the tibial plateau, as the skin bridge between the two incisions will be too narrow. As such, bicondylar tibial plateau fractures are a relative indication for performing a single, rather than a dual, incision fasciotomy. The placement of single lateral incision for the initial fasciotomy leaves the medial side untouched for the later posterior-medial approach to the plateau. Additionally, a direct lateral incision is posterior enough that the traditional anterior-lateral incision for open reduction and internal fixation of the lateral portion of the plateau is still possible.
In addition to the above clinical signs direct measurements of compartment pressure can be taken and used to help confirm the diagnosis. A compartment pressure within 30mmHg of the diastolic blood pressure (delta p) is thought to be diagnostic of compartment syndrome. While the exact role of pressure monitoring remains to be defined, it may be most useful in the obtunded patient who is unable to report their symptoms or participate with a physical exam.
Anatomy
Internervous Plain:
No internervous plains are used while performing a dual incision fasciotomy. All four compartments are accessed superficially.
Muscular/Compartment Anatomy:
There are four compartments of the lower leg: anterior, lateral, superficial posterior, deep posterior . The boundaries of these compartments are created by investing fascia over muscle, the tibia and fibula bones, and the interosseous membrane between the tibia and fibula. Muscles within a single compartment share their innervation from a single peripheral nerve. The three vascular bundles which supply the lower leg also travel within these compartments.
ANTERIOR COMPARTMENT:
Vascular bundle: Anterior tibial artery and veins
Nerve: Deep peroneal nerve
Muscles:
Tibialis Anterior:
Origin: Lateral condyle of the proximal tibia, proximal 1/2 of the lateral surface of the proximal tibia, interosseus membrane
Insertion: Medial cuneiform and 1st metatarsal base
Innervation: Deep peroneal nerve
Action: Ankle dorsiflexion and inversion
INSERT PICTURE
Extensor Hallucis Longus:
Origin: Middle 1/3rd of the anterior fibula, interosseus membrane
Insertion: Dorsal base of the distal phalanx of the hallux
Innervation: Deep peroneal nereve
Action: Extends hallux at interphalangeal and metatarsal-phalangeal joints, ankle dorsiflexion
INSERT PICTURE
Extensor Digitorum Longus:
Origin: Superior 1/3rd of anterior fibula, interosseus membrane, lateral condyle of tibia
Insertion: Dorsal base of the middle phalanx of lesser digits
Innervation: Deep peroneal nerve
Action: Extends digits at proximal interphalangeal and metatarsal-phalangeal joints, ankle dorsiflexion
INSERT PICTURE
Peroneus Teritus:
Origin: Inferior 1/3rd of the anterior fibula, interosseus membrane
Insertion: Dorsal 5th metatarsal base
Innervation: Deep peroneal nerve
Action: Ankle dorsiflexion and eversion
INSERT PICTURE
LATERAL COMPARTMENT MUSCLES:
Vascular bundle: None
Nerve: Superficial peroneal nerve
Muscles:
Peroneus Longus:
Origin: Fibular head and upper 2/3rds of the lateral fibular shaft
Insertion: Plantar surface of the medial cuneiform and 1st metatarsal base
Innervation: Superficial peroneal nerve
Action: Ankle plantarflexion and eversion
INSERT PICTURE
Peroneus Brevis:
Origin: Lower 2/3rds of the lateral fibular shaft
Insertion: 5th metatarsal base
Innervation: Superficial peroneal nerve
Action: Ankle plantarflexion and eversion
INSERT PICTURE
SUPERFICIAL POSTERIOR COMPARTMENT MUSCLES:
Vascular bundle: None
Nerve: Tibial nerve
Muscles:
Gastrocnemius:
Origin: Posterior aspects of the medial and lateral condyles of the femur just proximal to the articular surface
Insertion: Calcaneal tuberosity via the Achilles tendon
Innervation: Tibial nerve
Action: Ankle plantarflexion, knee flexion
INSERT PICTURE
Soleus:
Origin: Soleal line of the tibia, fibular head
Insertion: Calcaneal tuberosity via the Achilles tendon
Innervation: Tibial nerve
Action: Ankle plantarflexion
INSERT PICTURE
DEEP POSTERIOR COMPARTMENT MUSCLES:
Vascular bundle: Posterior tibial artery and veins, Peroneal artery and veins
Nerve: Tibial nerve
Muscles:
Flexor Hallucis Longus:
Origin: Posterior aspect of the fibula
Insertion: Plantar aspect of the base of the distal phalanx of the hallux
Innervation: Tibial nerve
Action: Flexion of hallux at interphalangeal and metatarsal phalangeal joints. Weak ankle plantar flexion.
INSERT PICTURE
Posterior Tibialis:
Origin: Posterior surface of interosseus membrane as well as small portions of posterior tibia and fibula
Insertion: Primarily inserts into plantar navicular and medial cuneiform. Also sends slips into middle and lateral cuneiforms, and bases of 2-4th metatarsals.
Innervation: Tibial nerve
Action: Ankle plantar flexion and inversion
INSERT PICTURE
Flexor Digitorum Longus:
Origin: Posterior surface of tibia inferior to soleal line
Insertion: Plantar aspect of the base of the distal phalanges of the 2-5th digits
Innervation: Tibial nerve
Action: Flexion of lesser toes at interphalangeal and metatarsal phalangeal joints. Weak ankle plantar flexion.
INSERT PICTURE
Vascular Anatomy:
The only vascular structure that is routinely visualized and at risk during a dual incision fasciotomy is the greater saphenous vein. This vein runs near the posterior-medial border of the tibia and thus is at risk when performing the medial incision. It is located in the subcutaneous tissue above fascia and travels with the saphenous nerve.
Nervous Anatomy:
Two nerves are encountered during a dual incision fasciotomy, one in each incision. In the anterior-lateral incision the superficial peroneal nerve will be identified and protected. This nerve travels within the lateral compartment of the leg, innervating the peroneus longus and brevis. Within 5-10cm of the ankle joint this nerve exits the anterior aspect of the lateral compartment along the intermuscular septum between the lateral and anterior compartments. From this point the nerve courses in an oblique fashion towards the dorsum of the foot while traveling superficially over the muscles/fascia of the anterior compartment. This nerve must be identified and protected in order to safely release the muscles of the anterior compartment.
In the medial incision, as mentioned previously, the saphenous nerve will be encountered running in the subcutaneous incision near the posterior-medial border of the tibia along with the greater saphenous vein. This nerve is the terminal branch of the femoral nerve and supplies sensation to the medial leg and foot.
Position & Markings
Patient Positioning:
The patient is placed supine. A bump is placed under the hip to internally rotate the leg which will tend to rest in an externally rotated position without this maneuver. The ipsilateral arm is placed over the patient's body, the contralateral arm is laid out on an arm board. If needed for associated fracture management the operative leg is elevated on a foam ramp of stack of blankets to allow for lateral imaging.
INSERT PICTURE
Marking the Incision:
Anterior-lateral Incision: The fibular head and lateral malleolus should be palpated and used to assess the position of the fibula. The anterior crest of the tibia can then also be palpated and marked. The incision is marked longitudinally directly between these two bony landmarks and extends from ~3cm below the tip of the fibula to ~5cm proximal to the tip of the lateral malleolus.
Medial Incision: The posterior-medial border of the tibia is palpated. An incision is marked parallel to this landmark 1-2cm more posteriorly. Again, the incision is lengthy, extending from ~5cm below the knee joint line to ~5cm proximal to the ankle joint.
Fasciotomies for the purposes of acute compartment syndrome release are not minimally invasive procedures! To allow a complete fascial release an incision which extends most of the length of the limb is required.
INSERT PICTURE
Dual Incision Fasciotomy of the Leg
Anterior-lateral Incision:
The previously marked incision is made through skin with a knife. In the proximal half of the incision it is safe to come down sharply to the level of the fascia. In the distal half of the approach the dissection through subcutaneous tissue should be performed with scissors to allow for safe identification of the superficial peroneal nerve. This nerve exits the lateral compartment within 5-10cm of the ankle joint at the level of the intermuscular septum between the lateral and anterior compartments and then travels within the subcutaneous tissue over the anterior compartment. Once the superficial peroneal nerve has been identified and dissected out small flaps can be raised anteriorly and posteriorly to expose the fascia over the anterior and lateral compartments respectively. The intermuscular septum between the two compartments can usually be seen or palpated, helping to insure both compartments are identified. The fascia over each compartment should then be split longitudinally for the length of the incision, with care to work around the superficial peroneal nerve distally.
Medial Incision:
The previously marked incision is made through skin with a knife. Dissection down through subcutaneous tissue should be performed with scissors. This allows for safe identification of the saphenous nerve and greater saphenous vein, which should be retracted. Dissection is carried down to fascia and the posterior-medial border of the tibia. An incision along the posterior-medial border of the tibia will release the fascia over the popliteus and flexor digitorum longus, the later being the most medial muscle of the deep posterior compartment. A small posterior flap can be raised above the level of the fascia to expose the fascia over the soleus and gastrocnemius. This can then also be incised longitudinally for the length of the incision releasing the superficial posterior compartment.
Tibial Plafond - Anterior Medial Approach
Video: Anterior Medial Approach
- Read Full Text
-
Objectives
At the end of this module, the learner should be able to:
1) List the indications for an anterior medial approach to the tibial plafond
2) Understand the relevant anatomy of the anterior medial approach to the tibial plafond
3) Discuss in detail the anterior medial approach to the tibial plafond, including:
-Patient positioning
-Landmarks for incision
-Relevant internervous plains
-Sequence of the superficial and deep dissection
Indications
Indications for an Anterior Medial Approach to the Tibial Plafond:
1) Open reduction internal fixation of fractures of the tibial plafond (pilon fractures)
Open reduction and internal fixation of fractures of the tibial plafond requires careful pre-operative planning to determine the required approach(es), reduction sequence, provisional fixation, and definitive fixation strategies. With regards to surgical approach, there are multiple options available to the fracture surgeon and several variables that may lead a surgeon to choose one over the other. Commonly used approaches include the anterior medial, anterior lateral, and posterior lateral approaches. Less commonly one might use a posterior medial approach. While some of the listed approaches are mutually exclusive (anterior medial and anterior lateral approaches), others may be used simultaneously (e.g., anterior medial and posterior lateral) or in conjunction with other smaller incisions (e.g., an anterior lateral approach combined with a small medial incision for percutaneous plate application on the anterior medial face of the tibia) for the applications of fixation outside of a single approach.
The choice of approach to the tibial plafond hinges on multiple factors, including the following:
-Fracture pattern:
While the range of fracture patterns in plafond injuries is highly variable, there are common fragments and patterns of displacement that may influence the choice of surgical approach. Frequently there are three dominant fragments: Chaput (anterior lateral), Volkman's (posterior lateral), and medial. In addition to these three fragments there is typically an area of central impaction in the plafond and an associated fibula fracture. All of these fragments and fracture lines must be addressed through whatever approach(es) the surgeon chooses.
The anterior medial approach may be most advantageous when the anterior fracture line separating the Chaput from the medial fragment and the associated central impaction is located more medially. Centering the incision over the anterior fracture line allows access not only for reducing this fracture line between the Chaput and the medial fragment, but also for booking open this fracture line initially to allow for reduction and grafting of central impaction. This fracture pattern, with more medial fracture lines and impaction, is caused by a varus force at the time of initial injury. Presenting AP x-rays which show varus of the talus as it has impacted the plafond and a relatively simple tensile failure of the fibula may be the first indication of this pattern of injury. After spanning external fixation has been applied and a CT scan has been obtained the precise positions of the fracture lines and impaction will be further delineated.
-Condition of the soft tissue envelop, including open wounds from the initial injury:
While reduction and fixation of the bone may be the primary goal of surgery, complications and outcomes are just as closely tied to safely handling the soft tissue envelope of the distal end of the tibia. This influences the timing of definitive fixation; most surgeons choosing to delay surgery until after a period of rest in an external fixator to allow for swelling to resolve. It may also affect the choice of approach. Put simply, extensile incisions should not be made in areas of compromised soft tissue. A common example of this would be in the setting of an open fracture. Open wounds, even if successfully closed and healed prior to definitive fixation, may exclude or promote a particular approach. A transverse wound over the anterior medial face of the distal tibia may exclude the possibility of using the anterior medial approach. Conversely, a longitudinal wound in line with an anterior lateral approach may push a surgeon to consider this approach even if, based of the fracture pattern, it would not otherwise have been the first choice of the surgeon.
-Surgeon preference and familiarity
Anatomy
Internervous Plain:
There is no internervous plane used during this approach. The distal portions of the muscles of the anterior compartment of the leg are elevated and retracted en masse along with their nerovascular bundle (deep peroneal nerve, anterior tibial artery) to avoid deinnervation.
Muscular Anatomy:
The tibia is a triangular shaped bone. While the anterior medial surface is devoid of muscular attachments, the anterior lateral and posterior surfaces are the places of origin of the majority of the muscles of the anterior and superficial and deep posterior compartments respectively. Access to the distal tibia is thus gained by working around (or through) these muscular compartments. For the anterior medial approach the muscles of the anterior compartment are elevated off the anterior lateral surface of the distal tibia en masse. The anterior medial face of the tibia may also be exposed during this approach by elevating the soft tissue of the anterior medial distal tibia as necessary in a subperiosteal fashion.
Tibialis Anterior:
Origin: Lateral condyle of the proximal tibia, proximal 1/2 of the lateral surface of the proximal tibia, interosseus membrane
Insertion: Medial cuneiform and 1st metatarsal base
Innervation: Deep peroneal nerve
Action: Ankle dorsiflexion and inversion
Extensor Hallucis Longus:
Origin: Middle 1/3rd of the anterior fibula, interosseus membrane
Insertion: Dorsal base of the distal phalanx of the hallux
Innervation: Deep peroneal nereve
Action: Extends hallux at interphalangeal and metatarsal-phalangeal joints, ankle dorsiflexion
Extensor Digitorum Longus:
Origin: Superior 1/3rd of anterior fibula, interosseus membrane, lateral condyle of tibia
Insertion: Dorsal base of the middle phalanx of lesser digits
Innervation: Deep peroneal nerve
Action: Extends digits at proximal interphalangeal and metatarsal-phalangeal joints, ankle dorsiflexion
Peroneus Teritus:
Origin: Inferior 1/3rd of the anterior fibula, interosseus membrane
Insertion: Dorsal 5th metatarsal base
Innervation: Deep peroneal nerve
Action: Ankle dorsiflexion and eversion
Vascular Anatomy:
The primary vascular bundle at theoretical risk during this approach is the anterior tibial artery and its accompanying veins. This artery originates in the popliteal fossa and passes into the anterior compartment of the leg via a round opening in the proximal portion of the interosseus membrane. It then continues distally between the tibialis anterior muscle and the extensor hallucis longus muscle. As it crosses the ankle joint the extensor hallucis longus courses across it as it heads towards the hallux. As such, distal to the ankle joint it lies between the tendons of the extensor hallucis longus and extensor digitorum longus. As long as the entire anterior compartment is elevated en masse from the distal tibia this artery should be safely retracted away from the operative approach and should not be routinely identified during the course of the dissection.
The greater saphenous vein is routinely identified in the most medial aspect of the anterior medial approach to the distal tibia. Once through skin the surgeon to switch to scissors in this portion of the dissection to allow for its safe identification, dissection, and retraction.
Nervous Anatomy:
Similar to the vascular anatomy just described, a nervous structure at theoretical risk, though rarely encountered during surgery, is the deep peroneal nerve. This nerve is of course a branch off the common peroneal nerve which typically arborizes at the level of the fibular neck. The deep peroneal nerve continues distally along with the anterior tibial artery and innervates all the muscles of the anterior compartment before innervating the two small extensor muscles on the dorsum of the foot (extensor digitorum and hallucis brevis) and eventually providing sensation in the first dorsal webspace. Like the anterior tibial artery, this nerve is not routinely sought in surgery, but rather is retracted laterally en masse with the muscles of the anterior compartment.
The superficial peroneal nerve is also at risk during this surgical dissection. This nerve branches from the common peroneal nerve at the level of the fibular neck and then courses between the peroneus longus and brevis on its way distal through the lateral compartment of the leg. Several centimeters proximal to the ankle joint the nerve exits the lateral compartment anteriorly and begins to course within the subcutaneous tissue superficial to the anterior compartment. It eventually branches into the medial and intermediate dorsal cutaneous nerves which supply sensation to the dorsum of the foot along with the lateral dorsal cutaneous nerve, a branch of the sural nerve. The superficial peroneal nerve may be identified during the superficial portion of the dissection. Specifically, it may be come across in the distal aspect of the longitudinal portion of the incision.
Positioning & Markings
Patient Positioning:
For this approach the typical positioning of the patient is supine. A bump is placed under the hip to internally rotate the leg which will tend to rest in an externally rotated position without this maneuver. The ipsilateral arm is placed over the patient's body, the contralateral arm is laid out on an arm board. The operative leg is elevated on a foam ramp or stack of blankets to allow for lateral imaging.
A cantilever table with no metal appliances attached allows for simplified fluoroscopic imaging of the limb. The patient should be brought to the end of this bed so that the surgeon may stand at the end of the bed while operating if desired.
Intra-op Imaging:
The fluoroscopy machine comes in from the contralateral side and obtains mortise and lateral images throughout the case. The mortise view typically required 10-15 degrees of internal rotation relative to an AP view. The lateral view is defined by complete overlap of the talar dome.
Marking the Incision:
The incision consists of two limbs which connect at the level of the ankle. The longitudinal limb runs from the ankle joint proximally, parallel to but one centimeter lateral to the palpable anterior tibial crest. The oblique limb runs from the ankle joint at the distal extent of the longitudinal limb towards a point 1cm inferior to the tip of the medial malleolus. The junction of these two limbs may be slightly curved to avoid a sharp point. It is highly recommended to verify the level of the ankle joint (and so the junction of these two limbs of the incision) radiographically. Being too proximal with the oblique limb can in particular reduce the surgeon's ability to visualize the articular surface.
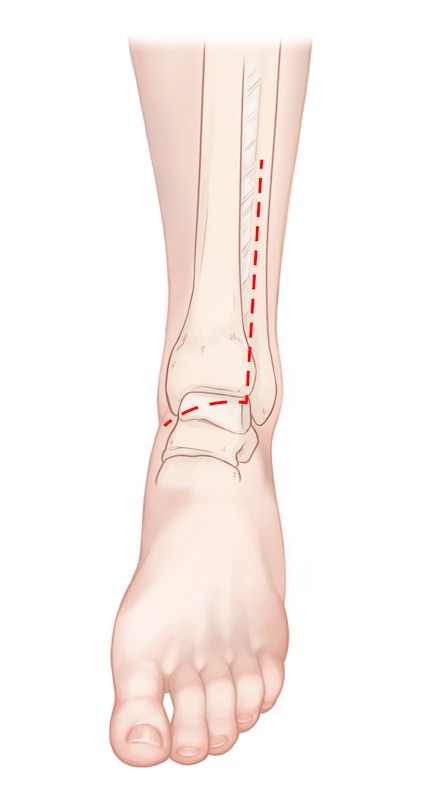
Anterior Medial Approach to the Ankle | Video
Superficial dissection:
A knife is used to make the incision as previously described. Care should be used to make sure the knife is held perpendicular to the skin to avoid undermining either skin edge. In the longitudinal portion of the incision the knife may be used to dissect sharply down to the fascia over the anterior compartment. Along the oblique limb of the incision the knife should be exchanged for scissors to allow for more careful dissection and identification of the greater saphenous vein and nerve in the medial extent of the incision. Large flaps should not be developed at this level. Dissection medially should only be performed to the level of the palpable anterior crest of the tibia.
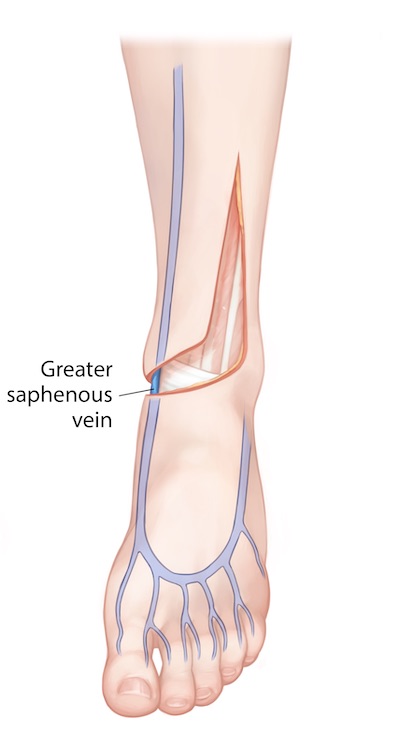
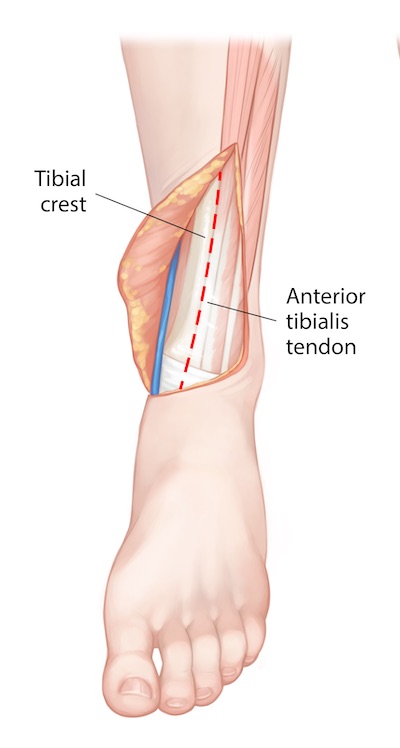
Deep Dissection:
A knife should then be used to incise periosteum longitudinally along the anterior crest of the tibia just medial to the tibialis anterior tendon. If the tibialis anterior tendon sheath is accidentally violated it should be repaired. A full thickness flap may then be raised with a knife or elevator medially and laterally in a subperiosteal fashion. Medially this flap consists of periosteum, subcutaneous tissue, and skin. Laterally this flap also includes the anterior compartment. Once the primary sagittal fracture line has been identified in the anterior cortex of the distal tibia the ankle joint capsule distally may be incised in line with this fracture line. Additionally, the ankle joint may be incised transversely to make a "T" shaped capsulotomy.
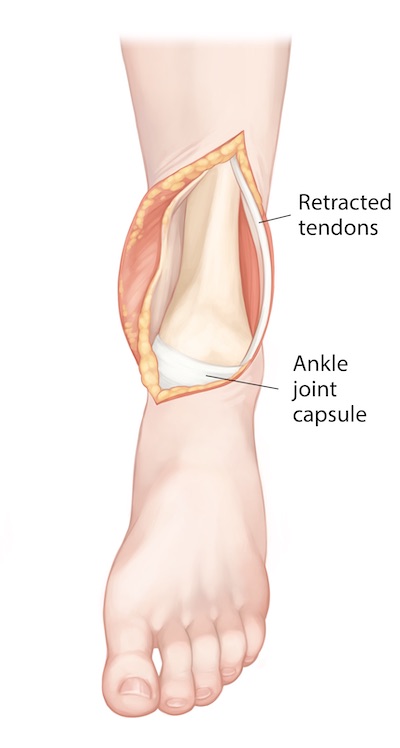
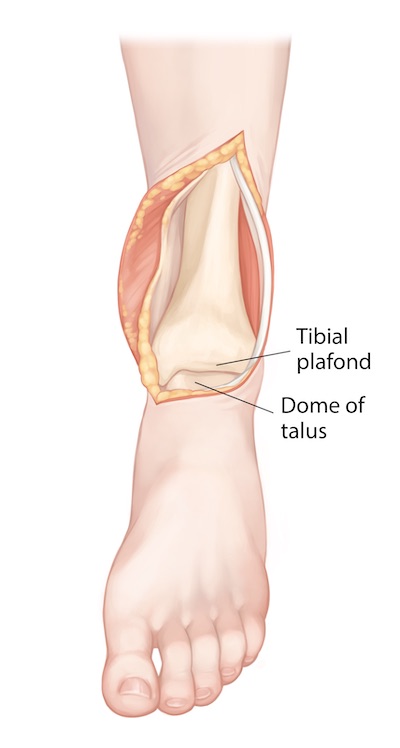
Visualization of the plafond may be vastly improved with static distraction across the ankle joint. This may be applied through a previously placed external fixator or through a universal distractor.
Tips, Tricks & Precautions
Tips:
Avoiding entering the tibialis anterior tendon sheath:
The sheath which contains the tibialis anterior tendon is not perfectly circular like the tendon itself. Instead, it has a long, thin tail which approaches the anterior crest of the tibia when the tendon is in its resting position. Thus it is possible to wander into the sheath unintentionally even when what seems like considerable space is left between the periosteal incision along the anterior crest of the tibia and this tendon. To help with this, it is beneficial, though counterintuitive, to gently push the tibialis anterior tendon towards the anterior crest of the tibia while making this periosteal incision. Though this seemingly brings the tendon closer to the incision it also causes the tendon to fill the most medial extent of its sheath, making the surgeon less likely to stray into it unintentionally.
Distraction:
Visualizing the articular surface of the plafond is aided by distraction across the ankle joint. This may be done with a previously applied and retained external fixator or a universal distractor placed at the time of definitive surgery. For the later, one pin is applied into the medial proximal tibial shaft above the intended level of definitive fixation and the other into the talar neck via a percutaneous incision guided with fluoroscopy. While distraction certainly aids visualization, it may, however, impair reduction. This is particularly true for the medial fragment. This fragment is typically attached to the talus via the deltoid ligament even after injury, and so distraction through the talus may distalize the medial fragment and prevent its reduction. As such distraction may have to be cyclically applied and loosened during the process of fracture fixation.
Closure:
Closure of the wound at the conclusion of the case can be particularly challenging. Using Allgower-Donati type throws (vertical mattress type throws where one side is place only through the deep dermal tissue rather than skin) and placing all sutures prior to tying any knots allows multiple sutures to be used simultaneously to hold the wound shut while individual knots are sequentially tied. Knots should be placed on the non-flap side of the incision.
Objectives
At the end of this module, the learner should be able to:
1) List the indications for an anterior medial approach to the tibial plafond
2) Understand the relevant anatomy of the anterior medial approach to the tibial plafond
3) Discuss in detail the anterior medial approach to the tibial plafond, including:
-Patient positioning
-Landmarks for incision
-Relevant internervous plains
-Sequence of the superficial and deep dissection
Indications
Indications for an Anterior Medial Approach to the Tibial Plafond:
1) Open reduction internal fixation of fractures of the tibial plafond (pilon fractures)
Open reduction and internal fixation of fractures of the tibial plafond requires careful pre-operative planning to determine the required approach(es), reduction sequence, provisional fixation, and definitive fixation strategies. With regards to surgical approach, there are multiple options available to the fracture surgeon and several variables that may lead a surgeon to choose one over the other. Commonly used approaches include the anterior medial, anterior lateral, and posterior lateral approaches. Less commonly one might use a posterior medial approach. While some of the listed approaches are mutually exclusive (anterior medial and anterior lateral approaches), others may be used simultaneously (e.g., anterior medial and posterior lateral) or in conjunction with other smaller incisions (e.g., an anterior lateral approach combined with a small medial incision for percutaneous plate application on the anterior medial face of the tibia) for the applications of fixation outside of a single approach.
The choice of approach to the tibial plafond hinges on multiple factors, including the following:
-Fracture pattern:
While the range of fracture patterns in plafond injuries is highly variable, there are common fragments and patterns of displacement that may influence the choice of surgical approach. Frequently there are three dominant fragments: Chaput (anterior lateral), Volkman's (posterior lateral), and medial. In addition to these three fragments there is typically an area of central impaction in the plafond and an associated fibula fracture. All of these fragments and fracture lines must be addressed through whatever approach(es) the surgeon chooses.
The anterior medial approach may be most advantageous when the anterior fracture line separating the Chaput from the medial fragment and the associated central impaction is located more medially. Centering the incision over the anterior fracture line allows access not only for reducing this fracture line between the Chaput and the medial fragment, but also for booking open this fracture line initially to allow for reduction and grafting of central impaction. This fracture pattern, with more medial fracture lines and impaction, is caused by a varus force at the time of initial injury. Presenting AP x-rays which show varus of the talus as it has impacted the plafond and a relatively simple tensile failure of the fibula may be the first indication of this pattern of injury. After spanning external fixation has been applied and a CT scan has been obtained the precise positions of the fracture lines and impaction will be further delineated.
-Condition of the soft tissue envelop, including open wounds from the initial injury:
While reduction and fixation of the bone may be the primary goal of surgery, complications and outcomes are just as closely tied to safely handling the soft tissue envelope of the distal end of the tibia. This influences the timing of definitive fixation; most surgeons choosing to delay surgery until after a period of rest in an external fixator to allow for swelling to resolve. It may also affect the choice of approach. Put simply, extensile incisions should not be made in areas of compromised soft tissue. A common example of this would be in the setting of an open fracture. Open wounds, even if successfully closed and healed prior to definitive fixation, may exclude or promote a particular approach. A transverse wound over the anterior medial face of the distal tibia may exclude the possibility of using the anterior medial approach. Conversely, a longitudinal wound in line with an anterior lateral approach may push a surgeon to consider this approach even if, based of the fracture pattern, it would not otherwise have been the first choice of the surgeon.
-Surgeon preference and familiarity
Anatomy
Internervous Plain:
There is no internervous plane used during this approach. The distal portions of the muscles of the anterior compartment of the leg are elevated and retracted en masse along with their nerovascular bundle (deep peroneal nerve, anterior tibial artery) to avoid deinnervation.
Muscular Anatomy:
The tibia is a triangular shaped bone. While the anterior medial surface is devoid of muscular attachments, the anterior lateral and posterior surfaces are the places of origin of the majority of the muscles of the anterior and superficial and deep posterior compartments respectively. Access to the distal tibia is thus gained by working around (or through) these muscular compartments. For the anterior medial approach the muscles of the anterior compartment are elevated off the anterior lateral surface of the distal tibia en masse. The anterior medial face of the tibia may also be exposed during this approach by elevating the soft tissue of the anterior medial distal tibia as necessary in a subperiosteal fashion.
Tibialis Anterior:
Origin: Lateral condyle of the proximal tibia, proximal 1/2 of the lateral surface of the proximal tibia, interosseus membrane
Insertion: Medial cuneiform and 1st metatarsal base
Innervation: Deep peroneal nerve
Action: Ankle dorsiflexion and inversion
Extensor Hallucis Longus:
Origin: Middle 1/3rd of the anterior fibula, interosseus membrane
Insertion: Dorsal base of the distal phalanx of the hallux
Innervation: Deep peroneal nereve
Action: Extends hallux at interphalangeal and metatarsal-phalangeal joints, ankle dorsiflexion
Extensor Digitorum Longus:
Origin: Superior 1/3rd of anterior fibula, interosseus membrane, lateral condyle of tibia
Insertion: Dorsal base of the middle phalanx of lesser digits
Innervation: Deep peroneal nerve
Action: Extends digits at proximal interphalangeal and metatarsal-phalangeal joints, ankle dorsiflexion
Peroneus Teritus:
Origin: Inferior 1/3rd of the anterior fibula, interosseus membrane
Insertion: Dorsal 5th metatarsal base
Innervation: Deep peroneal nerve
Action: Ankle dorsiflexion and eversion
Vascular Anatomy:
The primary vascular bundle at theoretical risk during this approach is the anterior tibial artery and its accompanying veins. This artery originates in the popliteal fossa and passes into the anterior compartment of the leg via a round opening in the proximal portion of the interosseus membrane. It then continues distally between the tibialis anterior muscle and the extensor hallucis longus muscle. As it crosses the ankle joint the extensor hallucis longus courses across it as it heads towards the hallux. As such, distal to the ankle joint it lies between the tendons of the extensor hallucis longus and extensor digitorum longus. As long as the entire anterior compartment is elevated en masse from the distal tibia this artery should be safely retracted away from the operative approach and should not be routinely identified during the course of the dissection.
The greater saphenous vein is routinely identified in the most medial aspect of the anterior medial approach to the distal tibia. Once through skin the surgeon to switch to scissors in this portion of the dissection to allow for its safe identification, dissection, and retraction.
Nervous Anatomy:
Similar to the vascular anatomy just described, a nervous structure at theoretical risk, though rarely encountered during surgery, is the deep peroneal nerve. This nerve is of course a branch off the common peroneal nerve which typically arborizes at the level of the fibular neck. The deep peroneal nerve continues distally along with the anterior tibial artery and innervates all the muscles of the anterior compartment before innervating the two small extensor muscles on the dorsum of the foot (extensor digitorum and hallucis brevis) and eventually providing sensation in the first dorsal webspace. Like the anterior tibial artery, this nerve is not routinely sought in surgery, but rather is retracted laterally en masse with the muscles of the anterior compartment.
The superficial peroneal nerve is also at risk during this surgical dissection. This nerve branches from the common peroneal nerve at the level of the fibular neck and then courses between the peroneus longus and brevis on its way distal through the lateral compartment of the leg. Several centimeters proximal to the ankle joint the nerve exits the lateral compartment anteriorly and begins to course within the subcutaneous tissue superficial to the anterior compartment. It eventually branches into the medial and intermediate dorsal cutaneous nerves which supply sensation to the dorsum of the foot along with the lateral dorsal cutaneous nerve, a branch of the sural nerve. The superficial peroneal nerve may be identified during the superficial portion of the dissection. Specifically, it may be come across in the distal aspect of the longitudinal portion of the incision.
Positioning & Markings
Patient Positioning:
For this approach the typical positioning of the patient is supine. A bump is placed under the hip to internally rotate the leg which will tend to rest in an externally rotated position without this maneuver. The ipsilateral arm is placed over the patient's body, the contralateral arm is laid out on an arm board. The operative leg is elevated on a foam ramp or stack of blankets to allow for lateral imaging.
A cantilever table with no metal appliances attached allows for simplified fluoroscopic imaging of the limb. The patient should be brought to the end of this bed so that the surgeon may stand at the end of the bed while operating if desired.
Intra-op Imaging:
The fluoroscopy machine comes in from the contralateral side and obtains mortise and lateral images throughout the case. The mortise view typically required 10-15 degrees of internal rotation relative to an AP view. The lateral view is defined by complete overlap of the talar dome.
Marking the Incision:
The incision consists of two limbs which connect at the level of the ankle. The longitudinal limb runs from the ankle joint proximally, parallel to but one centimeter lateral to the palpable anterior tibial crest. The oblique limb runs from the ankle joint at the distal extent of the longitudinal limb towards a point 1cm inferior to the tip of the medial malleolus. The junction of these two limbs may be slightly curved to avoid a sharp point. It is highly recommended to verify the level of the ankle joint (and so the junction of these two limbs of the incision) radiographically. Being too proximal with the oblique limb can in particular reduce the surgeon's ability to visualize the articular surface.
Anterior Medial Approach to the Ankle | Video
Superficial dissection:
A knife is used to make the incision as previously described. Care should be used to make sure the knife is held perpendicular to the skin to avoid undermining either skin edge. In the longitudinal portion of the incision the knife may be used to dissect sharply down to the fascia over the anterior compartment. Along the oblique limb of the incision the knife should be exchanged for scissors to allow for more careful dissection and identification of the greater saphenous vein and nerve in the medial extent of the incision. Large flaps should not be developed at this level. Dissection medially should only be performed to the level of the palpable anterior crest of the tibia.
Deep Dissection:
A knife should then be used to incise periosteum longitudinally along the anterior crest of the tibia just medial to the tibialis anterior tendon. If the tibialis anterior tendon sheath is accidentally violated it should be repaired. A full thickness flap may then be raised with a knife or elevator medially and laterally in a subperiosteal fashion. Medially this flap consists of periosteum, subcutaneous tissue, and skin. Laterally this flap also includes the anterior compartment. Once the primary sagittal fracture line has been identified in the anterior cortex of the distal tibia the ankle joint capsule distally may be incised in line with this fracture line. Additionally, the ankle joint may be incised transversely to make a "T" shaped capsulotomy.
Visualization of the plafond may be vastly improved with static distraction across the ankle joint. This may be applied through a previously placed external fixator or through a universal distractor.
Tips, Tricks & Precautions
Tips:
Avoiding entering the tibialis anterior tendon sheath:
The sheath which contains the tibialis anterior tendon is not perfectly circular like the tendon itself. Instead, it has a long, thin tail which approaches the anterior crest of the tibia when the tendon is in its resting position. Thus it is possible to wander into the sheath unintentionally even when what seems like considerable space is left between the periosteal incision along the anterior crest of the tibia and this tendon. To help with this, it is beneficial, though counterintuitive, to gently push the tibialis anterior tendon towards the anterior crest of the tibia while making this periosteal incision. Though this seemingly brings the tendon closer to the incision it also causes the tendon to fill the most medial extent of its sheath, making the surgeon less likely to stray into it unintentionally.
Distraction:
Visualizing the articular surface of the plafond is aided by distraction across the ankle joint. This may be done with a previously applied and retained external fixator or a universal distractor placed at the time of definitive surgery. For the later, one pin is applied into the medial proximal tibial shaft above the intended level of definitive fixation and the other into the talar neck via a percutaneous incision guided with fluoroscopy. While distraction certainly aids visualization, it may, however, impair reduction. This is particularly true for the medial fragment. This fragment is typically attached to the talus via the deltoid ligament even after injury, and so distraction through the talus may distalize the medial fragment and prevent its reduction. As such distraction may have to be cyclically applied and loosened during the process of fracture fixation.
Closure:
Closure of the wound at the conclusion of the case can be particularly challenging. Using Allgower-Donati type throws (vertical mattress type throws where one side is place only through the deep dermal tissue rather than skin) and placing all sutures prior to tying any knots allows multiple sutures to be used simultaneously to hold the wound shut while individual knots are sequentially tied. Knots should be placed on the non-flap side of the incision.
Tibial Plafond - Anterior Lateral Approach
Video: Anterior Lateral Approach
- Read Full Text
-
Objectives
At the end of this module, the learner should be able to:
1) List the indications for an anterior lateral approach to the tibial plafond
2) Understand the relevant anatomy of the anterior lateral approach to the tibial plafond
3) Discuss in detail the anterior lateral approach to the tibial plafond, including:
a. Patient positioning
b. Landmarks for incision
c. Relevant internervous plains
d. Sequence of the superficial and deep dissection
Indications
Indications for an Anterior Lateral Approach to the Tibial Plafond:
1) Open reduction internal fixation of fractures of the tibial plafond (pilon fractures)
Open reduction and internal fixation of fractures of the tibial plafond requires careful pre-operative planning to determine the required approach(es), reduction sequence, provisional fixation, and definitive fixation strategies. With regards to surgical approach, there are multiple options available to the fracture surgeon and several variables that may lead a surgeon to choose one over the other. Commonly used approaches include the anterior medial, anterior lateral, and posterior lateral approaches. Less commonly one might use a posterior medial approach. While some of the listed approaches are mutually exclusive (anterior medial and anterior lateral approaches), others may be used simultaneously (e.g., anterior medial and posterior lateral) or in conjunction with other smaller incisions (e.g., an anterior lateral approach combined with a small medial incision for percutaneous plate application on the anterior medial face of the tibia) for the applications of fixation outside of a single approach.
The choice of approach to the tibial plafond hinges on multiple factors, including the following:
-Fracture pattern:
While the range of fracture patterns in plafond injuries is highly variable, there are common fragments and patterns of displacement that may influence the choice of surgical approach. Frequently there are three dominant fragments: Chaput (anterior lateral), Volkman's (posterior lateral), and medial. In addition to these three fragments there is typically an area of central impaction in the plafond and an associated fibula fracture. All of these fragments and fracture lines must be addressed through whatever approach(es) the surgeon chooses.
The anterior lateral approach may be most advantageous when the anterior fracture line separating the Chaput from the medial fragment and the associated central impaction is located more laterally. Centering the incision over the anterior fracture line allows access not only for reducing this fracture line between the Chaput and the medial fragment, but also for booking open this fracture line initially to allow for reduction and grafting of central impaction. This fracture pattern, with more lateral fracture lines and impaction, is caused by a valgus force at the time of initial injury. Presenting AP x-rays which show valgus of the talus as it has impacted the plafond and a frequently comminuted fracture of the fibula may be the first indication of this pattern of injury. After spanning external fixation has been applied and a CT scan has been obtained the precise positions of the fracture lines and impaction will be further delineated.
-Condition of the soft tissue envelop, including open wounds from the initial injury:
While reduction and fixation of the bone may be the primary goal of surgery, complications and outcomes are just as closely tied to safely handling the soft tissue envelope of the distal end of the tibia. This influences the timing of definitive fixation; most surgeons choosing to delay surgery until after a period of rest in an external fixator to allow for swelling to resolve. It may also affect the choice of approach. Put simply, extensile incisions should not be made in areas of compromised soft tissue. A common example of this would be in the setting of an open fracture. Open wounds, even if successfully closed and healed prior to definitive fixation, may exclude or promote a particular approach. A transverse wound over the anterior lateral face of the distal tibia may exclude the possibility of using the anterior lateral approach. Conversely, a longitudinal wound in line with an anterior lateral approach may push a surgeon to consider this approach even if, based of the fracture pattern, it would not otherwise have been the first choice of the surgeon.
-Surgeon preference and familiarity
Anatomy
Internervous Plane:
The anterior lateral approach uses the internervous plane between the anterior (deep peroneal nerve) and lateral (superficial peroneal nerve) compartments. The anterior compartment muscles are retracted medially along with the deep peroneal nerve and anterior tibial artery en masse to expose the distal tibia.
Muscular Anatomy:
The tibia is a triangular shaped bone. While the anterior medial surface is devoid of muscular attachments, the anterior lateral and posterior surfaces are the places of origin of the majority if the muscles of the anterior and superficial and deep posterior compartments respectively. Access to the distal tibia is thus gained by working around (or through) these muscular compartments. For the anterior lateral approach the muscles of the anterior compartment are elevated off the anterior lateral surface of the distal tibia en masse. The anterior medial face of the tibia may also be exposed to a limited extentduring this approach by elevating the soft tissue of the anterior medial distal tibia as necessary in a subperiosteal fashion.
Tibialis Anterior:
Origin: Lateral condyle of the proximal tibia, proximal 1/2 of the lateral surface of the proximal tibia, interosseus membrane
Insertion: Medial cuneiform and 1st metatarsal base
Innervation: Deep peroneal nerve
Action: Ankle dorsiflexion and inversion
Extensor Hallucis Longus:
Origin: Middle 1/3rd of the anterior fibula, interosseus membrane
Insertion: Dorsal base of the distal phalanx of the hallux
Innervation: Deep peroneal nereve
Action: Extends hallux at interphalangeal and metatarsal-phalangeal joints, ankle dorsiflexion
Extensor Digitorum Longus:
Origin: Superior 1/3rd of anterior fibula, interosseus membrane, lateral condyle of tibia
Insertion: Dorsal base of the middle phalanx of lesser digits
Innervation: Deep peroneal nerve
Action: Extends digits at proximal interphalangeal and metatarsal-phalangeal joints, ankle dorsiflexion
Peroneus Teritus:
Origin: Inferior 1/3rd of the anterior fibula, interosseus membrane
Insertion: Dorsal 5th metatarsal base
Innervation: Deep peroneal nerve
Action: Ankle dorsiflexion and eversion
Peroneus Longus:
Origin: Fibular head and upper 2/3rds of the lateral fibular shaft
Insertion: Plantar surface of the medial cuneiform and 1st metatarsal base
Innervation: Superficial peroneal nerve
Action: Ankle plantarflexion and eversion
Peroneus Brevis:
Origin: Lower 2/3rds of the lateral fibular shaft
Insertion: 5th metatarsal base
Innervation: Superficial peron
Action: Ankle plantarflexion and eversion
Vascular Anatomy:
The primary vascular bundle at theoretical risk during this approach is the anterior tibial artery and its accompanying veins. This artery originates in the popliteal fossa and passes into the anterior compartment of the leg via a round opening in the proximal portion of the interosseus membrane. It then continues distally between the tibialis anterior muscle and the extensor hallucis longus muscle. As it crosses the ankle joint the extensor hallucis longus courses across it as it heads towards the hallux. As such, distal to the ankle joint it lies between the tendons of the extensor hallucis longus and extensor digitorum longus. As long as the entire anterior compartment is elevated en masse from the distal tibia this artery should be safely retracted away from the operative approach and should not be routinely identified during the course of the dissection.
INSERT PICTURE
Nervous Anatomy:
Similar to the vascular anatomy just described, a nervous structure at theoretical risk, though rarely encountered during surgery, is the deep peroneal nerve. This nerve is of course a branch off the common peroneal nerve which typically arborizes at the level of the fibular neck. The deep peroneal nerve continues distally along with the anterior tibial artery and innervates all the muscles of the anterior compartment before innervating the two small extensor muscles on the dorsum of the foot (extensor digitorum and hallucis brevis) and eventually providing sensation in the first dorsal webspace. Like the anterior tibial artery, this nerve is not routinely sought in surgery, but rather is retracted laterally en masse with the muscles of the anterior compartment.
During the anterior lateral approach to the ankle the superficial peroneal nerve is exposed, dissected out, and at definite risk. This nerve branches from the common peroneal nerve at the level of the fibular neck and then courses between the peroneus longus and brevis on its way distal through the lateral compartment of the leg. Several centimeters proximal to the ankle joint the nerve exits the lateral compartment anteriorly and begins to course within the subcutaneous tissue superficial to the anterior compartment. It eventually branches into the medial and intermediate dorsal cutaneous nerves which supply sensation to the dorsum of the foot along with the lateral dorsal cutaneous nerve, a branch of the sural nerve. The superficial peroneal nerve must be immediately identified during the superficial portion of the dissection and protected through the case when using the anterior lateral approach.
Position & Markings
Patient Positioning:
For this approach the typical positioning of the patient is supine. A bump is placed under the hip to internally rotate the leg which will tend to rest in an externally rotated position without this maneuver. The ipsilateral arm is placed over the patient's body, the contralateral arm is laid out on an arm board. The operative leg is elevated on a foam ramp or stack of blankets to allow for lateral imaging.
A cantilever table with no metal appliances attached allows for simplified fluoroscopic imaging of the limb. The patient should be brought to the end of this bed so that the surgeon may stand at the end of the bed while operating if desired.
Intra-op Imaging:
The fluoroscopy machine comes in from the contralateral side and obtains mortise and lateral images throughout the case. The mortise view typically required 10-15 degrees of internal rotation relative to an AP view. The lateral view is defined by complete overlap of the talar dome.
Marking the Incision:
The incision is placed in-line with the 4th ray distally and about 3cm lateral to the anterior tibial crest proximally. C-arm can be used to determine the extent of the incision proximally (enough to expose the fracture) and also to help place it appropriately over the 4th ray and anterior lateral distal tibia proximally.
Ankle: Posterior Lateral Approach to the Tibia and Fibula
Video: Posterior Lateral Approach to the Tibia and Fibula
- Read Full Text
-
Objectives
At the end of this module, the learner should be able to:
1) List the indications for an posterior lateral approach to the tibial plafond
2) Understand the relevant anatomy of the posterior lateral approach to the tibial plafond
3) Discuss in detail the posterior lateral approach to the tibial plafond, including:
a. Patient positioning
b. Landmarks for incision
c. Relevant internervous plains
d. Sequence of the superficial and deep dissection
Indications
Indications for a Posterior Lateral Approach to the Tibial Plafond:
1) Open reduction internal fixation of fractures of the tibial plafond (pilon fractures)
Open reduction and internal fixation of fractures of the tibial plafond requires careful pre-operative planning to determine the required approach(es), reduction sequence, provisional fixation, and definitive fixation strategies. With regards to surgical approach, there are multiple options available to the fracture surgeon and several variables that may lead a surgeon to choose one over the other. Commonly used approaches include the anterior medial, anterior lateral, and posterior lateral approaches. Less commonly one might use a posterior medial approach. While some of the listed approaches are mutually exclusive (anterior medial and anterior lateral approaches), others may be used simultaneously (e.g., anterior medial and posterior lateral) or in conjunction with other smaller incisions (e.g., an anterior lateral approach combined with a small medial incision for percutaneous plate application on the anterior medial face of the tibia) for the applications of fixation outside of a single approach.
The choice of approach to the tibial plafond hinges on multiple factors, including the following:
-Fracture pattern:
While the range of fracture patterns in plafond injuries is highly variable, there are common fragments and patterns of displacement that may influence the choice of surgical approach. Frequently there are three dominant fragments: Chaput (anterior lateral), Volkman's (posterior lateral), and medial. In addition to these three fragments there is typically an area of central impaction in the plafond and an associated fibula fracture. All of these fragments and fracture lines must be addressed through whatever approach(es) the surgeon chooses.
The posterior lateral approach may be used to reduce and fix the posterior lateral fragment (Volkmar's fragment) of a pilon fracture if such a fragment is not deemed approachable via an anterior approach. Unlike the anterior approaches the articular reduction cannot be directly visualized through this approach; as such it not typically used in isolation.
-Condition of the soft tissue envelop, including open wounds from the initial injury:
-Surgeon preference and familiarity
2) Open reduction and internal fixation of the posterior malleolus portion of an ankle fracture
Anatomy
Internervous Plain:
The posterior lateral approach uses the internervous plane between the lateral (superficial peroneal nerve) and deep posterior (tibial nerve) compartments. The lateral compartment muscles are retracted anteriorly exposing the posterior border of the fibula and deep posterior compartment. Once entered the deep posterior compartment muscles are retracted posteriorly off the fibula, syndesmosis, and posterior tibia.
Muscular Anatomy:
Peroneus Longus:
Origin: Fibular head and upper 2/3rds of the lateral fibular shaft
Insertion: Plantar surface of the medial cuneiform and 1st metatarsal base
Innervation: Superficial peroneal nerve
Action: Ankle plantarflexion and eversion
Peroneus Brevis:
Origin: Lower 2/3rds of the lateral fibular shaft
Insertion: 5th metatarsal base
Innervation: Superficial peroneal nerve
Action: Ankle plantarflexion and eversion
Flexor Hallucis Longus:
Origin: Posterior aspect of the fibula
Insertion: Plantar aspect of the base of the distal phalanx of the hallux
Innervation: Tibial nerve
Action: Flexion of hallux at interphalangeal and metatarsal phalangeal joints. Weak ankle plantar flexion.
Posterior Tibialis:
Origin: Posterior surface of interosseus membrane as well as small portions of posterior tibia and fibula
Insertion: Primarily inserts into plantar navicular and medial cuneiform. Also sends slips into middle and lateral cuneiforms, and bases of 2-4th metatarsals.
Innervation: Tibial nerve
Action: Ankle plantar flexion and inversion
Flexor Digitorum Longus:
Origin: Posterior surface of tibia inferior to soleal line
Insertion: Plantar aspect of the base of the distal phalanges of the 2-5th digits
Innervation: Tibial nerve
Action: Flexion of lesser toes at interphalangeal and metatarsal phalangeal joints. Weak ankle plantar flexion.
Vascular Anatomy:
The primary vascular bundle at risk during this approach is the peroneal artery. The popliteal artery divides just below the knee into an anterior tibial artery and tibial-fibular trunk. The anterior tibial artery pierces the interosseous membrane to travel in the anterior compartment. The tibial-fibular trunk exists for only a short distance before dividing into a posterior tibial artery and peroneal artery. The peroneal artery travels distally in the deep posterior compartment just medial to the fibula. When elevating the deep posterior compartment muscles off the fibula, interosseus membrane/syndesmosis, and posterior surface of the tibia during the dissection this artery and accompanying veins (or perforators heading through the interosseous membrane) may be encountered and be a source of bleeding. Cauterizing these vessels at this level is safe.
Nervous Anatomy:
The primary superficial nerve at risk during this approach is the sural nerve. This nerve normally courses 1cm posterior to the fibula within the subcutaneous tissue. Skin incisions along the posterior border of the fibula generally do not put this nerve at risk when dissecting down to the fascia over the peroneal muscles/tendons. Placing the skin incision more posteriorly, between the border of the Achilles tendon and posterior border of the fibula, as some surgeons may choose to do, puts this cutaneous nerve at greater risk. If such a skin incision is used then the sural nerve must be identified and protected in the superficial portion of the dissection.
Additionally, as the peroneal muscles must be mobilized anteriorly, the superficial peroneal nerve may be encounter along their anterior edge and be at risk. As long as the incision through fascia is placed over the center of the peroneal muscles/tendons the nerve and these muscles respectfully retracted, injury in quite unlikely.
Position & Markings
Patient Positioning:
For this approach either a prone or "sloppy-lateral" position of the patient may be used. Prone positioning allows for relatively simple visualization through the posterior lateral approach. However, if an anterior approach must also be used during the same procedure, such as is typical during the fixation of a pilon fracture, the patient requires repositioning supine to allow for this additional anterior approach. An alternative to this is placing the patient in a "sloppy-lateral" position. A large bump is placed under the patient's ipsilateral hip and torso to turn the patient 45 degrees, rather than a full lateral 90 degrees. This provides enough internal rotation of the limb to perform a posterior lateral approach, though reduction and fixation of fracture fragments is done without the aid of gravity and the ease of visualization provided by prone positioning. By externally rotating the limb at the hip an anterior approach to the tibial plafond may also be performed in this position. Regardless of which position is chosen, the operative leg is elevated on a foam ramp or stack of blankets to allow for lateral imaging.
A cantilever table with no metal appliances attached allows for simplified fluoroscopic imaging of the limb. The patient should be brought to the end of this bed so that the surgeon may stand at the end of the bed while operating if desired.
Intra-op Imaging:
The fluoroscopy machine comes in from the contralateral side and obtains mortise and lateral images throughout the case. The mortise view typically required 10-15 degrees of internal rotation relative to an AP view. The lateral view is defined by complete overlap of the talar dome.
Marking the Incision:
Two skin incisions may be considered. For fractures with simple, lateral posterior malleolus fractures and a complex fibula fracture (trimalleolar ankle fracture), an incision along the posterior border of the fibula may be beneficial. This allows enough access to the posterior tibial to perform the posterior malleolus reduction and fixation while still providing easy access to the fibula. A 5-7cm longitudinal incision is marked along the palpable posterior border of the fibular shaft. Distally this incision crosses over the posterior protuberance of the distal fibula and extends to the tip of the fibula.
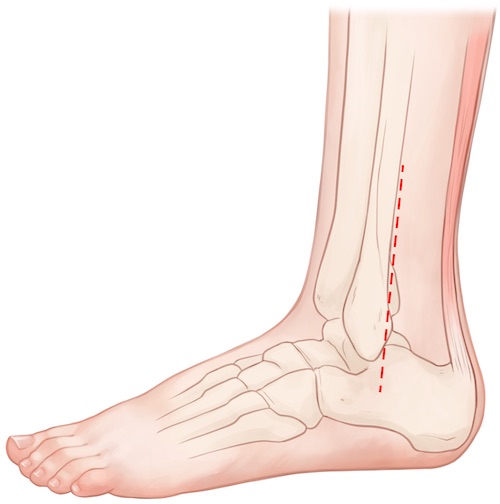
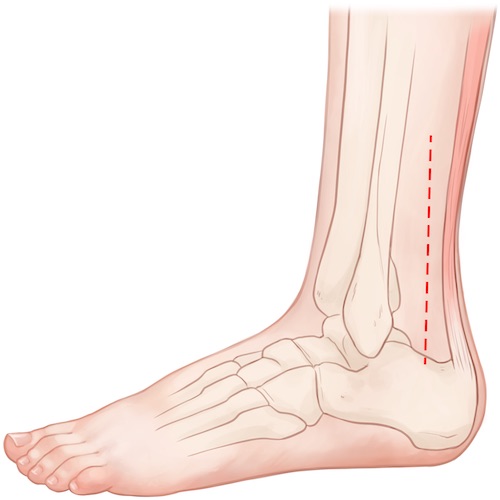
An alternative skin incision is to place this longitudinal marking more posteriorly, directly in between the posterior border of the fibula and lateral border of the Achilles tendon. The more posterior incision may make accessing the posterior surface of the tibia easier, such as with a large posterior malleolus fragment of a pilon. Placing the incision more posterior does however put the sural nerve at greater risk during the superficial portion of the dissection and also makes accessing the fibula more challenging.
Posterior Lateral Approach to the Ankle
Superficial dissection:
A knife is used to make one of the incisions as previously described. If the incision was placed along the posterior border of the fibula it is safe to use a knife to dissect down to fascia over the peroneal tendons. If the incision was placed more posteriorly then a scissors should be used to dissect down to fascia to avoid injury to the sural nerve.
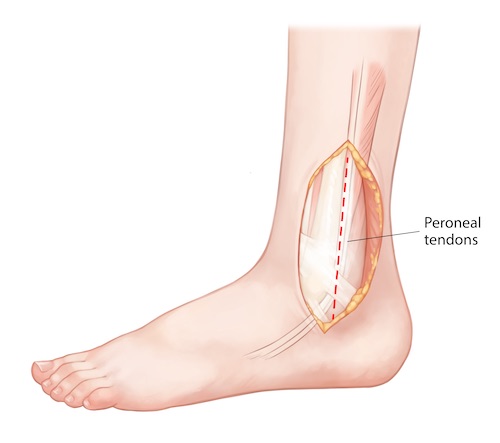
The peroneal tendons can be seen clearly through their overlying fascia. A knife may be used to incise the fascia directly over these tendons longitudinally in line with the skin incision. The peroneal muscles/tendons should then be elevated anteriorly, exposing the posterior border of the fibula and flexor hallucis longus posterior to the fibula, still covered in the fascia enclosing the deep posterior compartment
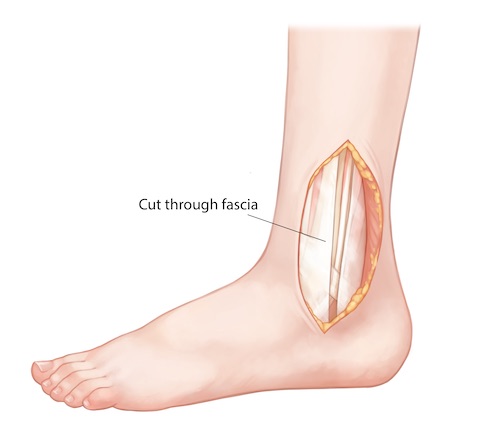
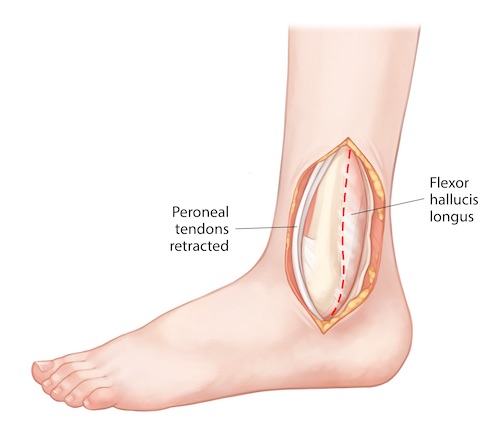
Deep Dissection:
The fascia over the flexor hallucis longus is then incised longitudinally exposing the muscle belly. This muscle is then elevated off the posterior border of the fibula with an elevator or knife. This dissection is carried medially sweeping the entire deep posterior compartment off the fibula, syndesmosis/interosseous membrane, and posterior tibia. Care must be taken not to remove all soft tissue directly from bone, as this will disrupt the posterior portion of the syndesmosis. If the periosteum has not been disrupted by the injury, this will also need to be incised to expose the fracture. The peroneal artery can be a source of brisk bleeding if it is injured during this dissection. This bleeding can be cauterized or ligated if encountered.
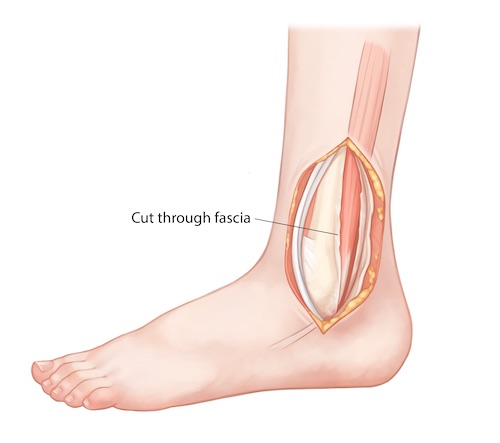
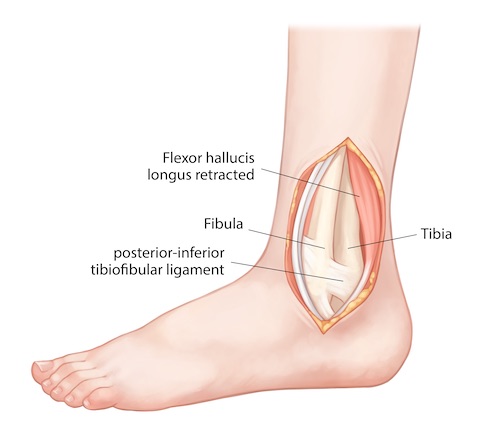
Tips, Tricks & Precautions
Tips:
A "sloppy lateral" position allows the surgeon to perform a posterior lateral and one of the anterior approaches to the tibial plafond without the need for repositioning the patient between the two approaches. Prior to deciding upon the use of this position, however, the surgeon should check to make sure the patient has enough external rotation at the hip to allow for the anterior approach with the operative hip bumped 45 degrees.
Precautions:
The sural nerve courses 1cm posterior to the lateral malleolus on its way to innervating the lateral aspect of the foot. If a skin incision is chosen that runs between the lateral border of the Achilles tendon and the posterior border of the fibula, this nerve must be identified and protected when dissecting superficially. Making the incision more anteriorly, along the posterior border of the fibula, eliminates this risk, though may make visualization of the posterior aspect of the tibia more challenging.
When elevating the deep posterior compartment off the posterior borders of the fibula, syndesmosis, and tibia it is critical not to remove all soft tissue directly from bone, as this will take down the posterior portion of the syndesmosis. Care must be taken to preserve the posterior inferior tibio-fibular and transverse ligaments during the deep dissection.
The peroneal artery runs in the deep posterior compartment just medial to the fibula. Injury to this structure when elevating the deep posterior compartment can be a source of brisk bleeding. Dissection should thus proceed carefully behind the fibula and interosseous membrane and any bleeding that is encountered should be controlled and cauterized.
Objectives
At the end of this module, the learner should be able to:
1) List the indications for an posterior lateral approach to the tibial plafond
2) Understand the relevant anatomy of the posterior lateral approach to the tibial plafond
3) Discuss in detail the posterior lateral approach to the tibial plafond, including:
a. Patient positioning
b. Landmarks for incision
c. Relevant internervous plains
d. Sequence of the superficial and deep dissection
Indications
Indications for a Posterior Lateral Approach to the Tibial Plafond:
1) Open reduction internal fixation of fractures of the tibial plafond (pilon fractures)
Open reduction and internal fixation of fractures of the tibial plafond requires careful pre-operative planning to determine the required approach(es), reduction sequence, provisional fixation, and definitive fixation strategies. With regards to surgical approach, there are multiple options available to the fracture surgeon and several variables that may lead a surgeon to choose one over the other. Commonly used approaches include the anterior medial, anterior lateral, and posterior lateral approaches. Less commonly one might use a posterior medial approach. While some of the listed approaches are mutually exclusive (anterior medial and anterior lateral approaches), others may be used simultaneously (e.g., anterior medial and posterior lateral) or in conjunction with other smaller incisions (e.g., an anterior lateral approach combined with a small medial incision for percutaneous plate application on the anterior medial face of the tibia) for the applications of fixation outside of a single approach.
The choice of approach to the tibial plafond hinges on multiple factors, including the following:
-Fracture pattern:
While the range of fracture patterns in plafond injuries is highly variable, there are common fragments and patterns of displacement that may influence the choice of surgical approach. Frequently there are three dominant fragments: Chaput (anterior lateral), Volkman's (posterior lateral), and medial. In addition to these three fragments there is typically an area of central impaction in the plafond and an associated fibula fracture. All of these fragments and fracture lines must be addressed through whatever approach(es) the surgeon chooses.
The posterior lateral approach may be used to reduce and fix the posterior lateral fragment (Volkmar's fragment) of a pilon fracture if such a fragment is not deemed approachable via an anterior approach. Unlike the anterior approaches the articular reduction cannot be directly visualized through this approach; as such it not typically used in isolation.
-Condition of the soft tissue envelop, including open wounds from the initial injury:
-Surgeon preference and familiarity
2) Open reduction and internal fixation of the posterior malleolus portion of an ankle fracture
Anatomy
Internervous Plain:
The posterior lateral approach uses the internervous plane between the lateral (superficial peroneal nerve) and deep posterior (tibial nerve) compartments. The lateral compartment muscles are retracted anteriorly exposing the posterior border of the fibula and deep posterior compartment. Once entered the deep posterior compartment muscles are retracted posteriorly off the fibula, syndesmosis, and posterior tibia.
Muscular Anatomy:
Peroneus Longus:
Origin: Fibular head and upper 2/3rds of the lateral fibular shaft
Insertion: Plantar surface of the medial cuneiform and 1st metatarsal base
Innervation: Superficial peroneal nerve
Action: Ankle plantarflexion and eversion
Peroneus Brevis:
Origin: Lower 2/3rds of the lateral fibular shaft
Insertion: 5th metatarsal base
Innervation: Superficial peroneal nerve
Action: Ankle plantarflexion and eversion
Flexor Hallucis Longus:
Origin: Posterior aspect of the fibula
Insertion: Plantar aspect of the base of the distal phalanx of the hallux
Innervation: Tibial nerve
Action: Flexion of hallux at interphalangeal and metatarsal phalangeal joints. Weak ankle plantar flexion.
Posterior Tibialis:
Origin: Posterior surface of interosseus membrane as well as small portions of posterior tibia and fibula
Insertion: Primarily inserts into plantar navicular and medial cuneiform. Also sends slips into middle and lateral cuneiforms, and bases of 2-4th metatarsals.
Innervation: Tibial nerve
Action: Ankle plantar flexion and inversion
Flexor Digitorum Longus:
Origin: Posterior surface of tibia inferior to soleal line
Insertion: Plantar aspect of the base of the distal phalanges of the 2-5th digits
Innervation: Tibial nerve
Action: Flexion of lesser toes at interphalangeal and metatarsal phalangeal joints. Weak ankle plantar flexion.
Vascular Anatomy:
The primary vascular bundle at risk during this approach is the peroneal artery. The popliteal artery divides just below the knee into an anterior tibial artery and tibial-fibular trunk. The anterior tibial artery pierces the interosseous membrane to travel in the anterior compartment. The tibial-fibular trunk exists for only a short distance before dividing into a posterior tibial artery and peroneal artery. The peroneal artery travels distally in the deep posterior compartment just medial to the fibula. When elevating the deep posterior compartment muscles off the fibula, interosseus membrane/syndesmosis, and posterior surface of the tibia during the dissection this artery and accompanying veins (or perforators heading through the interosseous membrane) may be encountered and be a source of bleeding. Cauterizing these vessels at this level is safe.
Nervous Anatomy:
The primary superficial nerve at risk during this approach is the sural nerve. This nerve normally courses 1cm posterior to the fibula within the subcutaneous tissue. Skin incisions along the posterior border of the fibula generally do not put this nerve at risk when dissecting down to the fascia over the peroneal muscles/tendons. Placing the skin incision more posteriorly, between the border of the Achilles tendon and posterior border of the fibula, as some surgeons may choose to do, puts this cutaneous nerve at greater risk. If such a skin incision is used then the sural nerve must be identified and protected in the superficial portion of the dissection.
Additionally, as the peroneal muscles must be mobilized anteriorly, the superficial peroneal nerve may be encounter along their anterior edge and be at risk. As long as the incision through fascia is placed over the center of the peroneal muscles/tendons the nerve and these muscles respectfully retracted, injury in quite unlikely.
Position & Markings
Patient Positioning:
For this approach either a prone or "sloppy-lateral" position of the patient may be used. Prone positioning allows for relatively simple visualization through the posterior lateral approach. However, if an anterior approach must also be used during the same procedure, such as is typical during the fixation of a pilon fracture, the patient requires repositioning supine to allow for this additional anterior approach. An alternative to this is placing the patient in a "sloppy-lateral" position. A large bump is placed under the patient's ipsilateral hip and torso to turn the patient 45 degrees, rather than a full lateral 90 degrees. This provides enough internal rotation of the limb to perform a posterior lateral approach, though reduction and fixation of fracture fragments is done without the aid of gravity and the ease of visualization provided by prone positioning. By externally rotating the limb at the hip an anterior approach to the tibial plafond may also be performed in this position. Regardless of which position is chosen, the operative leg is elevated on a foam ramp or stack of blankets to allow for lateral imaging.
A cantilever table with no metal appliances attached allows for simplified fluoroscopic imaging of the limb. The patient should be brought to the end of this bed so that the surgeon may stand at the end of the bed while operating if desired.
Intra-op Imaging:
The fluoroscopy machine comes in from the contralateral side and obtains mortise and lateral images throughout the case. The mortise view typically required 10-15 degrees of internal rotation relative to an AP view. The lateral view is defined by complete overlap of the talar dome.
Marking the Incision:
Two skin incisions may be considered. For fractures with simple, lateral posterior malleolus fractures and a complex fibula fracture (trimalleolar ankle fracture), an incision along the posterior border of the fibula may be beneficial. This allows enough access to the posterior tibial to perform the posterior malleolus reduction and fixation while still providing easy access to the fibula. A 5-7cm longitudinal incision is marked along the palpable posterior border of the fibular shaft. Distally this incision crosses over the posterior protuberance of the distal fibula and extends to the tip of the fibula.
An alternative skin incision is to place this longitudinal marking more posteriorly, directly in between the posterior border of the fibula and lateral border of the Achilles tendon. The more posterior incision may make accessing the posterior surface of the tibia easier, such as with a large posterior malleolus fragment of a pilon. Placing the incision more posterior does however put the sural nerve at greater risk during the superficial portion of the dissection and also makes accessing the fibula more challenging.
Posterior Lateral Approach to the Ankle
Superficial dissection:
A knife is used to make one of the incisions as previously described. If the incision was placed along the posterior border of the fibula it is safe to use a knife to dissect down to fascia over the peroneal tendons. If the incision was placed more posteriorly then a scissors should be used to dissect down to fascia to avoid injury to the sural nerve.
The peroneal tendons can be seen clearly through their overlying fascia. A knife may be used to incise the fascia directly over these tendons longitudinally in line with the skin incision. The peroneal muscles/tendons should then be elevated anteriorly, exposing the posterior border of the fibula and flexor hallucis longus posterior to the fibula, still covered in the fascia enclosing the deep posterior compartment
Deep Dissection:
The fascia over the flexor hallucis longus is then incised longitudinally exposing the muscle belly. This muscle is then elevated off the posterior border of the fibula with an elevator or knife. This dissection is carried medially sweeping the entire deep posterior compartment off the fibula, syndesmosis/interosseous membrane, and posterior tibia. Care must be taken not to remove all soft tissue directly from bone, as this will disrupt the posterior portion of the syndesmosis. If the periosteum has not been disrupted by the injury, this will also need to be incised to expose the fracture. The peroneal artery can be a source of brisk bleeding if it is injured during this dissection. This bleeding can be cauterized or ligated if encountered.
Tips, Tricks & Precautions
Tips:
A "sloppy lateral" position allows the surgeon to perform a posterior lateral and one of the anterior approaches to the tibial plafond without the need for repositioning the patient between the two approaches. Prior to deciding upon the use of this position, however, the surgeon should check to make sure the patient has enough external rotation at the hip to allow for the anterior approach with the operative hip bumped 45 degrees.
Precautions:
The sural nerve courses 1cm posterior to the lateral malleolus on its way to innervating the lateral aspect of the foot. If a skin incision is chosen that runs between the lateral border of the Achilles tendon and the posterior border of the fibula, this nerve must be identified and protected when dissecting superficially. Making the incision more anteriorly, along the posterior border of the fibula, eliminates this risk, though may make visualization of the posterior aspect of the tibia more challenging.
When elevating the deep posterior compartment off the posterior borders of the fibula, syndesmosis, and tibia it is critical not to remove all soft tissue directly from bone, as this will take down the posterior portion of the syndesmosis. Care must be taken to preserve the posterior inferior tibio-fibular and transverse ligaments during the deep dissection.
The peroneal artery runs in the deep posterior compartment just medial to the fibula. Injury to this structure when elevating the deep posterior compartment can be a source of brisk bleeding. Dissection should thus proceed carefully behind the fibula and interosseous membrane and any bleeding that is encountered should be controlled and cauterized.
Talar Neck - Dual Approaches
Dual Approaches to the Talar Neck | Video
Video - Drs. Shearer and Morshed
- Read Full Text
-
Objectives
At the end of this module, the learner should be able to:
1) List the indications for approaches to the talar neck
2) Understand the relevant anatomy of the dual approaches to the talar neck
3) Discuss in detail the dual approaches to the talar neck, including:
a. Patient positioning
b. Landmarks for incision
c. Relevant internervous planes
d. Sequence of the superficial and deep dissection
Indications
Indications for dual approaches to the talar neck:
1) Open reduction internal fixation of talar neck fractures
2) Open reduction internal fixation of talar head fractures
Anatomy
Internervous Plain:
Neither the medial nor the lateral approach to the talar neck uses a true internervous plane.
The medial approach is performed between the two tendons of the tibialis anterior and tibialis posterior. While it is true that the tibialis anterior (deep peroneal nerve) has a different innervation from the tibialis posterior (tibial nerve), the dissection is performed between the tendons of these two muscles, far distal to their source of innervation. As such, while perhaps technically an internervous plane, little risk would be posed to the innervation of these muscles at this level regardless of their source of innervation.
The lateral approach is performed by separating the tendons of the long extensors from the anterior compartment (extensor digitorum longus and peroneus teritus) from the muscle bellies of the short extensors which arise and course along the dorsum of the foot (extensor digitorum brevis and extensor hallucis brevis). All of these muscles receive their innervation from the deep peroneal nerve. However, since the muscles of the anterior compartment receive their innervation well proximal to the location of the dissection, no injury is risked to the innervation of these muscles despite using a technically intermuscular plain.
Muscular Anatomy:
During the medial approach to the talar neck no muscle should routinely be encountered. Working between the tendons of the tibialis anterior and posterior, only subcutaneous tissue and capsule separate the medial talar neck from the skin.
During the lateral approach to the talar neck both the tendinous extensions of the lateral anterior compartment muscles (extensor digitorum longus and peroneus teritus) and the muscle bellies of the short extensors of the digits (extensor digitorum and hallucis brevis) are encountered. The tendons of the long extensors of the anterior compartment are more superficial and medial than the muscles bellies of the short extensors of the digits, which are more deep and lateral.
Tibialis Anterior:
Origin: Lateral condyle of the proximal tibia, proximal 1/2 of the lateral surface of the proximal tibia, interosseus membrane
Insertion: Medial cuneiform and 1st metatarsal base
Innervation: Deep peroneal nerve
Action: Ankle dorsiflexion and inversion
INSERT PICTURE
Extensor Hallucis Longus:
Origin: Middle 1/3rd of the anterior fibula, interosseus membrane
Insertion: Dorsal base of the distal phalanx of the hallux
Innervation: Deep peroneal nereve
Action: Extends hallux at interphalangeal and metatarsal-phalangeal joints, ankle dorsiflexion
INSERT PICTURE
Extensor Digitorum Longus:
Origin: Superior 1/3rd of anterior fibula, interosseus membrane, lateral condyle of tibia
Insertion: Dorsal base of the middle phalanx of lesser digits
Innervation: Deep peroneal nerve
Action: Extends digits at proximal interphalangeal and metatarsal-phalangeal joints, ankle dorsiflexion
INSERT PICTURE
Peroneus Teritus:
Origin: Inferior 1/3rd of the anterior fibula, interosseus membrane
Insertion: Dorsal 5th metatarsal base
Innervation: Deep peroneal nerve
Action: Ankle dorsiflexion and eversion
INSERT PICTURE
Posterior Tibialis:
Origin: Posterior surface of interosseus membrane as well as small portions of posterior tibia and fibula
Insertion: Primarily inserts into plantar navicular and medial cuneiform. Also sends slips into middle and lateral cuneiforms, and bases of 2-4th metatarsals.
Innervation: Tibial nerve
Action: Ankle plantar flexion and inversion
INSERT PICTURE
Extensor Hallucis Brevis:
Origin: Anterior Process of the calcaneus
Insertion: Extensor hood of the hallux
Innervation: Deep peroneal nerve
Action: Extension of the hallux at the interphalangeal and metatarsal-phalangeal joints
Extensor Digitorum Brevis:
Origin: Anterior Process of the calcaneus
Insertion: Extensor hood of the lesser toes
Innervation: Deep peroneal nerve
Action: Extension of the lesser toes at the interphalangeal and metatarsal-phalangeal joints
Vascular Anatomy:
No major arteries are routinely encountered during the course of exposing the talar neck. During the medial approach, however, the greater saphenous vein is typically encountered and can be sizable. Once through skin dissection should continue with scissors to safely identify and dissect this vein.
Nervous Anatomy:
Two superficial sensory nerves are at risk when exposing the talar neck, once in each of the dual approaches. As just noted above, the saphenous vein is routinely encountered in the medial approach to the talar neck. The saphenous nerve courses with this structure, and so like-wise is at risk. During the lateral approach to the talar neck the superficial peroneal nerve (or branches thereof) is encountered. This nerve lies superficially, above fascia, and must be sought, dissected out, and protected once through the skin.
Position, Marking, Imaging
Patient Positioning:
The patient is placed supine and moved until the feet are at the end of the cantilever table. A bump is placed under the hip to internally rotate the leg which will tend to rest in an externally rotated position without this maneuver. The ipsilateral arm is placed over the patient's body, the contralateral arm is laid out on an arm board. The operative leg is first elevated on a foam ramp of stack of blankets to allow for lateral imaging. Once sterile prepping and draping have been performed the knee is flexed over a radiolucent triangle. The triangle is placed such that the base (short side) is against the patient's posterior thigh and the longer sides of the equilateral triangle are aimed towards the patient's foot such that one side rests on the foam ramp and the other supports the calf. The foot itself should be just off the end of the triangle. A roll of towels can be used to support the forefoot. This positioning places the rays of the foot parallel with the floor, making AP imaging simple to obtain.
Marking the Incisions:
Lateral Incision: A fluoroscopic oblique view of the foot should be obtained and use to mark out the 4th ray. An incision along this line can then be marked extending from 1-1.5cm proximal to the ankle to about the level of the cuboid.
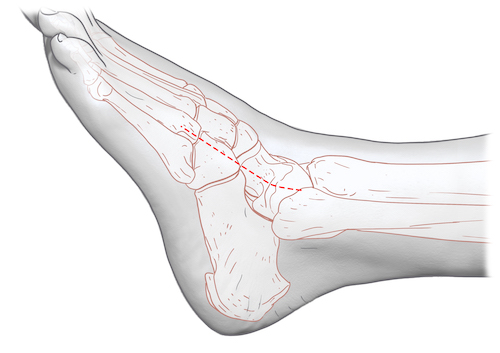
Medial Incision: A fluoroscopic lateral view of the foot is obtained and used to mark a line along the talar head, neck, navicular, and 1st ray. An incision along this line is marked from just anterior to the medial malleolus to the navicular-cuneiform joint. Note that the incision should not start proximally at the tip of the medial malleolus, but rather more cephalad near the medial shoulder of the mortise where the medial malleolus meets the tibial plafond.
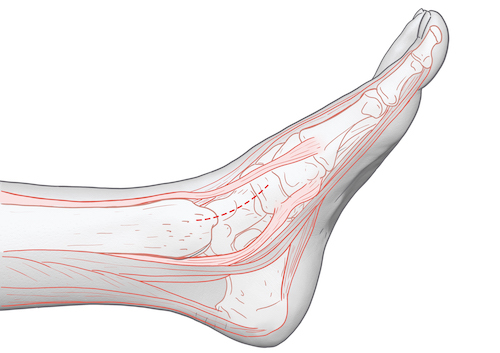
Same illustration with medial malleolus and navicular colored blue and green respectively.
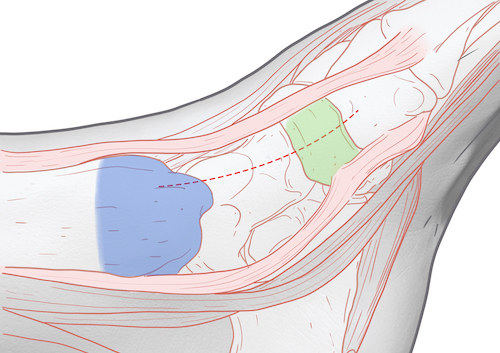
Imaging: The c-arm should come in from the opposite side of the table during the procedure. AP and lateral views of the foot and a mortise view of the ankle are required during talar neck reduction and fixation. AP foot images should be used to judge medial/lateral translation and varus/valgus alignment of the neck; varus being a common malediction due to comminution of the medial side of the neck. Lateral images are used to judge superior/inferior translation and flexion/extension of the neck. Along with AP and lateral views of the foot, the mortise view of the ankle can be used to assess the safety of any hardware placed as it heads into the body of the talus.
Some authors have also suggested the use of the Canale view during talar neck ORIF. This view is obtained by placing the beam of the c-arm perpendicular to the dorsum of the foot and internally rotating the limb ~15 degrees. Although an unfamiliar view relative to the other three images, it potentially provides an unobstructed view of the talar neck.
Dual Approaches to the Talar Neck | Description
Dual Approaches:
Before detailing the approaches to the talar neck it is worth emphasizing that BOTH approaches should be performed when reducing and fixing a talar neck fracture. While it may be tempting to avoid placing two incisions for the sake of the soft tissues, judging the adequacy of the talar neck reduction is extremely difficult through a single incision. Any benefit to the soft tissues is lost if the talar neck ends up mal-reduced (most often varus), as this may impede union and certainly disrupts the biomechanics of the foot.
Lateral Approach:
Superficial Dissection: The previously described skin incision from the ankle to the cuboid along the 4th ray is make with a knife. As soon as the skin has been gone through dissection should proceed instead with scissors. The superficial peroneal nerve needs to be identified, dissected out, and retracted out of the field within the areolar and subcutaneous tissue of the dorsum of the foot above the level of the fascia. Once this has been accomplished the fascia can be gently cleared and typically the deeper structures (tendons of the extensor digitorum longus and peroneus teritus and the muscle bellies of the extensor digotorum/hallucis brevis) will be visible through the fascia.
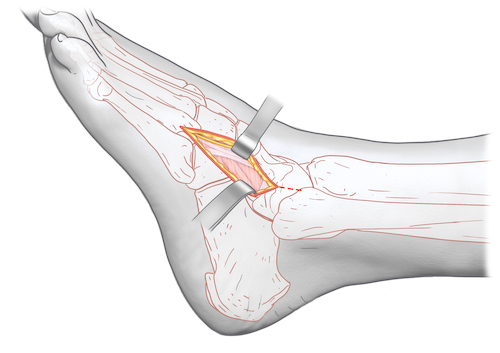
Deep Dissection: The fascia is then incised just lateral to the edge of the long extensor tendons and retracted. The long extensors are retracted medially. This exposes the medial edge of the short extensors (extensor digitorum/hallucis brevis) which can then be retracted laterally. Areolar tissue and fat may be swept away or removed. The confluent capsule over the ankle joint/talus/talar-navicular joint is thus exposed and should be incised longitudinally and elevated dorsal and plantarly to expose the talar neck (blue).
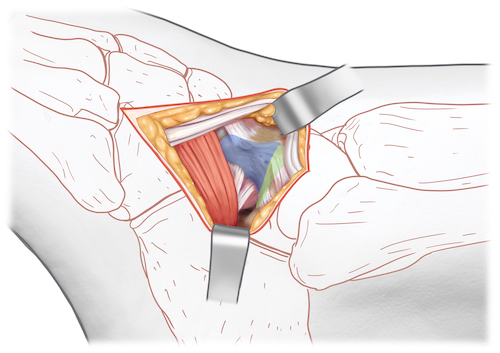
Medial Approach:
Superficial Dissection: The previously described incision along the medial aspect of the talar neck should be made through skin with a knife. Once through skin the surgeon should again switch to scissors to allow safe identification of the greater saphenous vein and accompanying nerve, which should be retracted away from the field.
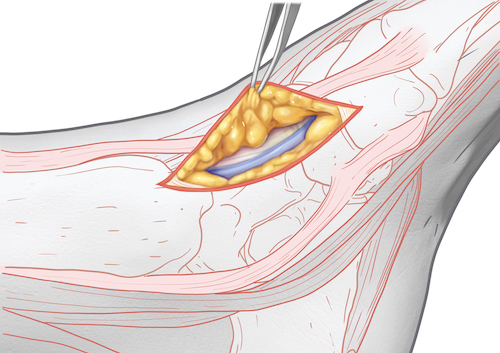
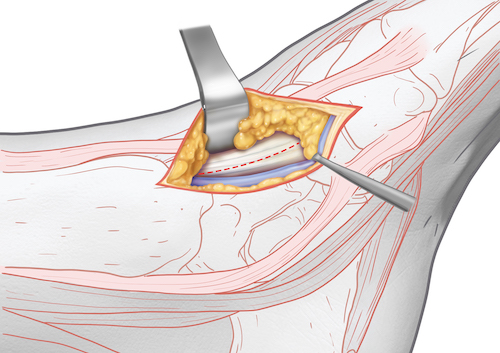
Deep Dissection: Once down through subcutaneous and areolar tissue the surgeon comes down directly onto the confluent capsule of the ankle/talus/talar-navicular joint. This should be incised longitudinally and elevated dorsal and plantarly to expose the talar neck. The talar head (pink) and talar body (green) cartilage are highlighted below.
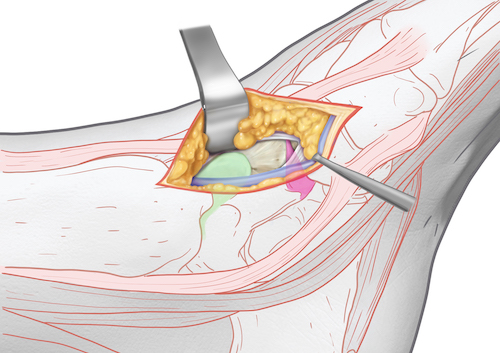
Tips, Tricks & Precautions
Precautions:
Superficial peroneal nerve: In the lateral incision care must be taken to identify and protect the superficial peroneal nerve. This nerve exists above fascia, just below skin, and so must be sough immediately after the incision is made. Frequently the nerve has arborized already at this level and so more than one branch may be discovered. An arborization may even need to be sacrificed to allow for safe retraction of the dominant portions of the nerve.
Saphenous nerve and greater saphenous vein: In the medial incision these two structures are almost always found. Once through skin dissection should be performed with scissors to allow for safe identification, dissection, and retraction of these structures.
Objectives
At the end of this module, the learner should be able to:
1) List the indications for approaches to the talar neck
2) Understand the relevant anatomy of the dual approaches to the talar neck
3) Discuss in detail the dual approaches to the talar neck, including:
a. Patient positioning
b. Landmarks for incision
c. Relevant internervous planes
d. Sequence of the superficial and deep dissection
Indications
Indications for dual approaches to the talar neck:
1) Open reduction internal fixation of talar neck fractures
2) Open reduction internal fixation of talar head fractures
Anatomy
Internervous Plain:
Neither the medial nor the lateral approach to the talar neck uses a true internervous plane.
The medial approach is performed between the two tendons of the tibialis anterior and tibialis posterior. While it is true that the tibialis anterior (deep peroneal nerve) has a different innervation from the tibialis posterior (tibial nerve), the dissection is performed between the tendons of these two muscles, far distal to their source of innervation. As such, while perhaps technically an internervous plane, little risk would be posed to the innervation of these muscles at this level regardless of their source of innervation.
The lateral approach is performed by separating the tendons of the long extensors from the anterior compartment (extensor digitorum longus and peroneus teritus) from the muscle bellies of the short extensors which arise and course along the dorsum of the foot (extensor digitorum brevis and extensor hallucis brevis). All of these muscles receive their innervation from the deep peroneal nerve. However, since the muscles of the anterior compartment receive their innervation well proximal to the location of the dissection, no injury is risked to the innervation of these muscles despite using a technically intermuscular plain.
Muscular Anatomy:
During the medial approach to the talar neck no muscle should routinely be encountered. Working between the tendons of the tibialis anterior and posterior, only subcutaneous tissue and capsule separate the medial talar neck from the skin.
During the lateral approach to the talar neck both the tendinous extensions of the lateral anterior compartment muscles (extensor digitorum longus and peroneus teritus) and the muscle bellies of the short extensors of the digits (extensor digitorum and hallucis brevis) are encountered. The tendons of the long extensors of the anterior compartment are more superficial and medial than the muscles bellies of the short extensors of the digits, which are more deep and lateral.
Tibialis Anterior:
Origin: Lateral condyle of the proximal tibia, proximal 1/2 of the lateral surface of the proximal tibia, interosseus membrane
Insertion: Medial cuneiform and 1st metatarsal base
Innervation: Deep peroneal nerve
Action: Ankle dorsiflexion and inversion
INSERT PICTURE
Extensor Hallucis Longus:
Origin: Middle 1/3rd of the anterior fibula, interosseus membrane
Insertion: Dorsal base of the distal phalanx of the hallux
Innervation: Deep peroneal nereve
Action: Extends hallux at interphalangeal and metatarsal-phalangeal joints, ankle dorsiflexion
INSERT PICTURE
Extensor Digitorum Longus:
Origin: Superior 1/3rd of anterior fibula, interosseus membrane, lateral condyle of tibia
Insertion: Dorsal base of the middle phalanx of lesser digits
Innervation: Deep peroneal nerve
Action: Extends digits at proximal interphalangeal and metatarsal-phalangeal joints, ankle dorsiflexion
INSERT PICTURE
Peroneus Teritus:
Origin: Inferior 1/3rd of the anterior fibula, interosseus membrane
Insertion: Dorsal 5th metatarsal base
Innervation: Deep peroneal nerve
Action: Ankle dorsiflexion and eversion
INSERT PICTURE
Posterior Tibialis:
Origin: Posterior surface of interosseus membrane as well as small portions of posterior tibia and fibula
Insertion: Primarily inserts into plantar navicular and medial cuneiform. Also sends slips into middle and lateral cuneiforms, and bases of 2-4th metatarsals.
Innervation: Tibial nerve
Action: Ankle plantar flexion and inversion
INSERT PICTURE
Extensor Hallucis Brevis:
Origin: Anterior Process of the calcaneus
Insertion: Extensor hood of the hallux
Innervation: Deep peroneal nerve
Action: Extension of the hallux at the interphalangeal and metatarsal-phalangeal joints
Extensor Digitorum Brevis:
Origin: Anterior Process of the calcaneus
Insertion: Extensor hood of the lesser toes
Innervation: Deep peroneal nerve
Action: Extension of the lesser toes at the interphalangeal and metatarsal-phalangeal joints
Vascular Anatomy:
No major arteries are routinely encountered during the course of exposing the talar neck. During the medial approach, however, the greater saphenous vein is typically encountered and can be sizable. Once through skin dissection should continue with scissors to safely identify and dissect this vein.
Nervous Anatomy:
Two superficial sensory nerves are at risk when exposing the talar neck, once in each of the dual approaches. As just noted above, the saphenous vein is routinely encountered in the medial approach to the talar neck. The saphenous nerve courses with this structure, and so like-wise is at risk. During the lateral approach to the talar neck the superficial peroneal nerve (or branches thereof) is encountered. This nerve lies superficially, above fascia, and must be sought, dissected out, and protected once through the skin.
Position, Marking, Imaging
Patient Positioning:
The patient is placed supine and moved until the feet are at the end of the cantilever table. A bump is placed under the hip to internally rotate the leg which will tend to rest in an externally rotated position without this maneuver. The ipsilateral arm is placed over the patient's body, the contralateral arm is laid out on an arm board. The operative leg is first elevated on a foam ramp of stack of blankets to allow for lateral imaging. Once sterile prepping and draping have been performed the knee is flexed over a radiolucent triangle. The triangle is placed such that the base (short side) is against the patient's posterior thigh and the longer sides of the equilateral triangle are aimed towards the patient's foot such that one side rests on the foam ramp and the other supports the calf. The foot itself should be just off the end of the triangle. A roll of towels can be used to support the forefoot. This positioning places the rays of the foot parallel with the floor, making AP imaging simple to obtain.
Marking the Incisions:
Lateral Incision: A fluoroscopic oblique view of the foot should be obtained and use to mark out the 4th ray. An incision along this line can then be marked extending from 1-1.5cm proximal to the ankle to about the level of the cuboid.
Medial Incision: A fluoroscopic lateral view of the foot is obtained and used to mark a line along the talar head, neck, navicular, and 1st ray. An incision along this line is marked from just anterior to the medial malleolus to the navicular-cuneiform joint. Note that the incision should not start proximally at the tip of the medial malleolus, but rather more cephalad near the medial shoulder of the mortise where the medial malleolus meets the tibial plafond.
Same illustration with medial malleolus and navicular colored blue and green respectively.
Imaging: The c-arm should come in from the opposite side of the table during the procedure. AP and lateral views of the foot and a mortise view of the ankle are required during talar neck reduction and fixation. AP foot images should be used to judge medial/lateral translation and varus/valgus alignment of the neck; varus being a common malediction due to comminution of the medial side of the neck. Lateral images are used to judge superior/inferior translation and flexion/extension of the neck. Along with AP and lateral views of the foot, the mortise view of the ankle can be used to assess the safety of any hardware placed as it heads into the body of the talus.
Some authors have also suggested the use of the Canale view during talar neck ORIF. This view is obtained by placing the beam of the c-arm perpendicular to the dorsum of the foot and internally rotating the limb ~15 degrees. Although an unfamiliar view relative to the other three images, it potentially provides an unobstructed view of the talar neck.
Dual Approaches to the Talar Neck | Description
Dual Approaches:
Before detailing the approaches to the talar neck it is worth emphasizing that BOTH approaches should be performed when reducing and fixing a talar neck fracture. While it may be tempting to avoid placing two incisions for the sake of the soft tissues, judging the adequacy of the talar neck reduction is extremely difficult through a single incision. Any benefit to the soft tissues is lost if the talar neck ends up mal-reduced (most often varus), as this may impede union and certainly disrupts the biomechanics of the foot.
Lateral Approach:
Superficial Dissection: The previously described skin incision from the ankle to the cuboid along the 4th ray is make with a knife. As soon as the skin has been gone through dissection should proceed instead with scissors. The superficial peroneal nerve needs to be identified, dissected out, and retracted out of the field within the areolar and subcutaneous tissue of the dorsum of the foot above the level of the fascia. Once this has been accomplished the fascia can be gently cleared and typically the deeper structures (tendons of the extensor digitorum longus and peroneus teritus and the muscle bellies of the extensor digotorum/hallucis brevis) will be visible through the fascia.
Deep Dissection: The fascia is then incised just lateral to the edge of the long extensor tendons and retracted. The long extensors are retracted medially. This exposes the medial edge of the short extensors (extensor digitorum/hallucis brevis) which can then be retracted laterally. Areolar tissue and fat may be swept away or removed. The confluent capsule over the ankle joint/talus/talar-navicular joint is thus exposed and should be incised longitudinally and elevated dorsal and plantarly to expose the talar neck (blue).
Medial Approach:
Superficial Dissection: The previously described incision along the medial aspect of the talar neck should be made through skin with a knife. Once through skin the surgeon should again switch to scissors to allow safe identification of the greater saphenous vein and accompanying nerve, which should be retracted away from the field.
Deep Dissection: Once down through subcutaneous and areolar tissue the surgeon comes down directly onto the confluent capsule of the ankle/talus/talar-navicular joint. This should be incised longitudinally and elevated dorsal and plantarly to expose the talar neck. The talar head (pink) and talar body (green) cartilage are highlighted below.
Tips, Tricks & Precautions
Precautions:
Superficial peroneal nerve: In the lateral incision care must be taken to identify and protect the superficial peroneal nerve. This nerve exists above fascia, just below skin, and so must be sough immediately after the incision is made. Frequently the nerve has arborized already at this level and so more than one branch may be discovered. An arborization may even need to be sacrificed to allow for safe retraction of the dominant portions of the nerve.
Saphenous nerve and greater saphenous vein: In the medial incision these two structures are almost always found. Once through skin dissection should be performed with scissors to allow for safe identification, dissection, and retraction of these structures.
LisFranc Injuries - Dual Approaches
Dual Approaches for LisFranc Injuries | Video
- Read Full Text
-
Objectives
At the end of this module, the learner should be able to:
1) List the indications for approaches to LisFranc injuries
2) Understand the relevant anatomy of the dual approaches to LisFranc injuries
3) Discuss in detail the dual approaches to LisFranc injuries, including:
a. Patient positioning
b. Landmarks for incision
c. Relevant internervous planes
d. Sequence of the superficial and deep dissection
Indications
Indications for dual approaches to LisFranc injuries:
1) Open reduction internal fixation of LisFranc fractures and/or dislocations
2) Fusion of the tarsal-metatarsal joints
Anatomy
Internervous Plain:
Neither the medial nor the lateral approach to the LisFranc joints uses a true internervous plane.
The medial approach is performed between the two tendons of the extensor hallucis longus (medially) and extensor hallucis brevis (laterally). Both of these muscles receive their innervation from the deep peroneal nerve. However, both of these muscles have received their innervation well proximal to the level of the dissection, which typically occurs between the tendinous portions of each muscle.
The lateral approach is performed by elevating the long extensor tendons and the small extensor muscles on the dorsum of the foot en masse from lateral to medial. Again, all these muscles receive their innervation from the deep peroneal nerve; however, since they are retracted together no internervous plain is used.
Muscular Anatomy:
During the medial approach the distal portion of the extensor hallucis brevis (EHB) muscle and its tendons and the tendon of the extensor hallucis longus muscle (EHL) are encountered. Dissection between these two structures brings the surgeon down on to the first and second tarsal-metatarsal joints. Of critical importance, the terminal branches of the doornails pedis artery and deep peroneal nerve pass through the interval between the EHB and EHL.
During the lateral approach the lateral edge of the extensor digitorum brevis (EDB) and the overlying tendons of some of the long extensors (peroneus teritus and extensor digitorum longus) are identified and retracted from lateral to medial to expose the underlying more lateral tarsal metatarsal joints.
Extensor Hallucis Longus:
Origin: Middle 1/3rd of the anterior fibula, interosseus membrane
Insertion: Dorsal base of the distal phalanx of the hallux
Innervation: Deep peroneal nereve
Action: Extends hallux at interphalangeal and metatarsal-phalangeal joints, ankle dorsiflexion
INSERT PICTURE
Extensor Digitorum Longus:
Origin: Superior 1/3rd of anterior fibula, interosseus membrane, lateral condyle of tibia
Insertion: Dorsal base of the middle phalanx of lesser digits
Innervation: Deep peroneal nerve
Action: Extends digits at proximal interphalangeal and metatarsal-phalangeal joints, ankle dorsiflexion
INSERT PICTURE
Peroneus Teritus:
Origin: Inferior 1/3rd of the anterior fibula, interosseus membrane
Insertion: Dorsal 5th metatarsal base
Innervation: Deep peroneal nerve
Action: Ankle dorsiflexion and eversion
INSERT PICTURE
Extensor Hallucis Brevis:
Origin: Anterior Process of the calcaneus
Insertion: Extensor hood of the hallux
Innervation: Deep peroneal nerve
Action: Extension of the hallux at the interphalangeal and metatarsal-phalangeal joints
Extensor Digitorum Brevis:
Origin: Anterior Process of the calcaneus
Insertion: Extensor hood of the lesser toes
Innervation: Deep peroneal nerve
Action: Extension of the lesser toes at the interphalangeal and metatarsal-phalangeal joints
Vascular Anatomy:
During the medial approach dissection occurs between the tendons of the EHB and EHL. Within this interval is the dorsalis pedis artery, which must be identified and protected. Occasionally this artery will be disrupted by trauma and severe displacement of joints of the midfoot, in which case it may no longer be identifiable.
Nervous Anatomy:
In the medially approach the deep peroneal nerve will be identified running along with the dorsalis pedis artery deep to fascia between the tendons of the EHB and EHL.
In the lateral incision branches of the superficial peroneal nerve are encountered. This nerve lies superficially, above fascia, and must be sought, dissected out, and protected once through the skin.
Position, Marking, Imaging
Patient Positioning:
The patient is placed supine and moved until the feet are at the end of the cantilever table. A bump is placed under the hip to internally rotate the leg which will tend to rest in an externally rotated position without this maneuver. The ipsilateral arm is placed over the patient's body, the contralateral arm is laid out on an arm board. The operative leg is first elevated on a foam ramp of stack of blankets to allow for lateral imaging. Once sterile prepping and draping have been performed the knee is flexed over a radiolucent triangle. The triangle is placed such that the base (short side) is against the patient's posterior thigh and the longer sides of the equilateral triangle are aimed towards the patient's foot such that one side rests on the foam ramp and the other supports the calf. The foot itself should be just off the end of the triangle. A roll of towels can be used to support the forefoot. This positioning places the rays of the foot parallel with the floor, making AP imaging simple to obtain.
Marking the Incisions:
Medial Incision: A fluoroscopic AP view of the foot is obtained and used to mark a line between the first and second rays from the navicular cuneiform joint to ~ 1/2 way down the shaft of the metatarsals.
Lateral Incision: A fluoroscopic oblique view of the foot should be obtained and use to mark out the interval between the third and fourth rays. This should extend from just proximal to the tarsal-metatarsal joints to ~ 1/2 way down the shafts of the metatarsals.
Imaging: The c-arm should come in from the opposite side of the table during the procedure. AP, oblique, and lateral views of the foot are required during reduction and fixation of the tarsal-metatarsal joints. AP foot images should be used to judge reduction and fixation of the medial column of the foot (navicular -> cuneiforms -> 1-3rd metatarsals). Oblique views of the foot should be used to judge reduction and fixation of the lateral column of the foot (Cuboid - > 4/5th metatarsals). Lateral images are used to judge superior/inferior translation and flexion/extension all tarsal-metatarsal joints.
Dual Approaches for LisFranc Injuries | Description
Dual Approaches:
Before detailing the approaches to the tarsal-metatarsal joints, it is worth stating what can be viewed through each. The medial approach routinely allows visualization of the inter-cuneiform joints, all of the first and second tarsal-metatarsal joints, and the medial portion of the third tarsal-metatarsal joint. It can be extended proximally to expose the navicular-cuneiform joints and distally to expose the shafts of the first and second metatarsals. The lateral incision routinely allows visualization of the third and fourth tarsal-metatarsal joints. It can be extended proximally to expose the lateral cuneiform and its joint with the navicular as well as the medial cuboid. It can be extended distally to expose the third and fourth metatarsal shafts.
Medial Approach:
Superficial Dissection: The previously described incision between the first and second rays should be made through skin with a knife. Once through skin the surgeon should switch to scissors to scissors of a blunt freer elevator to dissect down to fascia. This allow safe identification of any branches of the superficial peroneal nerve and sometime large superficial veins which may lie in the incision and also to dissect down safely to fascia.

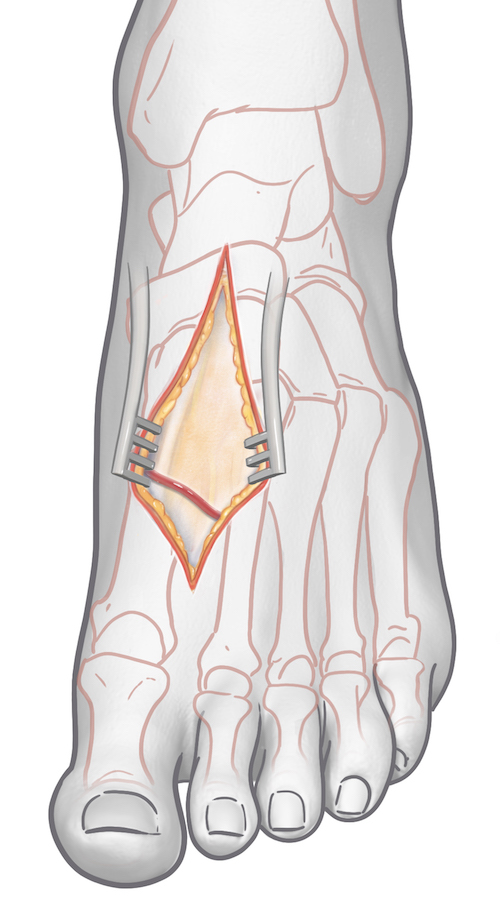
Deep Dissection: Once down through subcutaneous and areolar tissue the surgeon comes down onto fascia between the EHL and EHB tendons. Directly below fascia are the deep peroneal nerve and dorsalis pedis artery. Dissection through fascia should be performed longitudinally. The EHL tendon is retracted medially. The EHB tendon and the neurovascular bundle are retracted laterally. Only periosteum and joint capsule (if any remains intact) now lies between the surgeon and the bones/joints of the midfoot.
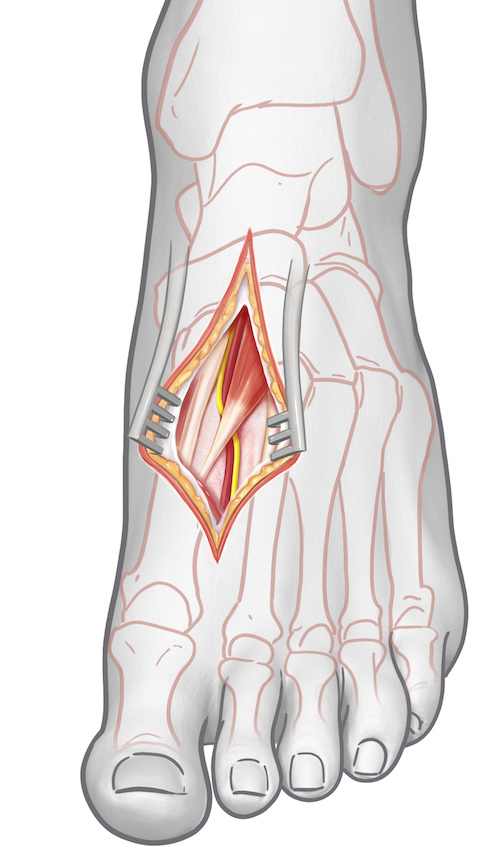
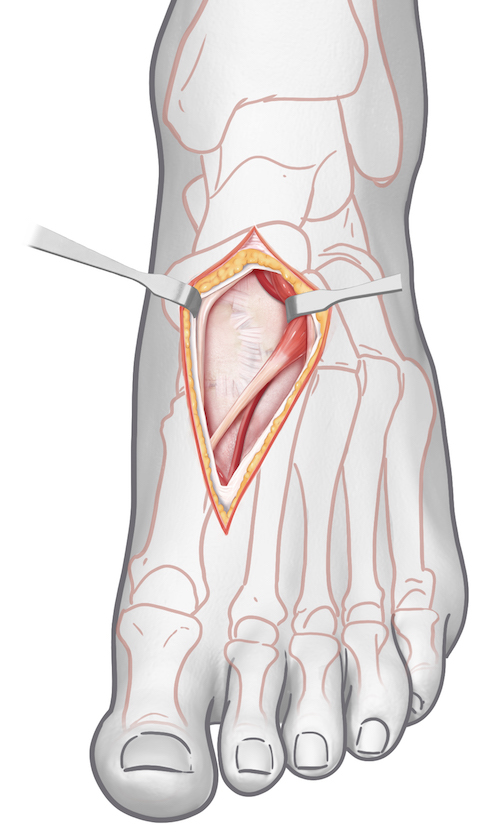
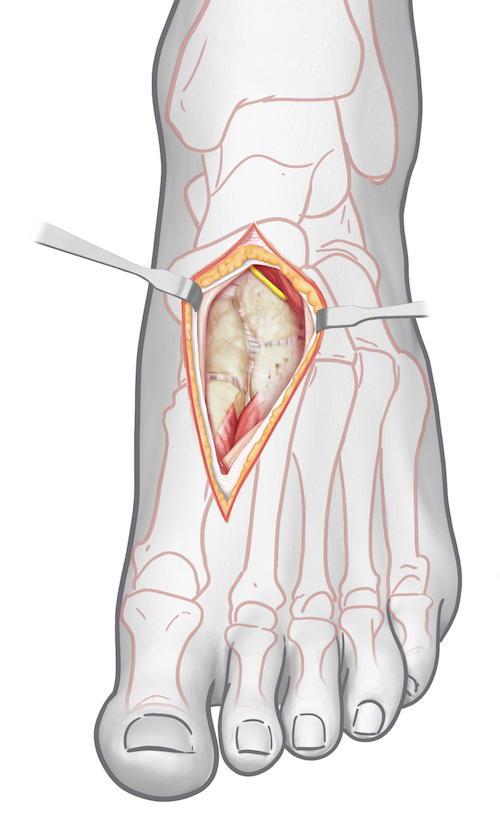
Lateral Approach:
Superficial Dissection: The previously described skin incision is made between the 3rd and fourth rays. As soon as the skin has been gone through dissection should proceed instead with scissors. Branches of the superficial peroneal nerve needs to be identified, dissected out, and retracted out of the field within the areolar and subcutaneous tissue of the dorsum of the foot above the level of the fascia. Once this has been accomplished the fascia can be gently cleared and typically the deeper structures (tendons of the extensor digitorum longus and peroneus teritus and the muscle bellies of the extensor digotorum/hallucis brevis) will be visible through the fascia.

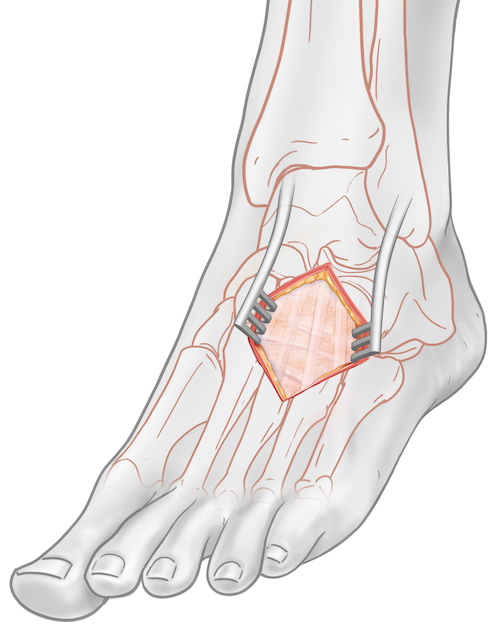
Deep Dissection: The fascia is then incised longitudinally in line with the skin incision. The muscle bellies of the EDB/EHB and long extensor tendons are retracted medially to expose the underlying capsule/periosteum of the third and fourth tarsal-metatarsal joints.
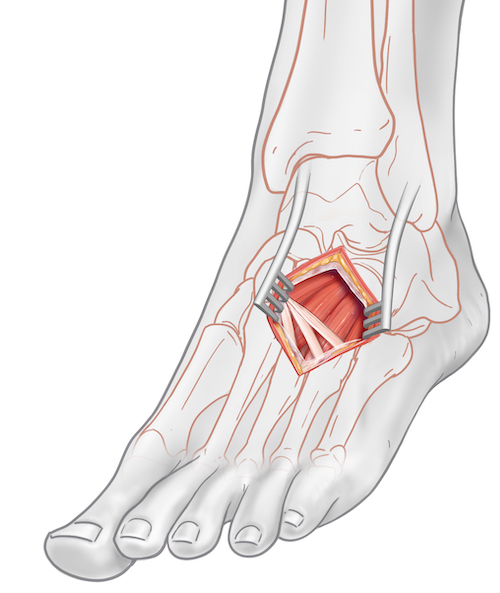
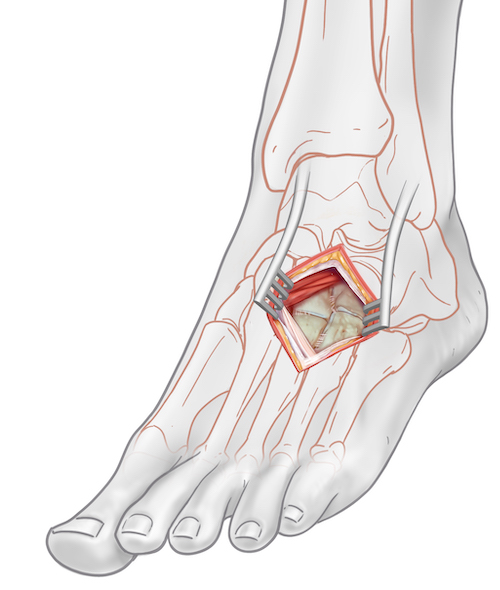
Tips, Tricks & Precautions
Precautions:
Superficial peroneal nerve: In the lateral incision care must be taken to identify and protect the superficial peroneal nerve. This nerve exists above fascia, just below skin, and so must be sough immediately after the incision is made. Frequently the nerve has arborized already at this level and so more than one branch may be discovered. An arborization may even need to be sacrificed to allow for safe retraction of the dominant portions of the nerve.
Deep peroneal nerve and dorsalis pedis artery: In the medial incision dissection below fascia occurs in the interval between the EHL and EHB. Directly within this interval lies a neurovascular bundle.
Objectives
At the end of this module, the learner should be able to:
1) List the indications for approaches to LisFranc injuries
2) Understand the relevant anatomy of the dual approaches to LisFranc injuries
3) Discuss in detail the dual approaches to LisFranc injuries, including:
a. Patient positioning
b. Landmarks for incision
c. Relevant internervous planes
d. Sequence of the superficial and deep dissection
Indications
Indications for dual approaches to LisFranc injuries:
1) Open reduction internal fixation of LisFranc fractures and/or dislocations
2) Fusion of the tarsal-metatarsal joints
Anatomy
Internervous Plain:
Neither the medial nor the lateral approach to the LisFranc joints uses a true internervous plane.
The medial approach is performed between the two tendons of the extensor hallucis longus (medially) and extensor hallucis brevis (laterally). Both of these muscles receive their innervation from the deep peroneal nerve. However, both of these muscles have received their innervation well proximal to the level of the dissection, which typically occurs between the tendinous portions of each muscle.
The lateral approach is performed by elevating the long extensor tendons and the small extensor muscles on the dorsum of the foot en masse from lateral to medial. Again, all these muscles receive their innervation from the deep peroneal nerve; however, since they are retracted together no internervous plain is used.
Muscular Anatomy:
During the medial approach the distal portion of the extensor hallucis brevis (EHB) muscle and its tendons and the tendon of the extensor hallucis longus muscle (EHL) are encountered. Dissection between these two structures brings the surgeon down on to the first and second tarsal-metatarsal joints. Of critical importance, the terminal branches of the doornails pedis artery and deep peroneal nerve pass through the interval between the EHB and EHL.
During the lateral approach the lateral edge of the extensor digitorum brevis (EDB) and the overlying tendons of some of the long extensors (peroneus teritus and extensor digitorum longus) are identified and retracted from lateral to medial to expose the underlying more lateral tarsal metatarsal joints.
Extensor Hallucis Longus:
Origin: Middle 1/3rd of the anterior fibula, interosseus membrane
Insertion: Dorsal base of the distal phalanx of the hallux
Innervation: Deep peroneal nereve
Action: Extends hallux at interphalangeal and metatarsal-phalangeal joints, ankle dorsiflexion
INSERT PICTURE
Extensor Digitorum Longus:
Origin: Superior 1/3rd of anterior fibula, interosseus membrane, lateral condyle of tibia
Insertion: Dorsal base of the middle phalanx of lesser digits
Innervation: Deep peroneal nerve
Action: Extends digits at proximal interphalangeal and metatarsal-phalangeal joints, ankle dorsiflexion
INSERT PICTURE
Peroneus Teritus:
Origin: Inferior 1/3rd of the anterior fibula, interosseus membrane
Insertion: Dorsal 5th metatarsal base
Innervation: Deep peroneal nerve
Action: Ankle dorsiflexion and eversion
INSERT PICTURE
Extensor Hallucis Brevis:
Origin: Anterior Process of the calcaneus
Insertion: Extensor hood of the hallux
Innervation: Deep peroneal nerve
Action: Extension of the hallux at the interphalangeal and metatarsal-phalangeal joints
Extensor Digitorum Brevis:
Origin: Anterior Process of the calcaneus
Insertion: Extensor hood of the lesser toes
Innervation: Deep peroneal nerve
Action: Extension of the lesser toes at the interphalangeal and metatarsal-phalangeal joints
Vascular Anatomy:
During the medial approach dissection occurs between the tendons of the EHB and EHL. Within this interval is the dorsalis pedis artery, which must be identified and protected. Occasionally this artery will be disrupted by trauma and severe displacement of joints of the midfoot, in which case it may no longer be identifiable.
Nervous Anatomy:
In the medially approach the deep peroneal nerve will be identified running along with the dorsalis pedis artery deep to fascia between the tendons of the EHB and EHL.
In the lateral incision branches of the superficial peroneal nerve are encountered. This nerve lies superficially, above fascia, and must be sought, dissected out, and protected once through the skin.
Position, Marking, Imaging
Patient Positioning:
The patient is placed supine and moved until the feet are at the end of the cantilever table. A bump is placed under the hip to internally rotate the leg which will tend to rest in an externally rotated position without this maneuver. The ipsilateral arm is placed over the patient's body, the contralateral arm is laid out on an arm board. The operative leg is first elevated on a foam ramp of stack of blankets to allow for lateral imaging. Once sterile prepping and draping have been performed the knee is flexed over a radiolucent triangle. The triangle is placed such that the base (short side) is against the patient's posterior thigh and the longer sides of the equilateral triangle are aimed towards the patient's foot such that one side rests on the foam ramp and the other supports the calf. The foot itself should be just off the end of the triangle. A roll of towels can be used to support the forefoot. This positioning places the rays of the foot parallel with the floor, making AP imaging simple to obtain.
Marking the Incisions:
Medial Incision: A fluoroscopic AP view of the foot is obtained and used to mark a line between the first and second rays from the navicular cuneiform joint to ~ 1/2 way down the shaft of the metatarsals.
Lateral Incision: A fluoroscopic oblique view of the foot should be obtained and use to mark out the interval between the third and fourth rays. This should extend from just proximal to the tarsal-metatarsal joints to ~ 1/2 way down the shafts of the metatarsals.
Imaging: The c-arm should come in from the opposite side of the table during the procedure. AP, oblique, and lateral views of the foot are required during reduction and fixation of the tarsal-metatarsal joints. AP foot images should be used to judge reduction and fixation of the medial column of the foot (navicular -> cuneiforms -> 1-3rd metatarsals). Oblique views of the foot should be used to judge reduction and fixation of the lateral column of the foot (Cuboid - > 4/5th metatarsals). Lateral images are used to judge superior/inferior translation and flexion/extension all tarsal-metatarsal joints.
Dual Approaches for LisFranc Injuries | Description
Dual Approaches:
Before detailing the approaches to the tarsal-metatarsal joints, it is worth stating what can be viewed through each. The medial approach routinely allows visualization of the inter-cuneiform joints, all of the first and second tarsal-metatarsal joints, and the medial portion of the third tarsal-metatarsal joint. It can be extended proximally to expose the navicular-cuneiform joints and distally to expose the shafts of the first and second metatarsals. The lateral incision routinely allows visualization of the third and fourth tarsal-metatarsal joints. It can be extended proximally to expose the lateral cuneiform and its joint with the navicular as well as the medial cuboid. It can be extended distally to expose the third and fourth metatarsal shafts.
Medial Approach:
Superficial Dissection: The previously described incision between the first and second rays should be made through skin with a knife. Once through skin the surgeon should switch to scissors to scissors of a blunt freer elevator to dissect down to fascia. This allow safe identification of any branches of the superficial peroneal nerve and sometime large superficial veins which may lie in the incision and also to dissect down safely to fascia.
Deep Dissection: Once down through subcutaneous and areolar tissue the surgeon comes down onto fascia between the EHL and EHB tendons. Directly below fascia are the deep peroneal nerve and dorsalis pedis artery. Dissection through fascia should be performed longitudinally. The EHL tendon is retracted medially. The EHB tendon and the neurovascular bundle are retracted laterally. Only periosteum and joint capsule (if any remains intact) now lies between the surgeon and the bones/joints of the midfoot.
Lateral Approach:
Superficial Dissection: The previously described skin incision is made between the 3rd and fourth rays. As soon as the skin has been gone through dissection should proceed instead with scissors. Branches of the superficial peroneal nerve needs to be identified, dissected out, and retracted out of the field within the areolar and subcutaneous tissue of the dorsum of the foot above the level of the fascia. Once this has been accomplished the fascia can be gently cleared and typically the deeper structures (tendons of the extensor digitorum longus and peroneus teritus and the muscle bellies of the extensor digotorum/hallucis brevis) will be visible through the fascia.
Deep Dissection: The fascia is then incised longitudinally in line with the skin incision. The muscle bellies of the EDB/EHB and long extensor tendons are retracted medially to expose the underlying capsule/periosteum of the third and fourth tarsal-metatarsal joints.
Tips, Tricks & Precautions
Precautions:
Superficial peroneal nerve: In the lateral incision care must be taken to identify and protect the superficial peroneal nerve. This nerve exists above fascia, just below skin, and so must be sough immediately after the incision is made. Frequently the nerve has arborized already at this level and so more than one branch may be discovered. An arborization may even need to be sacrificed to allow for safe retraction of the dominant portions of the nerve.
Deep peroneal nerve and dorsalis pedis artery: In the medial incision dissection below fascia occurs in the interval between the EHL and EHB. Directly within this interval lies a neurovascular bundle.